Difference between revisions of "Game Help:DFDD4 Download the File"
EllaCharm3d (Talk | contribs) (→one more tool) |
EllaCharm3d (Talk | contribs) m (→Sims 3 Helper Monkey) |
||
| Line 130: | Line 130: | ||
====Sims 3 Helper Monkey==== | ====Sims 3 Helper Monkey==== | ||
| − | The steps to get | + | The steps to get tools up and running are usually the same as above for MonkeyBars, ie: |
# Download | # Download | ||
# Extract to <code><nowiki><</nowiki>folder<nowiki>></nowiki></code> | # Extract to <code><nowiki><</nowiki>folder<nowiki>></nowiki></code> | ||
| + | # Install | ||
# Run | # Run | ||
| Line 138: | Line 139: | ||
Most of the tools for the game can be considered as "portable apps", in the sense that they can reside in any folder and be located outside of the Operating System's Program Files path.}} | Most of the tools for the game can be considered as "portable apps", in the sense that they can reside in any folder and be located outside of the Operating System's Program Files path.}} | ||
| − | |||
| − | |||
==If you are having trouble downloading...== | ==If you are having trouble downloading...== | ||
Revision as of 17:12, 17 April 2010
| TS3:Downloading for Downright Dunderheads | |
|---|---|
|
Introduction | Before you download | Get Organized | The Main Event | Additional Info |
Contents |
Download the file(s)
So, you've read about the content... You know the details about it, whether or not it will work in your game, and if you need to get anything else for it to work. Now, you need to transfer the file from the internet to your computer. This is called "downloading."
The Custom Content
Preparing the Download folder
It is always best to be organized. If you use a Download Manager, this task becomes even simpler. If you don't, you just need to stay organized manually i.e move files and remove unwanted content and prune things off as often as possible.
Setting up the folder
I have a MyDownloads folder in Documents for regular stuff that I download, but for Sims I have created a "landing folder" where all my Sims-related Downloads will go.
- In Windows Explorer,
- right-click on an empty area
- create a New folder in a directory or drive of your preference
- Name it as you like. In the image here, I've called mine
Sims3Downloadsin my secondary storageF:/drive, which I usually refer to as the parent download folder
- Under this parent downloads folder, I would go another step and create some sub-folders to organize my downloads by website, then drill further down for content type or creator name, etc. A more comprehensive Organizing Guide can be found [[link placeholder]].
Setting up the browser
You can set the Download folder in your browser so all your Downloads are in a central location.
In Firefox:
- Go to Tools menu → Options
- In General Tab's Downloads section, you can specify the folder of your choosing: click Browse button,
- If you want to have a "landing folder" for all downloads, navigate to the parent folder (eg: My Documents in the picture). Make a new folder and name it, and then select this, and click OK
- If you want to set it to the
Sims3Downloadsfolder we created before, set it like so, and click OK
- If you want both options, click Cancel in the previous Dialog box. Back in General tab, set the Downloads options to Always ask me where to save files (underlined in Red in the second image in this section)
- Click OK when you are done making your changes.
- If you want to have a "landing folder" for all downloads, navigate to the parent folder (eg: My Documents in the picture). Make a new folder and name it, and then select this, and click OK
Downloading the Custom Content
To start, find the download link of the item you would like to get.
- You can download by clicking on the smiling disk icon to the left of the item's name, or by clicking the name of the file.
- If there are multiple files where only one is required, make sure you're getting the right one(s) - the creator will specify if there are certain files you need to get.
- Only click on the link once. Sometimes if the site is slow, it will take a while for it to seem like anything is happening.
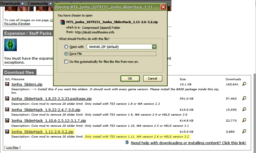
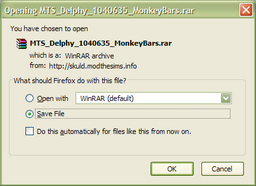
- When it has connected to the server and confirmed your request to get that file, you'll get a message that pops up that looks something like this.
- Your computer is asking you what you want to do with that file. Click OK (or Save) to save the file to a location on your hard drive.
- If your settings are to download to a folder, it has probably completed downloading by now.
- If you had set it to ask for a save destination, you will get a Save As window. Your computer would like to know where you would like to save the file. You can save it to anywhere on your hard drive that you will know where to find it. Your Desktop is generally an easy place to find it.
- But since we have prepared our download location to stay organized, we shall save it to the folder we created before, so navigate to that
<drive:>/Sims3Downloadsfolder. Click Save.
- Depending on the size of the file, how busy the site is, and how good a connection you have, it may take a while to download the file.
- If you haven't installed the tools to extract the files, you'll see a different icon than in the pictures. Don't worry, we'll install the tools next.
Content with Multi-part files
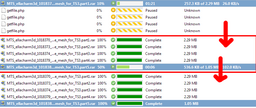
If the item consists of multi-part compressed files,
- you need to download ALL the parts before extracting
- the objective is to have the filenames of the downloaded files match as in the thread's Download panel
- download each file one at a time to your Desktop, as you would normally
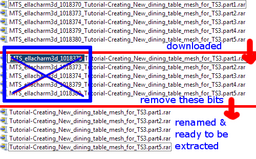
- rename the files by removing the "MTS_<uploader's_name>_<numbers>_" bits until you have filenames as shown in the thread:
- <uploader's_name>_<item_name>.part?.rar
- the filenames must only differ by the part? so the archiver application can find the subsequent files to join together
- rename the files by removing the "MTS_<uploader's_name>_<numbers>_" bits until you have filenames as shown in the thread:
The tools
| |
You only need one archiver program, so just choose Winrar or 7Zip. If you're on the Mac OS, you already have a built-in archiver program, or you can choose the alternative below. |
- Downloads on MTS are compressed in either .rar or .zip files. The content inside these files need to be uncompressed/extracted first by an archiver-type program. There are various types of these applications, among the popular ones are listed below. It is the "extracted" content in the rar/zip file that we shall be installing.
- You need to have one of these applications installed on your computer
-
 7-zip (Windows, freeware),
-
 winrar (Windows, nagware),
- You will most likely want the top link to the Graphic and Command Line, Trial version.
- Though WinRAR says it's a trial, it's a trial that never really runs out... After the 40 day trial is complete, it will nag you with a message if you double-click on an archive and actually open the program. But... you can close that message and continue using the program. If you just use Extract Here, it doesn't nag you at all.
-
 winzip (Windows, nagware),
-
 StuffIt Expander (Mac/Windows, freeware)
-
- You need to have one of these applications installed on your computer
- MonkeyBars or another Framework Installer tool or the individual components that make up the framework. You only need to run this once, unless the Framework components get corrupted somehow during patching or installing new EPs & SPs.
 MonkeyBars Framework Installer Tool @ModTheSims by Delphy
 TS3 Framework Installer for Mac OS X @ModTheSims by Marhis
- This tool is optional, as it is just as easy to cut+paste the content as it would have taken the time to open another tool; but I'm including it here as it is extremely useful and make installing hassle-free.
 Sims 3 Helper Monkey v1.2 @ModTheSims by Delphy
Installing the tools
Download and install the archiver program first. Everything else you do from here on out, needs you to "extract" files.
- Double-click the .exe and follow the on-screen instructions
- When you have completed installation, you'll be prompted to reboot to activate the right-click option
- When the archiver has been installed
- the zip/rar files will be associated with the program and bear its icon
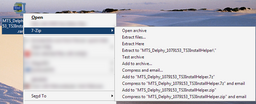
- you have a context menu when you do a right-click as shown in the pictures
- The next sections show a step-by-step illustration for 2 of these archiver tools
7Zip
- Download the appropriate file for your OS type and save it to your Desktop or your regular Download folder as setup above.
- Double-click on the downloaded 7z???.exe (32-bit OS) or 7z???.msi (64-bit OS) and follow the instructions in the dialog boxes to install it.
- When you've completed the installation process, you'll be prompted to restart the computer
- After a reboot, you'll get a new context menu when you right-click on a file or folder.
- If all goes well, the zip and rar files will now have icons associated with this application.
WinRar
- Download the appropriate file for your OS type and save it to your Desktop or your regular Download folder as setup above.
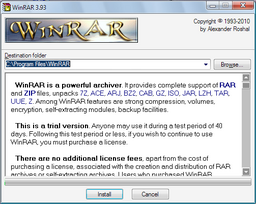
- Double-click on the downloaded winrar???.exe (32-bit OS) or winrar-x64-???.exe (64-bit OS) and follow the instructions in the dialog boxes to install it.
- When you've completed the installation process, you'll be prompted to restart the computer
- After a reboot, you'll get a new context menu when you right-click on a file or folder.
- If all goes well, the zip and rar files will now have icons associated with this application.
MonkeyBars
- Download the Framework Installer Tool aka MonkeyBars
- Save it to your Sims3Downloads folder
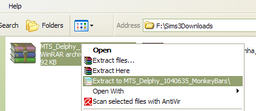
- Right-click on the downloaded file and select Extract To <downloaded filename>
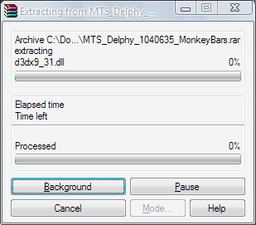
- You'll get the extraction progress...
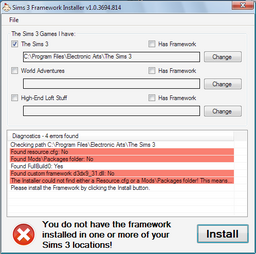
- When extraction has completed, double-click on the newly created folder and then double-click on FrameworkInstaller.exe. If there's no framework found there'll be a red & white cross (X).
- If you have The Sims 3 base game only, the other options won't be selected
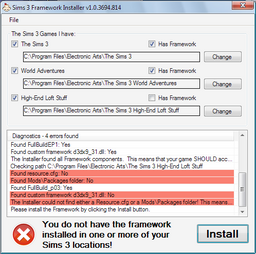
- If you have The Sims 3 and any extra packs, the appropriate options will be pre-selected.
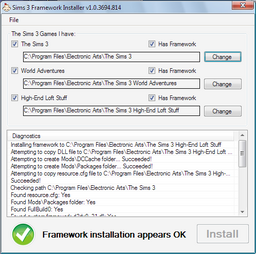
- Click on the Install button. If all goes well, you'll get a green + white check mark.
| |
If the extensions are set to be hidden as default, you won't be able to see the .zip, .rar, .exe, .msi extensions on the filenames. To be abale to view extensions, you need to do the Show File Extensions step from the previous page. |
Sims 3 Helper Monkey
The steps to get tools up and running are usually the same as above for MonkeyBars, ie:
- Download
- Extract to
<folder> - Install
- Run
If you are having trouble downloading...
- If you are getting error messages when trying to download from MTS, try again in a few minutes. MTS often has more than 3000 people online, and is funded by donations, so it can be a little slow at peak times.
- If you get a 503 error, means that you're downloading too many files at one time and are using up all the download slots. There's a limit of 3 files at a time or 3 chunks per file per downloader to give other members a chance. You'll have to wait for six hours when the server reset its caches for you to be able to download again.
- If you're still having trouble, try reading the latest Site News to see if there are any changes that you need to be aware of. Look for notices at the top of the page that may mention downloads being slow, intermittent, or offline.
| |
|
DFDD4 Download the File | |
|
| TS3:Downloading for Downright Dunderheads | |
|---|---|
|
Introduction | Before you download | Get Organized | The Main Event | Additional Info |


