Difference between revisions of "Sims 3:Adding Custom Stencils"
| Line 41: | Line 41: | ||
| − | [[Category:Sims 3]][[Category:Tutorials]][[Category:CTU Tutorials]] | + | [[Category:Sims 3]][[Category:Tutorials]][[Category:CTU Tutorials]][[Category:Sims 3 Tutorials]] |
Revision as of 15:16, 17 September 2012
Contents |
Introduction
This tutorial explains how to add custom stencils to CAS parts using the CAS Texture Unitool (CTU). This tutorial will not teach you how to make stencils, see Creating Clothing Stencils for that.
What Do I Need?
- Delphy's CAS Texture Unitool (CTU) found here
- A previously completed stencil(s) saved in an acceptable .DDS compression (DXT1, DXT3 or DXT5).
-
 See: Creating Clothing Stencils for help with creating a stencil.
How Do I Do It?
Step 1
Open the CTU and create a new file (File → New)
Step 2
In the "Find A CAS Part" tab, set the CAS part details to the parameters of the mesh you want to apply your stencil to. (i.e. Child-Male-Top) Next choose the mesh you want to use from the drop down list.
Step 3
Move over to the "Stencil Pool" tab. Under Stencil 1, click on the Texture Key to highlight it. Being sure that the texture key is highlighted, click "replace" at the bottom of the screen. Locate your stencil DDS image and select Open. (Notice how the texture key has changed) If you have multiple stencils you wish to use, repeat this step again under Stencil 2,3, etc. Once you're done click "Commit".
Step 4
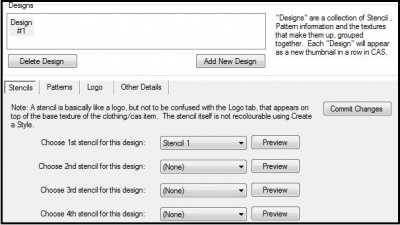
Move over to the "Designs" tab and add a new blank design.
Step 5
Under the stencils sub-tab you'll notice six drop down lists. Choose the first stencil for your design. If you wish to add multiple stencils, you may do so (keep in mind you can only add a total of six stencils per design). Once you've chosen all your stencils, click "Commit Changes".
Note: If you want to add multiple designs repeat steps 4 and 5.
Step 6
Once you've added all of the designs you want, make any other changes/additions to your package (if you don't have any, that's okay). Once you've finished, save your creation as a .package. Go to File → Save As, give your package a name, then hit Save.
And that's it!


