Difference between revisions of "Sims 3:Replacing Textures"
(→What Do I Need?) |
|||
| (11 intermediate revisions by 3 users not shown) | |||
| Line 1: | Line 1: | ||
| + | {{TS3ModdingHeader}} | ||
| + | |||
==Introduction== | ==Introduction== | ||
| Line 5: | Line 7: | ||
==What Do I Need?== | ==What Do I Need?== | ||
| − | * Delphy's CAS Texture Unitool (CTU) found [http://www.modthesims.info/ | + | * Delphy's CAS Texture Unitool (CTU) found [http://www.modthesims.info/download.php?t=364926| here] |
| − | * A previously completed texture saved in an acceptable [[Sims_3:Custom_Patterns#DDS_Files| .DDS]] compression ( | + | * A previously completed texture saved in an acceptable [[Sims_3:Custom_Patterns#DDS_Files| .DDS]] compression (DXT). |
==How Do I Do It?== | ==How Do I Do It?== | ||
| Line 14: | Line 16: | ||
====Step 2==== | ====Step 2==== | ||
| − | In the "Find A | + | In the "Find A CAS Part" tab, set the CAS part details to the parameters of the mesh you wish to change the texture of. (i.e. Adult-Female-Accessory) Next choose the mesh you want to use from the drop down list. |
| − | [[Image: | + | [[Image:Findcas.jpg|center|400px]] |
====Step 3==== | ====Step 3==== | ||
| − | Move over to the "Designs" tab and | + | Move over to the "Designs" tab and add a new blank design. |
====Step 4==== | ====Step 4==== | ||
| − | Under the " | + | Under the "Textures" sub-tab click the texture key to highlight it. |
| − | [[Image: | + | [[Image:Textureview.jpg|center|400px]] |
====Step 5==== | ====Step 5==== | ||
Being sure that the correct texture key is highlighted, click "replace". Select your new texture file and click Open. (Notice that the texture key changes) Next hit "Commit". | Being sure that the correct texture key is highlighted, click "replace". Select your new texture file and click Open. (Notice that the texture key changes) Next hit "Commit". | ||
| + | |||
[[Image:Step6basetext.jpg|center|400px]] | [[Image:Step6basetext.jpg|center|400px]] | ||
| + | |||
| + | =====Alternative===== | ||
| + | * Right-click on the texture key, then choose "Replace Image" | ||
====Step 6==== | ====Step 6==== | ||
| Line 36: | Line 42: | ||
And that's it! | And that's it! | ||
| + | |||
| + | {{TS3ModdingHeader}} | ||
| + | [[Category:Sims 3 Modding Tutorials]][[Category:CTU Tutorials]][[Category:Sims 3 CAS Tutorials]][[Category:Tutorials by daluved1]] | ||
Latest revision as of 16:35, 17 September 2012
| Tutorials by Category | |
|---|---|
|
CAS | Patterns | Objects | Building | Worlds | Modding | Modding Reference |
Contents |
[edit] Introduction
This tutorial explains how to replace a CAS part texture (i.e. base texture, mask, specular) using the CAS Texture Unitool (CTU).
[edit] What Do I Need?
- Delphy's CAS Texture Unitool (CTU) found here
- A previously completed texture saved in an acceptable .DDS compression (DXT).
[edit] How Do I Do It?
[edit] Step 1
Open the CTU and create a new file (File → New)
[edit] Step 2
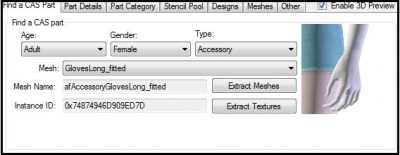
In the "Find A CAS Part" tab, set the CAS part details to the parameters of the mesh you wish to change the texture of. (i.e. Adult-Female-Accessory) Next choose the mesh you want to use from the drop down list.
[edit] Step 3
Move over to the "Designs" tab and add a new blank design.
[edit] Step 4
Under the "Textures" sub-tab click the texture key to highlight it.
[edit] Step 5
Being sure that the correct texture key is highlighted, click "replace". Select your new texture file and click Open. (Notice that the texture key changes) Next hit "Commit".
[edit] Alternative
- Right-click on the texture key, then choose "Replace Image"
[edit] Step 6
Make any other changes/additions to your package (if you don't have any, that's okay). Once you've finished, save your creation as a .package. Go to File → Save As, give your package a name, then hit save.
And that's it!
| Tutorials by Category | |
|---|---|
|
CAS | Patterns | Objects | Building | Worlds | Modding | Modding Reference |


