Difference between revisions of "Tutorials:Setting Up Blender 2.5 For TS3 Object Creation"
m (→User Preferences) |
m (→What you'll need:) |
||
| (11 intermediate revisions by 2 users not shown) | |||
| Line 1: | Line 1: | ||
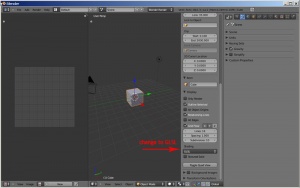
| − | + | {{TS3ModdingHeader}} | |
| + | |||
{| align="right" | {| align="right" | ||
|- | |- | ||
| __TOC__ | | __TOC__ | ||
|} | |} | ||
| + | {| align="right" | ||
| + | |- | ||
| + | | __TOC__ | ||
| + | |} | ||
| + | <br clear=all> | ||
| + | {| align="left" | ||
| + | |- | ||
| + | | __TOC__ | ||
| + | |} | ||
| + | <br clear=all> | ||
| + | {| align="left" | ||
| + | |- | ||
| + | | __TOC__ | ||
| + | |} | ||
| + | <br clear=all> | ||
| + | ==Introduction== | ||
| + | |||
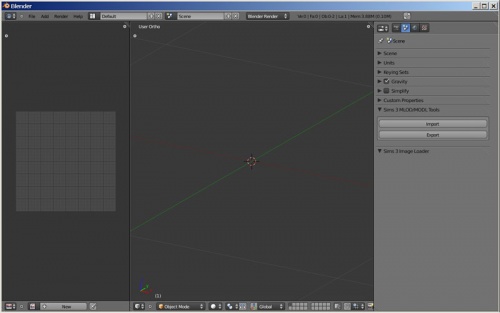
This tutorial will show you how to setup Blender 3D v.2.5 to create objects for TS3. It is not 'the' way, it is more the way I've found to be useful. Any Blender tutorial I do will be using this setup. | This tutorial will show you how to setup Blender 3D v.2.5 to create objects for TS3. It is not 'the' way, it is more the way I've found to be useful. Any Blender tutorial I do will be using this setup. | ||
[[File:Setup_pic--0.jpg|500x500px|center]] | [[File:Setup_pic--0.jpg|500x500px|center]] | ||
| + | |||
==What you'll need:== | ==What you'll need:== | ||
*[http://www.blender.org Blender 3D 2.5] | *[http://www.blender.org Blender 3D 2.5] | ||
*[http://modthesims.info/showthread.php?t=423406 Blender 2.5 TS3 Tools] | *[http://modthesims.info/showthread.php?t=423406 Blender 2.5 TS3 Tools] | ||
| + | *[http://www.mwgfx.co.uk/programs/dxtbmp.htm DXTBmp] | ||
| + | Download and install DXTBmp and Blender 3d 2.5. | ||
| − | + | Now we're going to set up the Default scene, so when we open Blender it will be set the way we want it to be. This is how my scene is set up, but feel free to modify it to your liking. I'm not going to go into a lot of detail about all the user preferences because they are '''user''' preferences. There are so many things Blender allows you to change, and most depend on what you want, how you work, etc. So, I'm only going to talk about the things that will help you work with TS3. | |
| − | + | ||
| − | Now we're going to set up the Default scene, so when we open Blender it will be set the way we want it to be. This is how my scene is set up, but feel free to modify it to your liking. | + | |
| − | + | ||
| − | + | ==Setup== | |
| − | [[File:Setup_pic--1.jpg| | + | ===Step 1=== |
| − | + | [[File:Setup_pic--1.jpg|right|300px]] | |
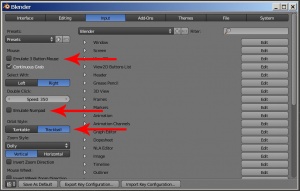
| + | Open Blender and press CTRL+ALT+U to open up the User Preferences window. In the row of buttons across the to, click 'Input'. Here are the options you want to consider: | ||
*[Emulate 3 Button Mouse - The middle mouse button is used to rotate the scene. This makes ALT+LMB work as the middle mouse button.] | *[Emulate 3 Button Mouse - The middle mouse button is used to rotate the scene. This makes ALT+LMB work as the middle mouse button.] | ||
*[Emulate Number Pad - The number pad is used to change to different views. This option makes the top row numbers on your keyboard work like the number pad. If you're using a laptop(like I am) you'll need to check this box.] | *[Emulate Number Pad - The number pad is used to change to different views. This option makes the top row numbers on your keyboard work like the number pad. If you're using a laptop(like I am) you'll need to check this box.] | ||
*[Orbit Style - This sets how the scene will rotate. Unless you actually have a trackball, I would use turntable(works like Milkshape 3d).] | *[Orbit Style - This sets how the scene will rotate. Unless you actually have a trackball, I would use turntable(works like Milkshape 3d).] | ||
| + | <br clear=all> | ||
| + | ===Step 2=== | ||
| + | [[File:Setup_pic--2.jpg|left|300px]] | ||
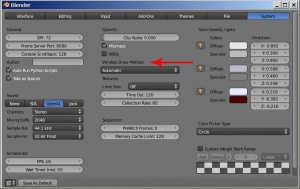
| + | Now in the top row of buttons, click 'System'. Here we're going to change the 'Window Draw Method'. I can't tell you which option to use because it really depends on your system. You really only need to change this Blender acts sluggish or slow. I use 'Overlap Flip'. | ||
| + | <br clear=all> | ||
| + | ===Step 3=== | ||
| + | [[File:Setup_pic_3.jpg|right|300px]] | ||
| + | Close the User Preferences Window, and go to the main Blender window. In Blender, where your cursor is determines what window is active. So put you cursor in the 3D viewport and press T. This toggles the Tool Shelf. If you need it later, you can always press T again, but for now we don't want it in the way. Now move your mouse to the bottom of the footer of the 3D viewport until the cursor changes to a up/down arrow. Right-click on the line in in the menu that pops up, select Join Area.Move the cursor down until the window below the 3D viewport(which happens to be the Timeline window) darkens with an arrow pointing down. This means that we are removing this window(the arrow points to window to be removed). We don't need the timeline, as it is used for animation. | ||
| + | <br clear=all> | ||
| + | ===Step 4=== | ||
| + | [[File:Setup_pic--5.jpg|left|300px]] | ||
| + | Another window we don't need is the Outliner, in the top right corner of the screen. Although you may use it, right now it's just in the way. So click on the little ridges in the top left of the window under it(the Properties window), and drag up into the Outliner window. | ||
| + | <br clear=all> | ||
| − | + | [[File:Setup_pic--6.jpg|right|300px]] | |
| − | + | ||
| − | + | ||
| − | [[File:Setup_pic-- | + | |
| − | + | ||
| − | + | ||
| − | + | ||
| − | + | ||
| − | + | ||
| − | + | ||
| − | + | ||
| − | + | ||
| − | + | ||
| − | + | ||
| − | + | ||
| − | + | ||
| − | + | ||
| − | + | ||
| − | + | ||
| − | + | ||
| − | + | ||
| − | + | ||
| − | + | ||
| − | + | ||
| − | + | ||
| − | + | ||
| − | + | ||
| − | + | ||
| − | + | ||
| − | + | ||
| − | + | ||
| − | + | ||
| − | + | ||
| − | + | ||
| − | + | ||
| − | + | ||
| − | + | ||
| − | + | ||
| − | + | ||
| − | + | ||
| − | + | ||
| − | + | ||
| − | + | ||
| − | + | ||
| − | + | ||
| − | + | ||
| − | + | ||
| − | + | ||
Now at the top of the Properties window, click the Scene button(next to the button with the camera). In this window, click all the arrows so that all the panels are collapsed. We won't need any of these, and this is where the TS3 tools panels will be. Put your cursor over the line dividing the the two windows and drag to the left until you can see all the buttons at the top of the Properties window. | Now at the top of the Properties window, click the Scene button(next to the button with the camera). In this window, click all the arrows so that all the panels are collapsed. We won't need any of these, and this is where the TS3 tools panels will be. Put your cursor over the line dividing the the two windows and drag to the left until you can see all the buttons at the top of the Properties window. | ||
| + | <br clear=all> | ||
| + | ===Step 5=== | ||
| + | [[File:Setup_pic--7.jpg|left|300px]] | ||
| + | In the 3D viewport, click and drag the ridges in the top right corner to the left. This adds a new window(another 3D viewport). Drag it until the new window is a little larger than than the original. | ||
| + | <br clear=all> | ||
| − | + | [[File:Setup_pic--8.jpg|right|300px]] | |
| − | + | ||
| − | + | ||
| − | + | ||
| − | + | ||
| − | + | ||
| − | [[File:Setup_pic-- | + | |
| − | + | ||
| − | + | ||
| − | + | ||
| − | + | ||
| − | + | ||
| − | + | ||
| − | + | ||
| − | + | ||
| − | + | ||
| − | + | ||
| − | + | ||
| − | + | ||
| − | + | ||
| − | + | ||
In the original window, click on the button at the bottom left corner(with the little cube) and change the editor to UV/Image Editor. | In the original window, click on the button at the bottom left corner(with the little cube) and change the editor to UV/Image Editor. | ||
| + | <br clear=all> | ||
| + | ===Step 6=== | ||
| + | [[File:Setup_pic--9.jpg|left|300px]] | ||
| + | Now with your cursor in the 3D viewport, Press N to toggle the 3D View Properties. In this panel scroll down until you see Display and click the arrow to uncollapse it. Change the Shading to GLSL. Press N again to close the panel. | ||
| + | <br clear=all> | ||
| − | + | [[File:Setup_pic--10.jpg|right|300px]] | |
| − | + | ||
| − | + | ||
| − | + | ||
| − | + | ||
| − | + | ||
| − | + | ||
| − | + | ||
| − | [[File:Setup_pic-- | + | |
| − | + | ||
| − | + | ||
| − | + | ||
| − | + | ||
| − | + | ||
| − | + | ||
| − | + | ||
| − | + | ||
| − | + | ||
| − | + | ||
| − | + | ||
| − | + | ||
| − | + | ||
Optional - The 3D manipulator is the red, blue, and green arrows on the cube. It lets you move an object on an axis by clicking and dragging the arrows. I don't use this, so it's just in the way to me. If you don't want to use it, click the button in the header of the 3D viewport(it looks like the manipulator). Otherwise ignore this step. | Optional - The 3D manipulator is the red, blue, and green arrows on the cube. It lets you move an object on an axis by clicking and dragging the arrows. I don't use this, so it's just in the way to me. If you don't want to use it, click the button in the header of the 3D viewport(it looks like the manipulator). Otherwise ignore this step. | ||
| + | <br clear=all> | ||
| + | ===Step 7=== | ||
| + | [[File:Setup_pic--11.jpg|left|300px]] | ||
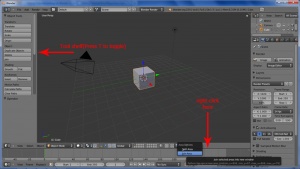
| + | 7. Now right click on the cube in the 3D viewport and press DELETE. Then press A to select all objects(in this case the camera and lamp) and press M. This let's you move these object to another layer. In the pop-up, click the last box on the right in the bottom row. The objects are now in the 20th layer. | ||
| + | {| class="nicetable" align="left width=600px" | ||
| + | |- | ||
| + | |'''Note:''' If you have trouble clicking on the the pop-up, press T to bring up the Tool shelf, and the layer options will be there. | ||
| + | |} | ||
| + | <br clear=all> | ||
| + | ===Step 8=== | ||
| + | [[File:Setupstep8.jpg|right|300px]] | ||
| + | 8. Go to File>User Preferences to pull up the User Preferences Window again. Click on the 'File' tab, then click the folder icon next to 'Image Editor'. Navigate to where you installed DXTBmp(e.g. C:\Graphics\MWGraphics\DXTBmp\DTXBmp.exe). | ||
| + | <br clear=all> | ||
| − | + | ===Step 9=== | |
| − | + | 9. Install TS3 Tools using the installation instructions(be sure to save as default-step 7). Now when you start Blender, your scene will be set up this way. | |
| − | + | <br clear=all> | |
| − | + | ||
| − | + | ||
| − | + | ||
| − | + | ||
| − | + | ||
| − | + | ||
| − | + | ||
| − | + | ||
| − | + | ||
| − | + | ||
==Need Help? Got Questions?== | ==Need Help? Got Questions?== | ||
Please post any comment or questions [http://modthesims.info/showthread.php?t=426229 in this thread] | Please post any comment or questions [http://modthesims.info/showthread.php?t=426229 in this thread] | ||
| + | {| style="border:none; background-color:#f9f9f9" width="100%" align="center" | ||
| + | |||
| + | {{TS3ModdingHeader}} | ||
| + | [[Category:Blender Tutorials]][[Category:Sims 3 Modding Tutorials]][[Category:Sims 3 Objects Tutorials]][[Category:Tutorials by cmomoney]] | ||
Latest revision as of 23:38, 27 August 2013
| Tutorials by Category | |
|---|---|
|
CAS | Patterns | Objects | Building | Worlds | Modding | Modding Reference |
|
[edit] Introduction
This tutorial will show you how to setup Blender 3D v.2.5 to create objects for TS3. It is not 'the' way, it is more the way I've found to be useful. Any Blender tutorial I do will be using this setup.
[edit] What you'll need:
Download and install DXTBmp and Blender 3d 2.5.
Now we're going to set up the Default scene, so when we open Blender it will be set the way we want it to be. This is how my scene is set up, but feel free to modify it to your liking. I'm not going to go into a lot of detail about all the user preferences because they are user preferences. There are so many things Blender allows you to change, and most depend on what you want, how you work, etc. So, I'm only going to talk about the things that will help you work with TS3.
[edit] Setup
[edit] Step 1
Open Blender and press CTRL+ALT+U to open up the User Preferences window. In the row of buttons across the to, click 'Input'. Here are the options you want to consider:
*[Emulate 3 Button Mouse - The middle mouse button is used to rotate the scene. This makes ALT+LMB work as the middle mouse button.]
*[Emulate Number Pad - The number pad is used to change to different views. This option makes the top row numbers on your keyboard work like the number pad. If you're using a laptop(like I am) you'll need to check this box.]
*[Orbit Style - This sets how the scene will rotate. Unless you actually have a trackball, I would use turntable(works like Milkshape 3d).]
[edit] Step 2
Now in the top row of buttons, click 'System'. Here we're going to change the 'Window Draw Method'. I can't tell you which option to use because it really depends on your system. You really only need to change this Blender acts sluggish or slow. I use 'Overlap Flip'.
[edit] Step 3
Close the User Preferences Window, and go to the main Blender window. In Blender, where your cursor is determines what window is active. So put you cursor in the 3D viewport and press T. This toggles the Tool Shelf. If you need it later, you can always press T again, but for now we don't want it in the way. Now move your mouse to the bottom of the footer of the 3D viewport until the cursor changes to a up/down arrow. Right-click on the line in in the menu that pops up, select Join Area.Move the cursor down until the window below the 3D viewport(which happens to be the Timeline window) darkens with an arrow pointing down. This means that we are removing this window(the arrow points to window to be removed). We don't need the timeline, as it is used for animation.
[edit] Step 4
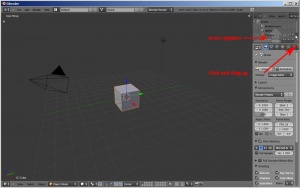
Another window we don't need is the Outliner, in the top right corner of the screen. Although you may use it, right now it's just in the way. So click on the little ridges in the top left of the window under it(the Properties window), and drag up into the Outliner window.
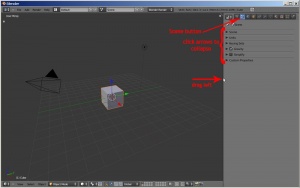
Now at the top of the Properties window, click the Scene button(next to the button with the camera). In this window, click all the arrows so that all the panels are collapsed. We won't need any of these, and this is where the TS3 tools panels will be. Put your cursor over the line dividing the the two windows and drag to the left until you can see all the buttons at the top of the Properties window.
[edit] Step 5
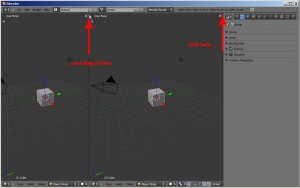
In the 3D viewport, click and drag the ridges in the top right corner to the left. This adds a new window(another 3D viewport). Drag it until the new window is a little larger than than the original.
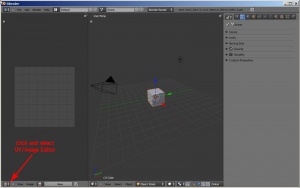
In the original window, click on the button at the bottom left corner(with the little cube) and change the editor to UV/Image Editor.
[edit] Step 6
Now with your cursor in the 3D viewport, Press N to toggle the 3D View Properties. In this panel scroll down until you see Display and click the arrow to uncollapse it. Change the Shading to GLSL. Press N again to close the panel.
Optional - The 3D manipulator is the red, blue, and green arrows on the cube. It lets you move an object on an axis by clicking and dragging the arrows. I don't use this, so it's just in the way to me. If you don't want to use it, click the button in the header of the 3D viewport(it looks like the manipulator). Otherwise ignore this step.
[edit] Step 7
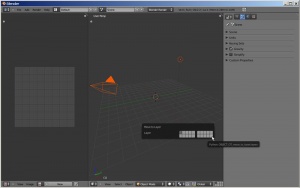
7. Now right click on the cube in the 3D viewport and press DELETE. Then press A to select all objects(in this case the camera and lamp) and press M. This let's you move these object to another layer. In the pop-up, click the last box on the right in the bottom row. The objects are now in the 20th layer.
| Note: If you have trouble clicking on the the pop-up, press T to bring up the Tool shelf, and the layer options will be there. |
[edit] Step 8
8. Go to File>User Preferences to pull up the User Preferences Window again. Click on the 'File' tab, then click the folder icon next to 'Image Editor'. Navigate to where you installed DXTBmp(e.g. C:\Graphics\MWGraphics\DXTBmp\DTXBmp.exe).
[edit] Step 9
9. Install TS3 Tools using the installation instructions(be sure to save as default-step 7). Now when you start Blender, your scene will be set up this way.
[edit] Need Help? Got Questions?
Please post any comment or questions in this thread
| Tutorials by Category | |
|---|---|
|
CAS | Patterns | Objects | Building | Worlds | Modding | Modding Reference |
