Difference between revisions of "MTS2:Creator Guidelines/Creating Archive Files"
(→Step 2) |
|||
| (6 intermediate revisions by 5 users not shown) | |||
| Line 1: | Line 1: | ||
| − | + | =RAR or ZIP Your Custom Content= | |
| − | + | ||
| − | + | ||
| − | + | ||
| − | + | ||
| + | When uploading to MTS, you will need to compress your files into a RAR, ZIP, or 7Z file. Compressed files take up less space - which means they're quicker for you to upload, take up less space on MTS's servers, and are quicker for people to download. | ||
==You will need...== | ==You will need...== | ||
| − | A program to create RAR or ZIP Files. | + | {| class="collapsible nicetable" style="width:100%" |
| + | |A program to create RAR or ZIP Files. | ||
These instructions use [http://www.rarlabs.com/ WinRAR]. It is a great little utility that can both compress and extract from RAR and ZIP files. Other programs such as [http://www.winzip.com WinZip] and [http://www.7-zip.org/ 7zip] can also be used, but you will have to look at their help files to see how to use them, as they will work slightly differently. WinRAR is our recommended program, and it is quite easy to use. | These instructions use [http://www.rarlabs.com/ WinRAR]. It is a great little utility that can both compress and extract from RAR and ZIP files. Other programs such as [http://www.winzip.com WinZip] and [http://www.7-zip.org/ 7zip] can also be used, but you will have to look at their help files to see how to use them, as they will work slightly differently. WinRAR is our recommended program, and it is quite easy to use. | ||
WinRAR is a trial program, often called "nagware" - this means that you can use it for free for 40 days, and once the 40 days are up, you will get a "nag" screen asking you to pay for the program. You can still use WinRAR completely free after 40 days - you just have to click "close" on the nag screen when it comes up. However, if you use it and like it, you should consider paying for it, even though you don't actually have to. | WinRAR is a trial program, often called "nagware" - this means that you can use it for free for 40 days, and once the 40 days are up, you will get a "nag" screen asking you to pay for the program. You can still use WinRAR completely free after 40 days - you just have to click "close" on the nag screen when it comes up. However, if you use it and like it, you should consider paying for it, even though you don't actually have to. | ||
| − | + | |} | |
| − | == | + | {| class="collapsible nicetable" style="width:100%" |
| − | + | |- | |
| − | + | ! style="text-align:left" | 1) Find your custom content files | |
| − | + | |- | |
| − | ''The Sims 2:'' | + | | |
| + | '''The Sims 2:''' | ||
* All Body Shop content (hair, clothes, eyes, etc.) will be in your ''My Documents\EA Games\The Sims 2\SavedSims'' folder, containing your project name after an 8-character random string (i.e. 8edf7c5b_MyProjectName.package). Do NOT use the files from your Projects folder as they will not work in-game. | * All Body Shop content (hair, clothes, eyes, etc.) will be in your ''My Documents\EA Games\The Sims 2\SavedSims'' folder, containing your project name after an 8-character random string (i.e. 8edf7c5b_MyProjectName.package). Do NOT use the files from your Projects folder as they will not work in-game. | ||
| Line 32: | Line 31: | ||
* Walls, floors, and ground cover will be in your ''My Documents\EA Games\The Sims 2\Downloads'' folder. Do NOT package walls, floors, or ground cover to .sims2pack files from within Homecrafter - it is an unnecessary extra step and they will not be accepted for upload on MTS2. | * Walls, floors, and ground cover will be in your ''My Documents\EA Games\The Sims 2\Downloads'' folder. Do NOT package walls, floors, or ground cover to .sims2pack files from within Homecrafter - it is an unnecessary extra step and they will not be accepted for upload on MTS2. | ||
| − | ''The Sims 3:'' | + | '''The Sims 3:''' |
| − | * | + | * Lots/houses and worlds will be in your ''My Documents\Electronic Arts\The Sims 3\Exports'' folder. |
| − | + | * Sims will be in your ''My Documents\Electronic Arts\The Sims 3\SavedSims'' folder. | |
| + | |} | ||
| − | + | {| class="collapsible nicetable" style="width:100%" | |
| − | + | |- | |
| − | ''The Sims 2 | + | ! style="text-align:left" | 2) Rename your files (optional) |
| + | |- | ||
| + | | | ||
| + | '''The Sims 2:''' | ||
If you have made an item with Body Shop or Homecrafter, it won't have a very descriptive name. It's better to rename the files so they're descriptive. You don't have to do this, but it helps people downloading to know what's what. The easiest way to do this is to write down the order you created your files in the first place and then sort the files in the folder by date so you can see the order they were created in. The last file created will be the last file you made. | If you have made an item with Body Shop or Homecrafter, it won't have a very descriptive name. It's better to rename the files so they're descriptive. You don't have to do this, but it helps people downloading to know what's what. The easiest way to do this is to write down the order you created your files in the first place and then sort the files in the folder by date so you can see the order they were created in. The last file created will be the last file you made. | ||
| Line 48: | Line 51: | ||
It's a good idea to make your filenames descriptive - say what it is, the set name, the colour, and your name so people know what the item is and who made it at a glance. | It's a good idea to make your filenames descriptive - say what it is, the set name, the colour, and your name so people know what the item is and who made it at a glance. | ||
| − | + | '''The Sims 3''': | |
| − | + | * Skip to Step 3. | |
| + | |} | ||
| + | {| class="collapsible nicetable" style="width:100%" | ||
| + | |- | ||
| + | ! style="text-align:left" | 3) Select the files to compress | ||
| + | |- | ||
| + | | | ||
Once you have found your files and renamed them if desired, you need to select the ones you want to compress into a RAR or ZIP. Select the first file in the list and CTRL-click on any more files that you want to add to that RAR or ZIP. If the files are all in a row, you can hold the SHIFT key and then click on the last file in the list to select all of them at once. | Once you have found your files and renamed them if desired, you need to select the ones you want to compress into a RAR or ZIP. Select the first file in the list and CTRL-click on any more files that you want to add to that RAR or ZIP. If the files are all in a row, you can hold the SHIFT key and then click on the last file in the list to select all of them at once. | ||
If you have files in a different folder that you want to add to the same RAR or ZIP (for example, another user's mesh that you want to include with your clothing recolour, or files for a lot that didn't package with the .sims2pack), it's easiest to copy those additional files into the same folder temporarily so you can put them all together at once. | If you have files in a different folder that you want to add to the same RAR or ZIP (for example, another user's mesh that you want to include with your clothing recolour, or files for a lot that didn't package with the .sims2pack), it's easiest to copy those additional files into the same folder temporarily so you can put them all together at once. | ||
| + | |} | ||
| − | == | + | {| class="collapsible nicetable" style="width:100%" |
| − | + | |- | |
| − | + | ! style="text-align:left" | 4) Compress the files | |
| − | + | |- | |
| − | Now, with all the files you want to compress still selected, right-click on one of the selected files and choose "Add to archive..." | + | |[[Image:Addtoarchive.jpg|right|thumb|250px|Click Image to see larger version]] |
| − | + | Now, with all the files you want to compress still selected, right-click on one of the selected files and choose "Add to archive..." | |
| − | + | ||
| − | + | ||
| − | + | ||
| − | + | ||
| − | + | ||
| − | + | ||
| − | + | ||
| − | + | ||
| − | + | ||
| − | + | ||
| − | + | ||
| − | + | ||
| + | <br clear="all"> | ||
| + | [[Image:Archivesettings.jpg|right|thumb|250px|Click Image to see larger version]] | ||
| + | *You'll get a window that pops up, labelled "Archive name and parameters". | ||
| + | *In the box under "Archive name" type a name for your file. This is usually the name of the set or item. | ||
| + | *Under "Archive format" you can choose whether you want RAR or ZIP. For MTS upload, RAR (or 7z) is preferred as it is a better compression format, which means smaller files, and quicker uploads and downloads. | ||
| + | *Click the dropdown arrow under "Compression method" and choose "Best." This makes your file as compressed as possible - making it as small as it can be. | ||
| + | <br clear="all"> | ||
When you have your settings set up properly, click OK. | When you have your settings set up properly, click OK. | ||
You'll get a window that pops up that says "Creating archive..." and will disappear once it's done. Depending on the size of your archive, this may take just a second, or may take several minutes. | You'll get a window that pops up that says "Creating archive..." and will disappear once it's done. Depending on the size of your archive, this may take just a second, or may take several minutes. | ||
| + | |} | ||
| − | == | + | {| class="collapsible nicetable" style="width:100%" |
| − | + | |- | |
| − | + | ! style="text-align:left" | 5) Check the size of your archive: | |
| − | + | |- | |
| + | |[[Image:Checkfilesize.jpg|right]] | ||
Once you've created the archive, it will show up in the same folder as your files. Float your mouse cursor over it and hold it there, and you should see a small yellow box that pops up, similar to the picture below. | Once you've created the archive, it will show up in the same folder as your files. Float your mouse cursor over it and hold it there, and you should see a small yellow box that pops up, similar to the picture below. | ||
| − | + | The size will be displayed at the bottom. In this case, the file is 1.70 MB. The file size limit on MTS is 50 MB, so a 1.7 MB file is well under the limit. You will probably never exceed this limit, except for large worlds in TS3. | |
| − | + | ||
| − | The size will be displayed at the bottom. In this case, | + | |
| − | + | Please see the [[MTS2:Creator_Guidelines/Lots_and_Houses| TS2 Lots and Houses Creator Guidelines]] and [[MTS2:Creator_Guidelines/Sims_3_Lots_and_Houses | TS3 Lots and Houses Creator Guidelines]]for more information. | |
| + | |} | ||
[[Category:MTS2 Creator Guidelines]] | [[Category:MTS2 Creator Guidelines]] | ||
Latest revision as of 09:55, 29 November 2013
[edit] RAR or ZIP Your Custom Content
When uploading to MTS, you will need to compress your files into a RAR, ZIP, or 7Z file. Compressed files take up less space - which means they're quicker for you to upload, take up less space on MTS's servers, and are quicker for people to download.
[edit] You will need...
| A program to create RAR or ZIP Files.
These instructions use WinRAR. It is a great little utility that can both compress and extract from RAR and ZIP files. Other programs such as WinZip and 7zip can also be used, but you will have to look at their help files to see how to use them, as they will work slightly differently. WinRAR is our recommended program, and it is quite easy to use. WinRAR is a trial program, often called "nagware" - this means that you can use it for free for 40 days, and once the 40 days are up, you will get a "nag" screen asking you to pay for the program. You can still use WinRAR completely free after 40 days - you just have to click "close" on the nag screen when it comes up. However, if you use it and like it, you should consider paying for it, even though you don't actually have to. |
| 1) Find your custom content files |
|---|
|
The Sims 2:
The Sims 3:
|
| 2) Rename your files (optional) |
|---|
|
The Sims 2: If you have made an item with Body Shop or Homecrafter, it won't have a very descriptive name. It's better to rename the files so they're descriptive. You don't have to do this, but it helps people downloading to know what's what. The easiest way to do this is to write down the order you created your files in the first place and then sort the files in the folder by date so you can see the order they were created in. The last file created will be the last file you made. If you -do- rename your files, make sure you leave the extension on - that is, the part after the dot/period/. If your file is called "8edf7c5b_MyProjectName.package" to start with, you can rename it to "BlueDress_MyName.package" but not "BlueDress_MyName" or it won't work for people in the game. It's a good idea to make your filenames descriptive - say what it is, the set name, the colour, and your name so people know what the item is and who made it at a glance. The Sims 3:
|
| 3) Select the files to compress |
|---|
|
Once you have found your files and renamed them if desired, you need to select the ones you want to compress into a RAR or ZIP. Select the first file in the list and CTRL-click on any more files that you want to add to that RAR or ZIP. If the files are all in a row, you can hold the SHIFT key and then click on the last file in the list to select all of them at once. If you have files in a different folder that you want to add to the same RAR or ZIP (for example, another user's mesh that you want to include with your clothing recolour, or files for a lot that didn't package with the .sims2pack), it's easiest to copy those additional files into the same folder temporarily so you can put them all together at once. |
| 4) Compress the files |
|---|
|
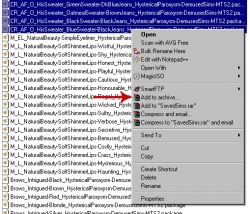
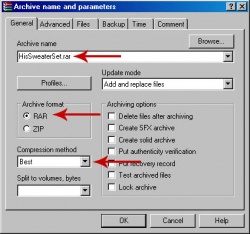
Now, with all the files you want to compress still selected, right-click on one of the selected files and choose "Add to archive..."
You'll get a window that pops up that says "Creating archive..." and will disappear once it's done. Depending on the size of your archive, this may take just a second, or may take several minutes. |
| 5) Check the size of your archive: |
|---|
|
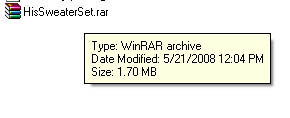
Once you've created the archive, it will show up in the same folder as your files. Float your mouse cursor over it and hold it there, and you should see a small yellow box that pops up, similar to the picture below. The size will be displayed at the bottom. In this case, the file is 1.70 MB. The file size limit on MTS is 50 MB, so a 1.7 MB file is well under the limit. You will probably never exceed this limit, except for large worlds in TS3. Please see the TS2 Lots and Houses Creator Guidelines and TS3 Lots and Houses Creator Guidelinesfor more information. |


