Difference between revisions of "Sims 3:Creating Custom Clothing Stencils"
(→Step 2) |
|||
| (36 intermediate revisions by 6 users not shown) | |||
| Line 1: | Line 1: | ||
| − | + | {{TS3ModdingHeader}} | |
| − | + | ||
| − | + | =Overview= | |
| + | Another way of customizing CAS parts in The Sims 3 is by using a stencil. Stencils are a non-tiling image on a part, such as a shirt, that still allows patterns to be customized, while having an image over top. Aimed for CTU beginners. To learn how to do this yourself, and make fancy content of your own, keep reading on! | ||
| + | __NOTOC__ | ||
| + | ==Custom Clothing Stencils== | ||
| + | [[Image:Prrof.jpg|200px|right]] | ||
| + | A stencil is another way to customize CAS parts in The Sims 3. Unlike patterns, stencils do not tile and they are kept in the same spot on the clothing texture. Stencils allow for neat designs to be put on a clothing item, while still allowing the patterns to be customized underneath it. | ||
===What This Tutorial Will Do=== | ===What This Tutorial Will Do=== | ||
| Line 8: | Line 12: | ||
===What This Tutorial Will Not Do=== | ===What This Tutorial Will Not Do=== | ||
| − | * | + | * Teach you how to make new meshes |
| − | * | + | * Teach you how to make new patterns. |
| + | : [[Image:RightArrow.gif]] ''Take a look at [[Sims_3:Custom_Patterns|HP's Custom Pattern Tutorial]] for that. patterns for the Sims 3.'' | ||
| + | * Teach you how to create new base textures or add transparency. | ||
: [[Image:RightArrow.gif]] ''Take a look at [[Sims_3:Creating_A_New_Base_Texture| Creating A New Base Texture]] for that.'' | : [[Image:RightArrow.gif]] ''Take a look at [[Sims_3:Creating_A_New_Base_Texture| Creating A New Base Texture]] for that.'' | ||
* Add a new RGB mask | * Add a new RGB mask | ||
| − | : [[Image:RightArrow.gif]] ''Take a look at [ | + | : [[Image:RightArrow.gif]] ''Take a look at [[Sims_3:Basic_Mask_Editing|Basic Mask Editing]] for that. '' |
===Difficulty=== | ===Difficulty=== | ||
| Line 38: | Line 44: | ||
====Step 2==== | ====Step 2==== | ||
| − | In the "Find A | + | In the "Find A CAS Part" tab, set the mesh details to the parameters of the mesh you want to apply a stencil to. (i.e. Child-Male-Top) Next choose the mesh you want to use from the drop down list or from the Quick Find. |
For the purpose of this tutorial, the cmTopShirtTee mesh will be used. | For the purpose of this tutorial, the cmTopShirtTee mesh will be used. | ||
| Line 44: | Line 50: | ||
====Step 3==== | ====Step 3==== | ||
| − | Move over to the "Designs" tab and | + | Move over to the "Designs" tab and add a new blank design. |
====Step 4==== | ====Step 4==== | ||
| − | Under the " | + | Under the "Textures" sub-tab click the base texture key to highlight it. |
| − | [[Image: | + | [[Image:Textureview.jpg|center|400px]] |
====Step 5==== | ====Step 5==== | ||
| Line 78: | Line 84: | ||
[[Image:Mipmapsbad.jpg|center|400px]] | [[Image:Mipmapsbad.jpg|center|400px]] | ||
| + | |||
| + | ''GIMP Users:'' After opening the DDS file as described above, under Select click 'all' and then copy the image. Return to blank canvas from Step 1 and click paste, then before doing anything else click on new layer (this is found on the dialoge box, it's the first icon which runs along the bottom) doing this will stop the layer from floating but anchor it down instead. | ||
====Step 3==== | ====Step 3==== | ||
Open up your stencil image in another window. Find the layer tool box and make a duplicate of the background layer (right-click on the layer). You can name the new layer if you want, but it's not that important--we are merely making a temporary backup of the layer. | Open up your stencil image in another window. Find the layer tool box and make a duplicate of the background layer (right-click on the layer). You can name the new layer if you want, but it's not that important--we are merely making a temporary backup of the layer. | ||
| − | ''GIMP Users:'' If the Layers, Channels, Paths, Undo dialog isn't on your screen, press ctrl-L to make it appear, select the layer by clicking on it, and then the third icon from the right at the bottom, which duplicates that layer. | + | ''GIMP Users:'' Follow the instructions above. If the Layers, Channels, Paths, Undo dialog isn't on your screen, press ctrl-L to make it appear, select the layer by clicking on it, and then the third icon from the right at the bottom, which duplicates that layer. |
''Paint.NET Users:'' No duplicated layer is needed, you can edit directly on the image. | ''Paint.NET Users:'' No duplicated layer is needed, you can edit directly on the image. | ||
| Line 91: | Line 99: | ||
When you have your image nice and clean, delete the old background layer. | When you have your image nice and clean, delete the old background layer. | ||
| − | ''GIMP Users:'' | + | ''GIMP Users:'' Hide the main background layer (the one we made a duplicate of) by clicking the image of the eye in the layers pane next to the main background layer. Then on the duplicate layer as described above get rid of the unecessary background colours. When you're done, you can get rid of the main background layer by selecting it and clicking the trashcan icon in the bottom right of the layers pane or by right clicking it and selecting delete layer. |
''Paint.NET Users:'' Use the Magic Wand to select all of the unnecessary background colors in the image and delete them. In my case I'll select all of the white area around the smiley face. You may have to use the Eraser Tool to get some of the finer spots or you can adjust the tolerance on the magic wand. | ''Paint.NET Users:'' Use the Magic Wand to select all of the unnecessary background colors in the image and delete them. In my case I'll select all of the white area around the smiley face. You may have to use the Eraser Tool to get some of the finer spots or you can adjust the tolerance on the magic wand. | ||
| Line 111: | Line 119: | ||
Copy and paste the stencil image into the blank canvas we created a few moments ago. Next go to the window with the shirt mesh texture and copy and paste it into the blank canvas as well. Arrange the layers so that the mesh texture is under the stencil image. | Copy and paste the stencil image into the blank canvas we created a few moments ago. Next go to the window with the shirt mesh texture and copy and paste it into the blank canvas as well. Arrange the layers so that the mesh texture is under the stencil image. | ||
| − | ''GIMP Users:'' | + | ''GIMP Users:'' Still on the stencil image, click select all, then copy. Return to the original file (the one with the blank background as one layer and the DDS file as another layer) then click paste. As before, before doing anything else click on new layer which will stop the layer from floating but anchor it down instead. |
''Paint.NET Users:'' Create a new layer, then paste the stencil image into the previously created blank canvas. | ''Paint.NET Users:'' Create a new layer, then paste the stencil image into the previously created blank canvas. | ||
| Line 125: | Line 133: | ||
''Tip: See the black area on the mesh where the neck will be? When you're placing/resizing, try not to make it too much bigger than the neck, otherwise it will probably distort and wrap around under the arms.'' | ''Tip: See the black area on the mesh where the neck will be? When you're placing/resizing, try not to make it too much bigger than the neck, otherwise it will probably distort and wrap around under the arms.'' | ||
| − | Once you have your image sized to your liking, place the image on the shirt texture guide. (Remember, the left half of the texture is the front of the shirt whereas the right is the back). I want my smiley face smack-dab in the middle but you can choose to place your stencil anywhere you want. And, I don't know why this picture turned grey-scaled...but imagine it in color<br clear="all"> | + | Once you have your image sized to your liking, place the image on the shirt texture guide. (Remember, the left half of the texture is the front of the shirt whereas the right is the back). I want my smiley face smack-dab in the middle but you can choose to place your stencil anywhere you want. And, I don't know why this picture turned grey-scaled...but imagine it in color |
| + | |||
| + | ''GIMP Users:'' This step applies to GIMP users aswell.<br clear="all"> | ||
====Step 3==== | ====Step 3==== | ||
When you have your stencil placed, hide the shirt texture layer and the background layer. | When you have your stencil placed, hide the shirt texture layer and the background layer. | ||
| + | |||
| + | ''GIMP Users:'' Ignore this step and move down to Part IV, GIMP Users. | ||
===Part IV: Creating the Alpha Channel=== | ===Part IV: Creating the Alpha Channel=== | ||
| Line 134: | Line 146: | ||
====GIMP Users==== | ====GIMP Users==== | ||
| + | Do not follow the 9 steps below as that is for photoshop users only who have to manually create an alpha channel, GIMP automatically creates it for you. Instead follow these three steps: | ||
| + | |||
| + | '''Step 1:''' Hide the layer that shows the DDs file. What you will be left seeing is your stencil on a checkered background. | ||
| + | |||
| + | '''Step 2:''' Right click on your stencil layer and click merge visible layers, a box will pop up. Leave it checked on 'Expand as necessary' and click merge. | ||
| + | |||
| + | '''Step 3:''' Right click on the DDS file layer and delete it. You should now be left with one layer which looks like a checkered background with your stencil on it. Now move down to part 5. | ||
| + | |||
| + | Once you have followed these steps move down to Part V. The following is extra information but not steps you need to take. | ||
| + | |||
GIMP will readily treat all layers as being transparencies once you have more than one layer defined because by default GIMP treats all new layers as RGBA images. The exception to this is that if a layer is named "Background" GIMP is telling you that it has no alpha-channel information and it will remain flattened (no alpha channel, which means you can't cut parts out of it--only paint over them). To add an alpha-channel to the background layer, go to the image and select Layer->Transparency->Add Alpha Channel. | GIMP will readily treat all layers as being transparencies once you have more than one layer defined because by default GIMP treats all new layers as RGBA images. The exception to this is that if a layer is named "Background" GIMP is telling you that it has no alpha-channel information and it will remain flattened (no alpha channel, which means you can't cut parts out of it--only paint over them). To add an alpha-channel to the background layer, go to the image and select Layer->Transparency->Add Alpha Channel. | ||
| Line 144: | Line 166: | ||
Paint.NET v3.36 makes the Alpha layer automatically. | Paint.NET v3.36 makes the Alpha layer automatically. | ||
| − | No further action is needed, skip to | + | No further action is needed, skip to Part V |
====Photoshop Users==== | ====Photoshop Users==== | ||
| Line 221: | Line 243: | ||
'''Note:''' | '''Note:''' | ||
| − | * DXT1 is also an acceptable compression format. | + | * DXT1 RGB 8bpp | 1 bit alpha is also an acceptable compression format. |
* You may have to play around with the three different DXT compressions to find out which one works the best for your particular image. | * You may have to play around with the three different DXT compressions to find out which one works the best for your particular image. | ||
| − | + | [[Image:RightArrow.gif]] '''See [[Sims_3:Adding_Custom_Stencils|Adding Custom Stencils]] to learn how to add your stencil to a CAS Part.''' | |
| − | == | + | ==Questions?== |
| − | + | ||
*If you need help with anything pertaining to a step(s) in '''this tutorial''' or have a tip/shortcut, then go to the [http://www.modthesims.info/showthread.php?t=349493 MTS forum thread] about this tutorial. | *If you need help with anything pertaining to a step(s) in '''this tutorial''' or have a tip/shortcut, then go to the [http://www.modthesims.info/showthread.php?t=349493 MTS forum thread] about this tutorial. | ||
| − | |||
| − | |||
| − | |||
<br clear="all"> | <br clear="all"> | ||
| + | |||
| + | {{TS3ModdingHeader}} | ||
| + | [[Category:Sims 3 Modding Tutorials]][[Category:CTU Tutorials]][[Category:Sims 3 CAS Tutorials]][[Category:Tutorials by daluved1]] | ||
Latest revision as of 17:37, 17 September 2012
| Tutorials by Category | |
|---|---|
|
CAS | Patterns | Objects | Building | Worlds | Modding | Modding Reference |
[edit] Overview
Another way of customizing CAS parts in The Sims 3 is by using a stencil. Stencils are a non-tiling image on a part, such as a shirt, that still allows patterns to be customized, while having an image over top. Aimed for CTU beginners. To learn how to do this yourself, and make fancy content of your own, keep reading on!
[edit] Custom Clothing Stencils
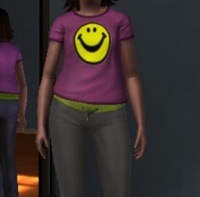
A stencil is another way to customize CAS parts in The Sims 3. Unlike patterns, stencils do not tile and they are kept in the same spot on the clothing texture. Stencils allow for neat designs to be put on a clothing item, while still allowing the patterns to be customized underneath it.
[edit] What This Tutorial Will Do
- Teach you how to make CAS part stencils for the Sims 3.
[edit] What This Tutorial Will Not Do
- Teach you how to make new meshes
- Teach you how to make new patterns.
-
 Take a look at HP's Custom Pattern Tutorial for that. patterns for the Sims 3.
- Teach you how to create new base textures or add transparency.
-
 Take a look at Creating A New Base Texture for that.
- Add a new RGB mask
-
 Take a look at Basic Mask Editing for that.
[edit] Difficulty
I've made this tutorial for beginners and first timers, however, some basic knowledge on how to use your imaging program is needed.
[edit] What You'll Need
- Adobe Photoshop (purchase), GIMP 2.0 (free), Paint.NET 3.36 (free)
- Delphy's CAS Texture Unitool
- DDS Plug-in for Photoshop or GIMP
Note:
- Paint.NET v3.1 and above has a built in DDS plug-in.
- In addition (but not needed) a channel mask plugin for Paint.NET should be installed. You don't need it, but it's a neat tool for more complicated projects.
(I'll be using Photoshop 7.0, so if you're using GIMP or Paint.NET the screen shots will be different but the concept is the same.)
[edit] The Tutorial
[edit] Part I: Preliminary Work
[edit] Step 1
Open the CAS Texture Unitool (CTU).
[edit] Step 2
In the "Find A CAS Part" tab, set the mesh details to the parameters of the mesh you want to apply a stencil to. (i.e. Child-Male-Top) Next choose the mesh you want to use from the drop down list or from the Quick Find. For the purpose of this tutorial, the cmTopShirtTee mesh will be used.
[edit] Step 3
Move over to the "Designs" tab and add a new blank design.
[edit] Step 4
Under the "Textures" sub-tab click the base texture key to highlight it.
[edit] Step 5
Being sure that the base texture key is highlighted, click on the "find" button at the bottom of the window.
[edit] Step 6
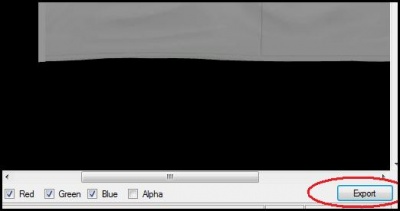
A DDS Preview window of the base texture of the shirt should pop up. Click the Export button at the bottom right corner of the preview window. Choose a destination for the file, give it a name, then save it.
[edit] Step 7
Usually you'd want to do this step first but we're doing it now! Find an image that you want to use as your stencil. I'm going to use this smiley face:
[edit] Part II: Creating the Stencil Image
[edit] Step 1
Open up your imaging program and make a new canvas. Set the canvas size to 1024 pixels wide and 1024 pixels high. Make sure that you're in RGB mode. And set the canvas content color to white.
GIMP Users: You merely need to select File->New (or press ctrl-n) and put 1024 in for both the height and width of the new image, and then click the little plus sign next to Advanced Options to open that extended dialog. 'Color space' should already be set to 'RGB color' by default, but change 'Fill with:' to 'Transparency'. Once that's done, click 'Ok'.
Paint.NET Users: RGB mode and white canvas are set by default.
[edit] Step 2
Open up the newly exported DDS file in your image editor. If asked, load default sizes and do not generate MIPmaps.
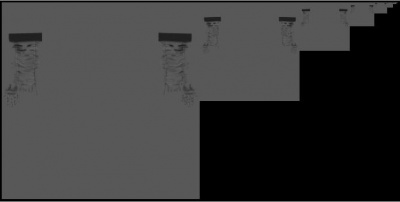
Note: If you get an image that looks like the one below, then you accidentally generated the MIPmaps. Close the file and reopen it, being sure to NOT GENERATE MIPMAPS!
GIMP Users: After opening the DDS file as described above, under Select click 'all' and then copy the image. Return to blank canvas from Step 1 and click paste, then before doing anything else click on new layer (this is found on the dialoge box, it's the first icon which runs along the bottom) doing this will stop the layer from floating but anchor it down instead.
[edit] Step 3
Open up your stencil image in another window. Find the layer tool box and make a duplicate of the background layer (right-click on the layer). You can name the new layer if you want, but it's not that important--we are merely making a temporary backup of the layer.
GIMP Users: Follow the instructions above. If the Layers, Channels, Paths, Undo dialog isn't on your screen, press ctrl-L to make it appear, select the layer by clicking on it, and then the third icon from the right at the bottom, which duplicates that layer.
Paint.NET Users: No duplicated layer is needed, you can edit directly on the image.
[edit] Step 4
Hide the main background layer (the one we made a duplicate of), then using the Magic Wand select all of the unnecessary background colors in the image and delete them. In my case I'll select all of the white area around the smiley face. You may have to use the Eraser Tool to get some of the finer spots or you can adjust the tolerance on the magic wand.
When you have your image nice and clean, delete the old background layer.
GIMP Users: Hide the main background layer (the one we made a duplicate of) by clicking the image of the eye in the layers pane next to the main background layer. Then on the duplicate layer as described above get rid of the unecessary background colours. When you're done, you can get rid of the main background layer by selecting it and clicking the trashcan icon in the bottom right of the layers pane or by right clicking it and selecting delete layer.
Paint.NET Users: Use the Magic Wand to select all of the unnecessary background colors in the image and delete them. In my case I'll select all of the white area around the smiley face. You may have to use the Eraser Tool to get some of the finer spots or you can adjust the tolerance on the magic wand.
[edit] Step 5
Using the Marquee Tool (Rectangle Selection Tool), draw a box around the meat of your image (or right-click and choose Select All). Then, make a copy. Now is a good idea to go ahead and save your clean stencil image just in case you need it again later.
GIMP Users: Use the crop tool (which looks like a hobby knife) to draw a box around the part of your image you'd like to keep plus or minus a few pixels, use the drag handles to resize it if needed, and then click in it to simply throw out all that blank canvas. This will make resizing your stencil image much easier in just a moment.
Paint.NET Users: Use the Rectangle Select tool to draw a box around the meat of your image, then make a copy.
[edit] Step 6 (Optional)
GIMP Users: There's an icon of an engineering compass between the magnifying glass and the four-way arrow in your toolbox which represents the measuring tool. If you want to be sure your decal is the right size, use the measuring tool to measure the width or height of the area you'd like the decal to occupy on the clothing. From there use Image->Scale Image to rescale your source art to that height or width. (This is why we discarded the extra canvas earlier.)
[edit] Part III: Working Around the Mesh
[edit] Step 1
Copy and paste the stencil image into the blank canvas we created a few moments ago. Next go to the window with the shirt mesh texture and copy and paste it into the blank canvas as well. Arrange the layers so that the mesh texture is under the stencil image.
GIMP Users: Still on the stencil image, click select all, then copy. Return to the original file (the one with the blank background as one layer and the DDS file as another layer) then click paste. As before, before doing anything else click on new layer which will stop the layer from floating but anchor it down instead.
Paint.NET Users: Create a new layer, then paste the stencil image into the previously created blank canvas.
[edit] Step 2
We're going to use the shirt base texture as a guide so make sure that it fills up the entire canvas (which it should by default) and do NOT move it (in fact, it's a good idea to go ahead and lock this layer for now).
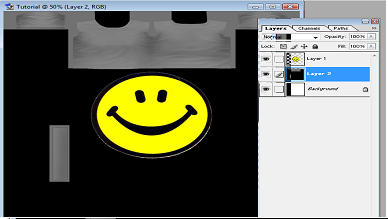
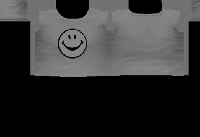
Judging by the shirt guide, you can see that (1) the stencil image is too big for the shirt mesh and (2) we need to do some more clean up on the stencil image.First let's erase some of the white left over at the bottom of the smiley face, then we'll resize it to fit on the shirt.
Tip: See the black area on the mesh where the neck will be? When you're placing/resizing, try not to make it too much bigger than the neck, otherwise it will probably distort and wrap around under the arms.
Once you have your image sized to your liking, place the image on the shirt texture guide. (Remember, the left half of the texture is the front of the shirt whereas the right is the back). I want my smiley face smack-dab in the middle but you can choose to place your stencil anywhere you want. And, I don't know why this picture turned grey-scaled...but imagine it in color
GIMP Users: This step applies to GIMP users aswell.
[edit] Step 3
When you have your stencil placed, hide the shirt texture layer and the background layer.
GIMP Users: Ignore this step and move down to Part IV, GIMP Users.
[edit] Part IV: Creating the Alpha Channel
When dealing with TS3 files, everything revolves around the four color channels: red, blue, green and alpha. Red, blue and green are created automatically but the Alpha channel is the one we may have to create manually. There are many ways to create the Alpha channel so if you know an easier route than the one that I'm using, feel free to do it your way.
[edit] GIMP Users
Do not follow the 9 steps below as that is for photoshop users only who have to manually create an alpha channel, GIMP automatically creates it for you. Instead follow these three steps:
Step 1: Hide the layer that shows the DDs file. What you will be left seeing is your stencil on a checkered background.
Step 2: Right click on your stencil layer and click merge visible layers, a box will pop up. Leave it checked on 'Expand as necessary' and click merge.
Step 3: Right click on the DDS file layer and delete it. You should now be left with one layer which looks like a checkered background with your stencil on it. Now move down to part 5.
Once you have followed these steps move down to Part V. The following is extra information but not steps you need to take.
GIMP will readily treat all layers as being transparencies once you have more than one layer defined because by default GIMP treats all new layers as RGBA images. The exception to this is that if a layer is named "Background" GIMP is telling you that it has no alpha-channel information and it will remain flattened (no alpha channel, which means you can't cut parts out of it--only paint over them). To add an alpha-channel to the background layer, go to the image and select Layer->Transparency->Add Alpha Channel.
Later you can simultaneously discard all alpha channel information, compress all visible layers into one, and simultaneously crop the parts of layers you moved that may continue off the edge of the canvas area by selecting Image->Flatten Image.
You may also edit the alpha channel directly using Colors->Components->Decompose and selecting Color Model RGBA (with Decompose to layers checked), which creates a new image composed of four greyscale layers named Red, Green, Blue and Alpha. You can toggle the visibility of the first three and then select the alpha channel to change it directly without affecting the other channels. Once this is done you can reassemble these layers back into the original layer by selecting Colors->Components->Compose.
[edit] Paint.NET Users
Paint.NET v3.36 makes the Alpha layer automatically.
No further action is needed, skip to Part V
[edit] Photoshop Users
[edit] Shortcut
Saikatsu suggested an easier alternative way to add the Alpha layer:
- Make sure that all layers, except for the one with the stencil, are hidden. If your image is spanned over multiple layers, make sure you merge all of the visible layers together.
- Hold down CTRL then click on the layer with the stencil image (in the Layer tab). This will select the stencil image only.
- Click on the Channels tab and create a new channel. It should automatically be named Alpha 1 or something similar
- With the new Alpha layer selected, hit ALT + DELETE. Now, the Alpha layer should have a white cutout where your stencil image should be.
- If that didn't work, then hit CTRL + DELETE instead.
- You should now have all four channels. If you do, hide the background layer and flatten the image, then skip to Part 5.
- If you still can't get it, then continue on with the rest of part 4.
[edit] Step 1
Merge any extra visible layers--be sure that the background and shirt texture layers are hidden! If you don't have any extra layers, that's okay, just skip this step.
[edit] Step 2
Duplicate the layer with the stencil image, then hide the original (the one we just duplicated).
Note: Make sure you don't accidentally move the stencil image, It's placement is still very important!
[edit] Step 3
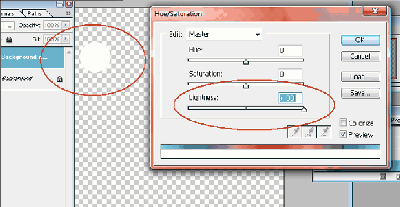
Next we're going to adjust the Hue/Saturation of the image (This should be under Image → Adjustments)
When you get to the Hue/Saturation adjuster, slide the Lightness adjuster all the way to +100. When done click Okay.
This should turn your image pure white.
.
[edit] Step 4
Using the Marquee tool, draw a box around the now-white image and make a copy.
[edit] Step 5
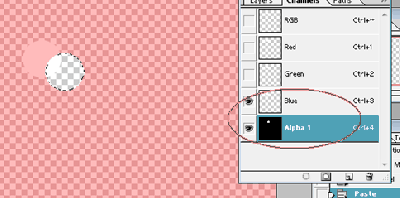
Click on the Channels tab. There should be 4 channels already set up: RGB, Red, Green and Blue. Create a new channel (it should automatically be called Alpha 1). The image should turn completely black. Next paste the whitened image we just copied anywhere in the black.
[edit] Step 6
Next comes the semi-tedious part: aligning the channels. Making only the Blue and Alpha channels visible usually shows the overlay of the channels and layers best, but try switching between combinations of Red, Green or Blue to find the best view for overlay channels. Depending on the photoshop version you use, you should get a pink tint added to the image. If you don't see the pink tint, don't worry, continue as normal, the end result will tell if it worked.[edit] Step 7
You can clearly see that the Alpha channel is misaligned. So, with the Alpha channel selected, move it around so that it's aligned with the blue channel. (Using the arrow keys can help you be more exact).
Tip from Mac: In photoshop, and most likely any other editing program with layers, use the paintbrush tool to make a dot (any color, your going to delete as soon as you transfer the layer) touching and covering two oppisite corner pixels of the image, ie.. Upper left & Bottom Right or Bottom Left & Upper Right, then copy the layer, paste in to the alpha layer and then erase your dots. Your image will then line up exactly. Then continue with changing the alpha layer to all white.
[edit] Step 8
Turn on all color channels to verify that everything is aligned correctly. When done, go back to the Layer view and hide all layers that are not part of the stencil image. You should get your original stencil image back.
[edit] Step 9
Merge any extra visible layers (if you don't have any that's okay), then flatten the entire image. If asked to discard hidden layers, click yes.
[edit] Part V: Saving the File
[edit] Step 1
Go to File → Save As. Pick D3D/DDS as your save format from the drop down list.
GIMP Users: Pick the DDS file type from the File Type tree.
Make sure that the Alpha Channels box is ticked. Give the file a name, then click save. When you do the DDS plug-in box should come up.
[edit] Step 2
In the long drop box, choose DXT3 ARGB 8bpp | explict alpha -OR- DXT5 ARGB 8bpp | interpolated alpha, then press save.
GIMP Users: Chose the BC2/DXT3 -OR- the BC3/DXT5 format and tick Generate Mipmaps , then press okay.
Paint.NET: Chose the DXT3 (Explicit Alpha) -OR- the DXT5 (Interpolated Alpha) format and tick Generate Mip Maps.
Make sure the MIPmaps are generated.
Note:
- DXT1 RGB 8bpp | 1 bit alpha is also an acceptable compression format.
- You may have to play around with the three different DXT compressions to find out which one works the best for your particular image.
![]() See Adding Custom Stencils to learn how to add your stencil to a CAS Part.
See Adding Custom Stencils to learn how to add your stencil to a CAS Part.
[edit] Questions?
- If you need help with anything pertaining to a step(s) in this tutorial or have a tip/shortcut, then go to the MTS forum thread about this tutorial.
| Tutorials by Category | |
|---|---|
|
CAS | Patterns | Objects | Building | Worlds | Modding | Modding Reference |
