Difference between revisions of "Tutorial:Sims 3 Pose Creation"
(Formatting) |
|||
| (34 intermediate revisions by 2 users not shown) | |||
| Line 6: | Line 6: | ||
| − | See below for instructions on making a pose using Milkshape. If you have questions please ask them in the '''[http://www.modthesims.info/showthread.php?t=438716 support thread]''' | + | See below for instructions on making a pose using Milkshape. If you have questions please ask them in the '''[http://www.modthesims.info/showthread.php?t=438716 support thread]''' If you would rather use Blender to make poses with the tutorials for that are '''[http://www.den.simlogical.com/denforum/index.php?board=48.0 at Simlogical]''' |
<br clear="all"/> | <br clear="all"/> | ||
| Line 16: | Line 16: | ||
:(adult male rig in post 5 & adult female rig in post 42) | :(adult male rig in post 5 & adult female rig in post 42) | ||
:OR WesHowe's new female rig here [http://www.modthesims.info/showthread.php?t=441722&goto=newpost Female Rig with EA mesh for Milkshape] | :OR WesHowe's new female rig here [http://www.modthesims.info/showthread.php?t=441722&goto=newpost Female Rig with EA mesh for Milkshape] | ||
| − | |||
*'''[http://dino.drealm.info/den/denforum/index.php?topic=526.0 S3PE Version 11-0402-0951] by Inge & Peter Jones | *'''[http://dino.drealm.info/den/denforum/index.php?topic=526.0 S3PE Version 11-0402-0951] by Inge & Peter Jones | ||
:(32 bit is the version most people will want). | :(32 bit is the version most people will want). | ||
| − | *''' | + | *'''Milkshape''' |
| − | + | ||
| − | + | ||
===A. Exporting the CLIP:=== | ===A. Exporting the CLIP:=== | ||
| Line 42: | Line 39: | ||
<blockquote>'''NOTE:''' In order for your pose to work correctly for you and others you must name your pose beginning with "a_". After that you can name as you like. But if the a_ is not at the beginning of your pose name the tool hash will not be correct and the pose will not play correctly in your game.</blockquote> | <blockquote>'''NOTE:''' In order for your pose to work correctly for you and others you must name your pose beginning with "a_". After that you can name as you like. But if the a_ is not at the beginning of your pose name the tool hash will not be correct and the pose will not play correctly in your game.</blockquote> | ||
| + | |||
| + | <blockquote>'''NOTE:''' Remember to make the name of your pose unique. If it is not it could cause a conflict. Often people use their creator name as part of the pose name to help keep things unique. If you do this, make sure the rest of the name is not the same as that of another pose you've created.</blockquote> | ||
<br clear="all"/> | <br clear="all"/> | ||
| Line 86: | Line 85: | ||
<blockquote>'''Note:''' When you're working on head, neck, spine, pelvis, thighs, and upper arms it's often useful to have the settings on Rotate Options be Center of Mass and Global. When you're working on forearms, calves, hands, feet, fingers, and toes it's often useful to change those settings to Origin and Local.</blockquote> | <blockquote>'''Note:''' When you're working on head, neck, spine, pelvis, thighs, and upper arms it's often useful to have the settings on Rotate Options be Center of Mass and Global. When you're working on forearms, calves, hands, feet, fingers, and toes it's often useful to change those settings to Origin and Local.</blockquote> | ||
| − | + | <br clear="all"/> | |
| − | + | ||
Credit and thank you to Wes Howe and Cmomoney for all their work on S3 animation and for teaching me about it. Credit also to Atavera for help & to mesher for the rig. :) | Credit and thank you to Wes Howe and Cmomoney for all their work on S3 animation and for teaching me about it. Credit also to Atavera for help & to mesher for the rig. :) | ||
Latest revision as of 22:58, 22 December 2012
[edit] Making a Pose using the Pose Player
|
See below for instructions on making a pose using Milkshape. If you have questions please ask them in the support thread If you would rather use Blender to make poses with the tutorials for that are at Simlogical
[edit] What you will need:
- Pose Player by cmomoney
- AnimTool V05 by Wes Howe
- Adult Rigs for Milkshape by mesher
- (adult male rig in post 5 & adult female rig in post 42)
- OR WesHowe's new female rig here Female Rig with EA mesh for Milkshape
- S3PE Version 11-0402-0951 by Inge & Peter Jones
- (32 bit is the version most people will want).
- Milkshape
[edit] A. Exporting the CLIP:
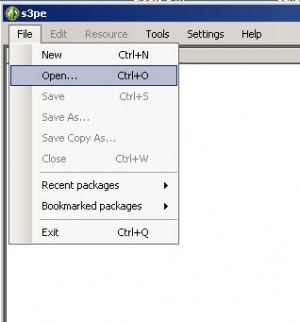
1. Open s3pe and click File. From the dropdown click Open. Navigate to Fullbuild0 which is here: Program Files/Electronic Arts/The Sims 3/GameData/Shared/FullBuild0
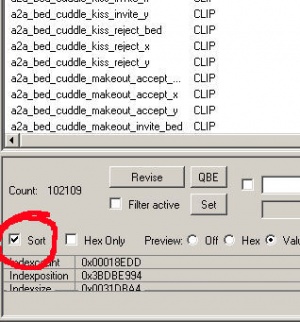
2. Make sure you have a check in the Sort box at the bottom left corner of s3pe and then click the Tag box near the top right corner
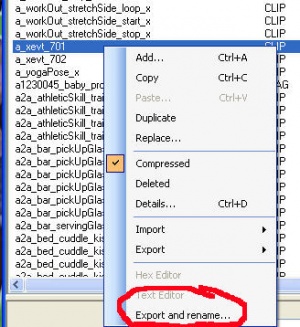
3. Scroll down to the CLIPs and select one of the clips that starts with a_xevt_. It doesn't matter whether you select a_xevt_701 or a_xevt_702. Right click on that line and click Export and rename. Make sure you pick the Export and rename option which is at the bottom of the dropdown list.
4. Enter the name you want for your new pose in the New CLIP name line of the popup box and click Save. Navigate to your working folder and save the CLIP there.
NOTE: In order for your pose to work correctly for you and others you must name your pose beginning with "a_". After that you can name as you like. But if the a_ is not at the beginning of your pose name the tool hash will not be correct and the pose will not play correctly in your game.
NOTE: Remember to make the name of your pose unique. If it is not it could cause a conflict. Often people use their creator name as part of the pose name to help keep things unique. If you do this, make sure the rest of the name is not the same as that of another pose you've created.
[edit] B. Converting the CLIP to SMD
- Open your working folder and open Mesher's rig download. Put the adult-rigfile.txt and the am_body_4_anim.ms3d in your working folder.
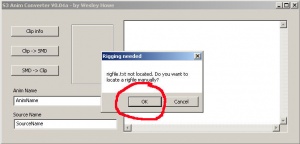
- Open the AnimTool-04a download and click on the exe to open the tool. Click the Clip->SMD button and navigate to your working folder. Double click on the CLIP you have there. A text box will pop up telling you the rigfile.text is not found. Click ok and navigate to your working folder. Click on adult_rigfile.txt and click Open. The box will close and the message No Errors will appear in the AnimTool's dialogue box.
- Now you can open your editor and open the am_body_4_anim.ms3d rig in it. Import your new smd. Create your pose. Save that to overwrite the new .smd that is in your working folder.
[edit] C. Converting the SMD to CLIP and Packaging the CLIP
- Open the AnimTool again. Click the SMD->CLIP button. Navigate to your working folder and select the .smd. Again you should receive a No Errors message in the AnimTool's dialogue box
- Open s3pe and Click File. From the dropdown menu select New.
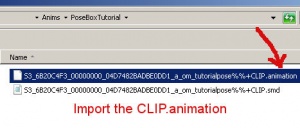
- Click Resource button (it's two over from File button) and from the dropdown menu select Import/From File. Navigate to your working folder and select your CLIP. Save without making any changes to the text or numbers. The item you want to import is the .animation.
Place the package in your Mods folder. Make sure you've also got the Pose Player in your Mods folder. Check your new pose in game.
Note: You can add multiple CLIPs to a single package. It is not necessary to make a new package for each individual CLIP.
Note: Remember to tick Readonly box when attempting to open fullbuild0 or any other EA game file in S3PE.
[edit] Making a Pose using Milkshape
1. Click File button in upper left hand corner and then choose Open. Navigate to your working folder and pick the am_body_4_anim.ms3d in MS.
2. Click File button in upper left hand corner again and then choose Import Halflife SMD. Navigate to your working folder and pick your new .smd. The SMD Import box will pop up with checks in each box. Leave all checks in place and click OK. A second box will pop up asking if you want to append the animation. Since all we want is a single frame pose choose No.
3. In the lower right hand corner click the Anim button.
4. Go to the joints tab. In the upper part of the joints tab you will see a list of all the joints in your rig. Put a check mark in the Show Skeleton box in the Vertex Weights section and you will see all the joints show up on your model in the view screen.
5. Now double click on a joint in the joints list. That joint and all the joints which are connected below it will light up in green if it is a joint you can move. So, for example, if you click the b_R_Thigh_ joint you will see the entire right leg has little green dots along it. This means that if you alter the position of the right thigh joint all the joints below will follow along automatically. If you click on a joint in the list and the joint lights up red instead of green on the model this means you should not alter the position of that joint...if you try the model will become distorted. An example of this kind of joint is the b_R_Right_Bicep joint.
6. To make your pose just click on the joint you want so it lights up with green and switch to Model tab. Click on the Rotate button, put your mouse in one of the view boxes and move it. You will see the model move accordingly. Play around with this until you have the model posed how you want it.
7. When you have the model posed how you like go to the top bar and click the Animate button there. From the drop down menu choose Set Keyframe. This will save your pose. Then go to the Anim button in the lower right hand corner and click it off. Don't be alarmed that your pose is lost when the model springs back to its original position. Your pose is still there as long as you set the keyframe.
8. Now click File and Export Halflife SMD. Navigate to your working folder and Save the new pose over the .smd. A box will pop up asking if you want to replace it-click yes. Another box will pop up. You should put a dot in the bubble in front of the word Sequence and leave the other two boxes blank. Then click OK.
Now you're ready to pick up with the tutorial above by converting this .smd back to a CLIP.
Note: When you're working on head, neck, spine, pelvis, thighs, and upper arms it's often useful to have the settings on Rotate Options be Center of Mass and Global. When you're working on forearms, calves, hands, feet, fingers, and toes it's often useful to change those settings to Origin and Local.
Credit and thank you to Wes Howe and Cmomoney for all their work on S3 animation and for teaching me about it. Credit also to Atavera for help & to mesher for the rig. :)
