Difference between revisions of "User:PharaohHound/Tutorialtest"
PharaohHound (Talk | contribs) |
PharaohHound (Talk | contribs) m |
||
| (12 intermediate revisions by one user not shown) | |||
| Line 1: | Line 1: | ||
| + | __notoc__ | ||
| + | |||
==Introduction== | ==Introduction== | ||
| − | This tutorial will show you how | + | Ever wanted to make your favourite pup some stylish new markings? This tutorial will show you how. |
*What this tutorial will teach you to do: | *What this tutorial will teach you to do: | ||
| Line 10: | Line 12: | ||
**Create pets in TS3 | **Create pets in TS3 | ||
**Hand-paint textures in your imaging program | **Hand-paint textures in your imaging program | ||
| − | ** | + | **Use the basic functions of your imaging program |
**Create Regional Markings | **Create Regional Markings | ||
| Line 17: | Line 19: | ||
*[http://dino.drealm.info/den/denforum/index.php?topic=190.0 s3oc]. You '''must''' have version 12-0204-2341 or later | *[http://dino.drealm.info/den/denforum/index.php?topic=190.0 s3oc]. You '''must''' have version 12-0204-2341 or later | ||
*An image editing program capable of working with DDS and PNG files. For this tutorial, I am using Adobe Photoshop CS5 with [http://developer.nvidia.com/nvidia-texture-tools-adobe-photoshop Nvidia DDS tools]. | *An image editing program capable of working with DDS and PNG files. For this tutorial, I am using Adobe Photoshop CS5 with [http://developer.nvidia.com/nvidia-texture-tools-adobe-photoshop Nvidia DDS tools]. | ||
| − | + | *'''Not necessary, but good to have''': a graphics tablet to paint your marking with. I am using a Wacom Intuos3. | |
| − | + | ||
| − | + | ||
==Preparations== | ==Preparations== | ||
| Line 29: | Line 29: | ||
Once you've decided on a direction for your marking, you will need to clone a premade EA marking to base your marking off of, using s3oc. | Once you've decided on a direction for your marking, you will need to clone a premade EA marking to base your marking off of, using s3oc. | ||
| − | Open s3oc and select "(experimental) CAS Part", wait patiently for it to load all of the parts. | + | Open s3oc and select "(experimental) CAS Part" from the Cloning menu, wait patiently for it to load all of the parts. |
| + | [[image:Marking_tut_s3oc_markingdal.jpg|300px|right]] | ||
You will be greeted with a very long list of files, organized alphabetically. Files are organized as follows, I have included Regional Markings for reference. | You will be greeted with a very long list of files, organized alphabetically. Files are organized as follows, I have included Regional Markings for reference. | ||
| Line 35: | Line 36: | ||
{|border="1" | {|border="1" | ||
| | | | ||
| − | |Dog | + | |'''Dog''' |
| − | |Cat | + | |'''Cat''' |
| − | |Horse | + | |'''Horse''' |
|- | |- | ||
| − | |Marking | + | |'''Marking''' |
|adMarkings | |adMarkings | ||
|acMarkings | |acMarkings | ||
|ahMarkings | |ahMarkings | ||
|- | |- | ||
| − | |Regional Marking | + | |'''Regional Marking''' |
|adRegions | |adRegions | ||
|acRegions | |acRegions | ||
| Line 50: | Line 51: | ||
|} | |} | ||
| − | + | However, all markings work with all species, so which species you clone from is basically irrelevant (this is not true for Regional Markings). | |
| − | Certain markings have multiple recolourable channels, you can see this in-game; some markings have multiple palettes to recolour, while some only have one. If you already have experience working with multichannel DDS images, feel free to make a marking with multiple channels. If you | + | Certain markings have multiple recolourable channels, you can see this in-game; some markings have multiple palettes to recolour, while some only have one. If you already have experience working with multichannel DDS images, feel free to make a marking with multiple channels. If you do not, I would '''strongly''' recommend starting with a single-channel marking. I will not be specifically detailing how to make a multichannel marking. The table below details the number of channels for all markings. |
| − | You will be met with a screen that asks you to choose options for your cloned file. | + | {| class="wikitable sortable" border="1" |
| + | |+ Markings by number of channels | ||
| + | |- | ||
| + | ! scope="col" | Marking name | ||
| + | ! scope="col" | Channels | ||
| + | |- | ||
| + | |acMarkings_bigOvalB || 1 | ||
| + | |- | ||
| + | |acMarkings_FlameA1 || 1 | ||
| + | |- | ||
| + | |acMarkings_SplotchA2 || 2 | ||
| + | |- | ||
| + | |acMarkings_splotchB2 || 2 | ||
| + | |- | ||
| + | |acMarkings_SplotchC2 || 2 | ||
| + | |- | ||
| + | |acMarkings_spotBlen || 2 | ||
| + | |- | ||
| + | |acMarkings_StripesA || 1 | ||
| + | |- | ||
| + | |acMarkings_tri || 1 | ||
| + | |- | ||
| + | |adMarkings_blaze || 1 | ||
| + | |- | ||
| + | |adMarkings_brindles || 2? | ||
| + | |- | ||
| + | |adMarkings_speckles || 1 | ||
| + | |- | ||
| + | |adMarkings_splotchA || ? | ||
| + | |- | ||
| + | |adMarkings_spot || 3? | ||
| + | |- | ||
| + | |adMarkings_spotBlen || 2 | ||
| + | |- | ||
| + | |adMarkings_spotsDal || 1 | ||
| + | |- | ||
| + | |adMarkings_StarA1 || 1 | ||
| + | |- | ||
| + | |adMarkings_StarC4 || 3 | ||
| + | |- | ||
| + | |adMarkings_stripeA || 1 | ||
| + | |- | ||
| + | |adMarkings_stripeBl || 1 | ||
| + | |- | ||
| + | |ahMarkings_Blotch || 1 | ||
| + | |- | ||
| + | |ahMarkings_Butterfly || 3 | ||
| + | |- | ||
| + | |ahMarkings_CowSpot || 1 | ||
| + | |- | ||
| + | |ahMarkings_Flower || 3 | ||
| + | |- | ||
| + | |ahMarkings_Heart || 3 | ||
| + | |- | ||
| + | |ahMarkings_Lollipop || 3 | ||
| + | |- | ||
| + | |ahMarkings_MuddySpo || 1? | ||
| + | |- | ||
| + | |ahMarkings_PolkaDot || 2 | ||
| + | |- | ||
| + | |ahMarkings_spotA || 1 | ||
| + | |- | ||
| + | |ahMarkings_spotB || 1 | ||
| + | |- | ||
| + | |ahMarkings_spotBlen(dB) || 2? | ||
| + | |- | ||
| + | |ahMarkings_spotBlen(dA) || 2 | ||
| + | |- | ||
| + | |ahMarkings_spotC2 || 2 | ||
| + | |- | ||
| + | |ahMarkings_Spots || 2 | ||
| + | |} | ||
| + | |||
| + | Whatever you decide to do, clone a marking that has the same number of channels as the marking you want to make. In my case, I am making a single-channel marking, so I will be cloning adMarkings_spotsDal. Select that CAS part, then click "Clone or Fix". | ||
| + | |||
| + | [[image:Marking_tut_s3oc_clone.jpg|360px|center]] | ||
| + | |||
| + | You will be met with a screen that asks you to choose options for your cloned file. Make sure "Include thumbnails" and "Renumber/rename internally" are ticked. Below "Renumber/rename internally", there is a text box for "Unique name". Change it to a simple, descriptive name of your marking, with your creator name if you want. In my case, I am changing it to PharaohHound_DalSpots1. In the upper right of the screen, change the text under "Unknown1" to a short, descriptive name of your marking. I am changing it to PH_DalSpots1. Press "Start", select your project folder, and s3oc will clone the marking and place it in the folder. You can now close s3oc. | ||
==Exporting the Resources== | ==Exporting the Resources== | ||
| − | Fire up s3pe and open your cloned package. You will see a list of resources that should look like the following image. The two resources that are particularly relevant to us right now are selected. The first one is the DDS file that contains the actual texture for the marking, it has an _IMG tag in s3pe. If you have DDS preview enabled in s3pe (look in the "Settings" menu), you will see an image of the marking in the preview window. The colours will look strange, this is normal. The background is black, and the marking will be red. If you have cloned a multichannel marking, other colours will appear. | + | Fire up s3pe and open your cloned package. You will see a list of resources that should look like the following image. The two resources that are particularly relevant to us right now are selected. |
| + | |||
| + | [[image:Marking_tut_s3pe_resources.jpg|360px|center]] | ||
| + | |||
| + | The first one is the DDS file that contains the actual texture for the marking, it has an _IMG tag in s3pe. If you have DDS preview enabled in s3pe (look in the "Settings" menu), you will see an image of the marking in the preview window. The colours will look strange, this is normal. The background is black, and the marking will be red. If you have cloned a multichannel marking, other colours will appear. | ||
The second resource we need right now is the thumbnail that you see in the Create-a-Pet screen, both in the list of markings, and on the "flat pet" that we place freeform markings on. There should be three resources with the "THUM" tag. Click on all three in turn, you should see that they are three different sizes, large, medium and small. We need the large thumbnail, the rest can be ignored. | The second resource we need right now is the thumbnail that you see in the Create-a-Pet screen, both in the list of markings, and on the "flat pet" that we place freeform markings on. There should be three resources with the "THUM" tag. Click on all three in turn, you should see that they are three different sizes, large, medium and small. We need the large thumbnail, the rest can be ignored. | ||
| Line 63: | Line 145: | ||
Select both the DDS and the proper thumbnail using Ctrl, then right click on one. In the menu that pops up, mouseover "Export", and select "To file...". Select your project folder, and export the resources. The texture will export as a .dds file, the thumbnail will export as a .png file. | Select both the DDS and the proper thumbnail using Ctrl, then right click on one. In the menu that pops up, mouseover "Export", and select "To file...". Select your project folder, and export the resources. The texture will export as a .dds file, the thumbnail will export as a .png file. | ||
| − | We are done in s3pe for the moment, however, leave it open but minimized | + | We are done in s3pe for the moment, however, leave it open but minimized. We will need it again. |
==Image Editing== | ==Image Editing== | ||
| Line 69: | Line 151: | ||
Now comes the fun part: we get to paint our new marking! All of the following descriptions and images are based on my imaging program, Adobe Photoshop CS5. If you have some experience in your chosen program, you should be able to adapt the directions. | Now comes the fun part: we get to paint our new marking! All of the following descriptions and images are based on my imaging program, Adobe Photoshop CS5. If you have some experience in your chosen program, you should be able to adapt the directions. | ||
| − | Firstly, we need to import the DDS and PNG we exported from our package. We will be working on the DDS for now. Make sure you have your Channels window open (if it's not, open it via the "Windows" menu). When you open the image it will have all 4 channels selected, | + | Firstly, we need to import the DDS and PNG we exported from our package. We will be working on the DDS for now. Make sure you have your Channels window open (if it's not, open it via the "Windows" menu). When you open the image it will have all 4 channels selected, and the marking will appear red as the following image. |
| − | I don't want to just tweak and EA marking, I want to remove their marking and start fresh. Select the bucket tool and fill the entire channel black. You will be painting your marking in white on black. Paint your marking as you will. Once you're done, Save your marking, overwriting the original DDS you exported. | + | [[image:Marking_tut_PS_DDS_loaded.jpg|300px|center]] |
| + | |||
| + | Select only the Red channel by clicking on it. This should cause it to turn white. | ||
| + | |||
| + | I don't want to just tweak and EA marking, I want to remove their marking and start fresh. Select the bucket tool and fill the entire channel black. You will be painting your marking in white on black. Paint your marking as you will. Once you're done, Save your marking, as a DXT5 with no mipmaps, overwriting the original DDS you exported. | ||
===Creating the Thumbnail=== | ===Creating the Thumbnail=== | ||
| − | Once you're done editing the DDS, making sure you have only the Red channel selected, select all (Ctrl A), then copy (Ctrl C). Create a new image, in Photoshop it will come preloaded with the settings of the selection you've just copied. Paste (Ctrl V) the selection into your new | + | Once you're done editing the DDS, making sure you have only the Red channel selected, select all (Ctrl A), then copy (Ctrl C). Create a new image, in Photoshop it will come preloaded with the settings of the selection you've just copied. Paste (Ctrl V) the selection into your new image. |
| + | [[image:Marking_tut_PS_thumb_preinvert.jpg|300px|center]] | ||
| + | |||
| + | Invert the colours, you will now have a "positive" image of your marking. | ||
| + | |||
| + | [[image:Marking_tut_PS_thumb_postinvert.jpg|300px|center]] | ||
| − | If you see anything you would like to tweak, go back to your DDS and fix, then add it back into your new image. Otherwise, merge all visible layers (Ctrl Shift E). This flattens all of the layers into the background layer | + | If you see anything you would like to tweak, go back to your DDS and fix, then add it back into your new image. Otherwise, merge all visible layers (Ctrl Shift E). This flattens all of the layers into the background layer. Duplicate that layer then delete the original background layer. Use the magic wand tool to select the white background, and lightly feather the selection edges. Delete the selection. |
| − | You should be left with your markings in black with a transparent background. Remember that PNG that we opened in Photoshop a while back? From your new image, select the markings and drag them into the PNG. They will be much too large, scale them down (make sure to hold down Shift so the image doesn't stretch) so that the height of the new layers matches the PNG. It will be not quite as wide as the PNG, so just centre it horizontally. Delete the original layer from the PNG. You should be left with a PNG that features only your marking. | + | You should be left with your markings in black with a transparent background. Remember that PNG that we opened in Photoshop a while back? From your new image, select the markings and drag them into the PNG. They will be much too large, scale them down (make sure to hold down Shift so the image doesn't stretch) so that the height of the new layers matches the PNG. It will be not quite as wide as the PNG, so just centre it horizontally. Delete the original layer from the PNG. You should be left with a PNG that features only your marking. I have also added a small custom logo to the corner of mine. |
| + | [[image:Marking_tut_PS_final_thumb.jpg|300px|center]] | ||
| − | You are now done with Photoshop, you can close it. | + | Save the image, this time overwrite the PNG you exported from s3pe. You are now done with Photoshop, you can close it. |
==Putting it All Together== | ==Putting it All Together== | ||
| Line 88: | Line 180: | ||
===Changing Catalogue Sort (Optional)=== | ===Changing Catalogue Sort (Optional)=== | ||
| − | Want to really get fancy? You can change where in the Create-a-Pet catalogue your marking appears. This is especially useful if (like me) you're creating a set of markings cloned from different source markings, but you want them to all be next to each other in the catalogue. In s3pe, find the resource with the tag CASP. Click it, then at the bottom of the screen click "Grid". A window will pop up with a list of different properties. | + | Want to really get fancy? You can change where in the Create-a-Pet catalogue your marking appears. This is especially useful if (like me) you're creating a set of markings cloned from different source markings, but you want them to all be next to each other in the catalogue. In s3pe, find the resource with the tag CASP. Click it, then at the bottom of the screen click "Grid". A window will pop up with a list of different properties. |
| + | [[image:Marking_tut_S3pe_sortpriority.jpg|300px|center]] | ||
| + | The only one we're concerned with is "SortPriority". Items are sorted in the catalogue from largest number to smallest. I am changing the value on mine to 51, which will place them about 2/3 down the catalogue. Enter your chosen value, press "commit", save your package, and you're done. | ||
==Closing Remarks== | ==Closing Remarks== | ||
| − | So, now you're completely done! Find your package (rename it if you like), then drop it in your game to test. If everything has worked out, you should see your marking in the markings catalogue with a nice matching thumbnail. | + | So, now you're completely done! Find your package (rename it if you like), then drop it in your game to test. If everything has worked out, you should see your marking in the markings catalogue with a nice matching thumbnail. Sometimes things don't quite look the way you anticipated; spots that you thought would be larger are actually kinda small. This is nothing to fret about, simply go back and adjust your texture (adjust the thumbnail while you're at it!) |
Latest revision as of 15:09, 25 February 2012
[edit] Introduction
Ever wanted to make your favourite pup some stylish new markings? This tutorial will show you how.
- What this tutorial will teach you to do:
- Clone the right CAS part
- Export it and import the texture files into your imaging program
- Reassemble all of the new texture files in s3pe
- What this tutorial will not teach you to do:
- Create pets in TS3
- Hand-paint textures in your imaging program
- Use the basic functions of your imaging program
- Create Regional Markings
[edit] You Will Need
- s3pe.
- s3oc. You must have version 12-0204-2341 or later
- An image editing program capable of working with DDS and PNG files. For this tutorial, I am using Adobe Photoshop CS5 with Nvidia DDS tools.
- Not necessary, but good to have: a graphics tablet to paint your marking with. I am using a Wacom Intuos3.
[edit] Preparations
Before we start doing anything, we need to plan what our marking will be. Start by figuring out why you are creating your marking. For me, I am looking to supplement the game's lacking selection of spotted markings. I use books and a Google images search to find good reference pictures of markings like the one I want to make.
Creating markings can result in a mess of files, I would strongly recommend you create a project folder to keep yourself organized.
[edit] Cloning
Once you've decided on a direction for your marking, you will need to clone a premade EA marking to base your marking off of, using s3oc.
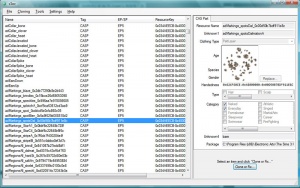
Open s3oc and select "(experimental) CAS Part" from the Cloning menu, wait patiently for it to load all of the parts.
You will be greeted with a very long list of files, organized alphabetically. Files are organized as follows, I have included Regional Markings for reference.
| Dog | Cat | Horse | |
| Marking | adMarkings | acMarkings | ahMarkings |
| Regional Marking | adRegions | acRegions | ahRegions |
However, all markings work with all species, so which species you clone from is basically irrelevant (this is not true for Regional Markings).
Certain markings have multiple recolourable channels, you can see this in-game; some markings have multiple palettes to recolour, while some only have one. If you already have experience working with multichannel DDS images, feel free to make a marking with multiple channels. If you do not, I would strongly recommend starting with a single-channel marking. I will not be specifically detailing how to make a multichannel marking. The table below details the number of channels for all markings.
| Marking name | Channels |
|---|---|
| acMarkings_bigOvalB | 1 |
| acMarkings_FlameA1 | 1 |
| acMarkings_SplotchA2 | 2 |
| acMarkings_splotchB2 | 2 |
| acMarkings_SplotchC2 | 2 |
| acMarkings_spotBlen | 2 |
| acMarkings_StripesA | 1 |
| acMarkings_tri | 1 |
| adMarkings_blaze | 1 |
| adMarkings_brindles | 2? |
| adMarkings_speckles | 1 |
| adMarkings_splotchA | ? |
| adMarkings_spot | 3? |
| adMarkings_spotBlen | 2 |
| adMarkings_spotsDal | 1 |
| adMarkings_StarA1 | 1 |
| adMarkings_StarC4 | 3 |
| adMarkings_stripeA | 1 |
| adMarkings_stripeBl | 1 |
| ahMarkings_Blotch | 1 |
| ahMarkings_Butterfly | 3 |
| ahMarkings_CowSpot | 1 |
| ahMarkings_Flower | 3 |
| ahMarkings_Heart | 3 |
| ahMarkings_Lollipop | 3 |
| ahMarkings_MuddySpo | 1? |
| ahMarkings_PolkaDot | 2 |
| ahMarkings_spotA | 1 |
| ahMarkings_spotB | 1 |
| ahMarkings_spotBlen(dB) | 2? |
| ahMarkings_spotBlen(dA) | 2 |
| ahMarkings_spotC2 | 2 |
| ahMarkings_Spots | 2 |
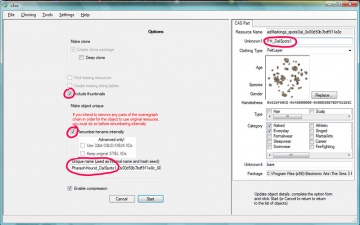
Whatever you decide to do, clone a marking that has the same number of channels as the marking you want to make. In my case, I am making a single-channel marking, so I will be cloning adMarkings_spotsDal. Select that CAS part, then click "Clone or Fix".
You will be met with a screen that asks you to choose options for your cloned file. Make sure "Include thumbnails" and "Renumber/rename internally" are ticked. Below "Renumber/rename internally", there is a text box for "Unique name". Change it to a simple, descriptive name of your marking, with your creator name if you want. In my case, I am changing it to PharaohHound_DalSpots1. In the upper right of the screen, change the text under "Unknown1" to a short, descriptive name of your marking. I am changing it to PH_DalSpots1. Press "Start", select your project folder, and s3oc will clone the marking and place it in the folder. You can now close s3oc.
[edit] Exporting the Resources
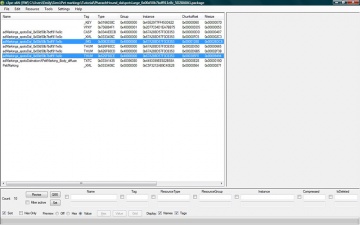
Fire up s3pe and open your cloned package. You will see a list of resources that should look like the following image. The two resources that are particularly relevant to us right now are selected.
The first one is the DDS file that contains the actual texture for the marking, it has an _IMG tag in s3pe. If you have DDS preview enabled in s3pe (look in the "Settings" menu), you will see an image of the marking in the preview window. The colours will look strange, this is normal. The background is black, and the marking will be red. If you have cloned a multichannel marking, other colours will appear.
The second resource we need right now is the thumbnail that you see in the Create-a-Pet screen, both in the list of markings, and on the "flat pet" that we place freeform markings on. There should be three resources with the "THUM" tag. Click on all three in turn, you should see that they are three different sizes, large, medium and small. We need the large thumbnail, the rest can be ignored.
Select both the DDS and the proper thumbnail using Ctrl, then right click on one. In the menu that pops up, mouseover "Export", and select "To file...". Select your project folder, and export the resources. The texture will export as a .dds file, the thumbnail will export as a .png file.
We are done in s3pe for the moment, however, leave it open but minimized. We will need it again.
[edit] Image Editing
[edit] Creating Your Marking Texture
Now comes the fun part: we get to paint our new marking! All of the following descriptions and images are based on my imaging program, Adobe Photoshop CS5. If you have some experience in your chosen program, you should be able to adapt the directions.
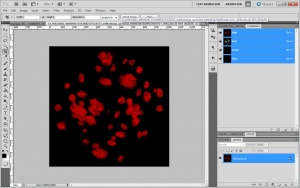
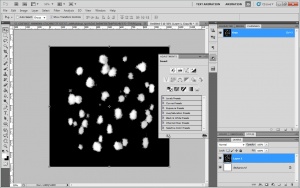
Firstly, we need to import the DDS and PNG we exported from our package. We will be working on the DDS for now. Make sure you have your Channels window open (if it's not, open it via the "Windows" menu). When you open the image it will have all 4 channels selected, and the marking will appear red as the following image.
Select only the Red channel by clicking on it. This should cause it to turn white.
I don't want to just tweak and EA marking, I want to remove their marking and start fresh. Select the bucket tool and fill the entire channel black. You will be painting your marking in white on black. Paint your marking as you will. Once you're done, Save your marking, as a DXT5 with no mipmaps, overwriting the original DDS you exported.
[edit] Creating the Thumbnail
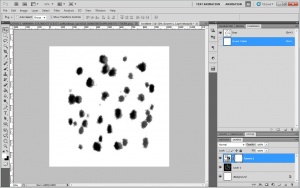
Once you're done editing the DDS, making sure you have only the Red channel selected, select all (Ctrl A), then copy (Ctrl C). Create a new image, in Photoshop it will come preloaded with the settings of the selection you've just copied. Paste (Ctrl V) the selection into your new image.
Invert the colours, you will now have a "positive" image of your marking.
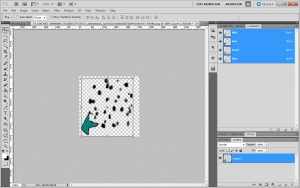
If you see anything you would like to tweak, go back to your DDS and fix, then add it back into your new image. Otherwise, merge all visible layers (Ctrl Shift E). This flattens all of the layers into the background layer. Duplicate that layer then delete the original background layer. Use the magic wand tool to select the white background, and lightly feather the selection edges. Delete the selection.
You should be left with your markings in black with a transparent background. Remember that PNG that we opened in Photoshop a while back? From your new image, select the markings and drag them into the PNG. They will be much too large, scale them down (make sure to hold down Shift so the image doesn't stretch) so that the height of the new layers matches the PNG. It will be not quite as wide as the PNG, so just centre it horizontally. Delete the original layer from the PNG. You should be left with a PNG that features only your marking. I have also added a small custom logo to the corner of mine.
Save the image, this time overwrite the PNG you exported from s3pe. You are now done with Photoshop, you can close it.
[edit] Putting it All Together
Mosey on back to s3pe. If you closed the program, reopen your package file. Now, select the DDS from the list of resources. Right click on it, and in the popup menu select "Replace". If it doesn't take you to your project folder, find that folder. Assuming you've kept your folder neat and tidy, there should be only one image that s3pe can use to replace. Select it. If you have DDS preview enabled, you should see the old EA marking replaced with your new, shiny marking. Yay!
Replace the correct thumbnail (the largest image with the THUM tag) using the same procedure as for the DDS. Once you're done, save your package.
[edit] Changing Catalogue Sort (Optional)
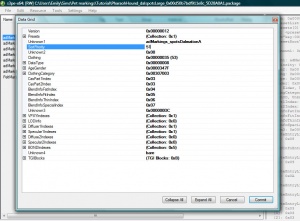
Want to really get fancy? You can change where in the Create-a-Pet catalogue your marking appears. This is especially useful if (like me) you're creating a set of markings cloned from different source markings, but you want them to all be next to each other in the catalogue. In s3pe, find the resource with the tag CASP. Click it, then at the bottom of the screen click "Grid". A window will pop up with a list of different properties.
The only one we're concerned with is "SortPriority". Items are sorted in the catalogue from largest number to smallest. I am changing the value on mine to 51, which will place them about 2/3 down the catalogue. Enter your chosen value, press "commit", save your package, and you're done.
[edit] Closing Remarks
So, now you're completely done! Find your package (rename it if you like), then drop it in your game to test. If everything has worked out, you should see your marking in the markings catalogue with a nice matching thumbnail. Sometimes things don't quite look the way you anticipated; spots that you thought would be larger are actually kinda small. This is nothing to fret about, simply go back and adjust your texture (adjust the thumbnail while you're at it!)
