Difference between revisions of "Tutorial:Sims 3 Making Poses"
(→Tips and Tricks for fabulous poses!) |
(→Tips and Tricks for fabulous poses!) |
||
| Line 92: | Line 92: | ||
'''Screenshots, best friend or enemy?''' - Obviously people will be using your poses primarily in photos of their sims. So to make a good pose, it's gotta be something they can use and looks good. You may have a stellar pose, but bad screenshots might stunt its greatness. Pick angles that flatter the pose and show off it's best qualities. Make sure to show the pose in good light, and have it fill as much of the screen as possible. When choosing hair and clothing make sure you pick clothes that show the shapes you've created and the hair doesn't hide or obscure any details of the pose. Good screenshots show off the pose and make it look its best. Avoid photoshopping because you could change important things that a mod would need to see, such as minor errors or missing shadows. Careless photoshopping will lead to your poses be rejected or sent back for changes. | '''Screenshots, best friend or enemy?''' - Obviously people will be using your poses primarily in photos of their sims. So to make a good pose, it's gotta be something they can use and looks good. You may have a stellar pose, but bad screenshots might stunt its greatness. Pick angles that flatter the pose and show off it's best qualities. Make sure to show the pose in good light, and have it fill as much of the screen as possible. When choosing hair and clothing make sure you pick clothes that show the shapes you've created and the hair doesn't hide or obscure any details of the pose. Good screenshots show off the pose and make it look its best. Avoid photoshopping because you could change important things that a mod would need to see, such as minor errors or missing shadows. Careless photoshopping will lead to your poses be rejected or sent back for changes. | ||
| + | |||
'''To make facial expressions is pretty simple.''' - It must be done first though! Before you've made any changes to the body, basically directly from a_xevt_701. With the exception of posing eye positions, all other facial changes must be made before doing the rest of the body. That is the most important part. I'm just trying to stress this point haha. Okay, so now that that's pounded into your head, to pose the mouth, go all the way down the joints list to the mouth section. You will see right_mouth and left_mouth and a bunch of other lip joints. Let's say you're making a smile, choose right_mouth then go to the tab where rotate is located, and click on move. Lock the x and z axis by clicking them. They should turn white instead of blue. Now zoom in your view window, preferably your "front" view, that way you can see what you are doing. Now you can move the corner of the mouth up to make a smile. In the sims you probably have to really exaggerate the smile to make it look somewhat decent in game. I don't know why this is, but whatever. Okay so once you've put the right_mouth up where you want it, Choose the left mouth and do the same. You can then tweak the lip joints so that you get a realistic smile (because real people don't just smile with the corners of their mouths). For eyebrows it's the same deal, just find the joints and move them up or down. It helps to turn the skeleton on when doing eyebrows so you can see exactly where each of the three joints are, and to line them up with the other eyebrow. Now let's say you were going for a scream or laughing with the mouth open, you would choose the jaw joint, and then switch back to rotate and go to your "left" or "right" view port and rotate it so the mouth opens up. But any rotating of the face must come last after moving any of the joints. This is because if the face is rotated from it's original position, the movements of lips or eyebrows will be different because they might end up going into the skin or flying off of the face when you move them. Test this for yourself and you will see what I mean. Lastly to pose eyes, all you need to do is select one of the eye joints right_eye or left_eye and then choose rotate. Unlike other facial posing, moving the eyes can be done at any point in the process of making the pose. It helps if you have an eye texture on the eyeball so you can see where the eye is looking. | '''To make facial expressions is pretty simple.''' - It must be done first though! Before you've made any changes to the body, basically directly from a_xevt_701. With the exception of posing eye positions, all other facial changes must be made before doing the rest of the body. That is the most important part. I'm just trying to stress this point haha. Okay, so now that that's pounded into your head, to pose the mouth, go all the way down the joints list to the mouth section. You will see right_mouth and left_mouth and a bunch of other lip joints. Let's say you're making a smile, choose right_mouth then go to the tab where rotate is located, and click on move. Lock the x and z axis by clicking them. They should turn white instead of blue. Now zoom in your view window, preferably your "front" view, that way you can see what you are doing. Now you can move the corner of the mouth up to make a smile. In the sims you probably have to really exaggerate the smile to make it look somewhat decent in game. I don't know why this is, but whatever. Okay so once you've put the right_mouth up where you want it, Choose the left mouth and do the same. You can then tweak the lip joints so that you get a realistic smile (because real people don't just smile with the corners of their mouths). For eyebrows it's the same deal, just find the joints and move them up or down. It helps to turn the skeleton on when doing eyebrows so you can see exactly where each of the three joints are, and to line them up with the other eyebrow. Now let's say you were going for a scream or laughing with the mouth open, you would choose the jaw joint, and then switch back to rotate and go to your "left" or "right" view port and rotate it so the mouth opens up. But any rotating of the face must come last after moving any of the joints. This is because if the face is rotated from it's original position, the movements of lips or eyebrows will be different because they might end up going into the skin or flying off of the face when you move them. Test this for yourself and you will see what I mean. Lastly to pose eyes, all you need to do is select one of the eye joints right_eye or left_eye and then choose rotate. Unlike other facial posing, moving the eyes can be done at any point in the process of making the pose. It helps if you have an eye texture on the eyeball so you can see where the eye is looking. | ||
Latest revision as of 17:35, 1 May 2012
[edit] What will I need?
|
- Cmomoney's Pose Player
- WesHowe's Animtool V05
- S3PE by Peter and Inge Jones
- Source photos or drawings of the poses you want to create (Google is your friend!)
Rigs
- Choose between these three depending on what poses you are looking to create. Extract the .ms3d and .txt file on the desktop or somewhere easy to find.
Animation software
- Choose one or the other depending on your personal preference, however this tutorial will be made using Milkshape.
[edit] Let's get started!
1. Being organized
Make a folder somewhere where you can get to it quickly and easily and name it something like "My Poses". I usually keep my "Poses" folder on my desktop. In order to stay organized, it helps to make folders inside your main pose folder and name them with the name of the pose or pose pack you are working on. If you really want to be super-organized like me, you should make folders for each individual pose, because trust me, these files get messy and hard to read.
2. Extracting files for use
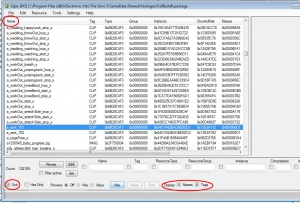
Open up S3PE and choose "File->open". Navigate to your Sims 3 folder in the C: drive. To get to that folder on my computer I have to go to "C:->ProgramsFiles->Electronic Arts->The Sims 3". Once there open the fullbuild0.package found at "GameData->Shared->Packages". MAKE SURE "OPEN AS READ ONLY" IS TICKED BEFORE CLICKING "OPEN". Once that is open, S3PE will look like a giant mess of numbers and letters. In order to make it easier to find what we're looking for tick the box "sort" in the bottom left hand corner of S3PE. Now tick the boxes "Display: name" and "tags".
To make it even easier, click on "Name" in the explore window to put everything in alphabetical order.
Now scroll through the files and find the highlighted file in picture "a_xevt_701". VERY IMPORTANT: Right click and choose "Export and rename", choose a name that starts with a_ such as a_pose1. It has to start like that in order for it to work correctly. Save your pose file in your new folder on the desktop or where ever you put your pose folder.
[edit] Converting your files
So now that your .animation file is in it's little folder, and named correctly, we have to convert it to something that Milkshape or Blender can work with. We have a CLIP and we need an SMD.
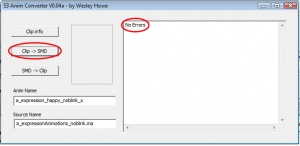
Open the AnimTool V05 and click on "Clip->SMD". A text box will pop up asking you to locate the rig file. Click okay and navigate to where you extracting your adultrig.text file and select that. The words "no error" should be in the big white box on the anim converter.
[edit] Let's pose!
Okay now we're ready to open Milkshape. Start a new file in Milkshape and then choose "File->Open". Navigate to where you extracted the am_body_4.ms3d (or whatever rig file you chose) and choose that. It should open up a grey 3D version of a male (or female/child). Now this tutorial will not teach you how to get acquainted with Milkshape or Blender. If you have never used Milkshape before, just mess around with everything to see how it works. Once you're all set and comfortable you can move on to the next step.
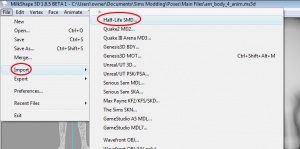
1. Go to "File->Import->Half-Life SMD" and navigate to where your pose file was saved and choose it. The file is going to have lost of weird letters and numbers in front of the actual name you chose, so that is why organization is important.
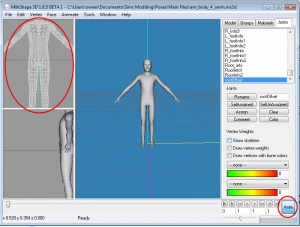
2. A text box will pop up with three tick boxes, make sure they are all ticked and click "OK". A second text box will pop up asking you if you want to append the animation, click "No". Click the "Anim" button in the bottom right corner, and any view with wireframes in it will become grayed out.
3. Okay at this point you should know what pose you want to make. Have pictures ready to reference to, because most of the time, it's hard to make things look natural if you don't see them in front of you. If you can't find exactly the pose you are looking for, then go pose your own body in that manner and take a photo or make mental notes of what your body looks like. Your body knows best, so if a pose feels uncomfortable or impossible, then it will look uncomfortable or impossible when you translate it to The Sims 3.
So if you're sure about your pose and are confident it looks natural and believable, then you are ready to start moving some joints!
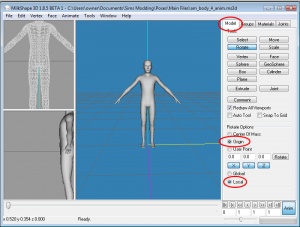
4.To start off, you'll need to make sure Milkshape is ready to work with your skeleton. If you click the "Model" move the ticks into "Origin" and "Local", otherwise, when you work with toes, fingers, or the head some very weird things will happen.
In the "Model" tab make sure "Rotate" is clicked in, it should be blue when it's selected. You should never use anything besides "Rotate" unless you need to fix floating or sinking, but I'll get to that later. Now go to the "Joints" tab and for now make sure that "Show Skeleton" is ticked (you can turn the skeleton off later once you are comfortable with everything). Click on any joint, if you scroll the list all the way to the top, you will see two ROOT joints (don't mess with those unless you are fixing floating or sinking), and then you will see Pelvis and spine joints. Each joint will light up to show you where on the skeleton it is so you are aware of what you are moving, however the names of the joints are pretty easy to figure out (except on the Child rig, for some reason they are all out of order, but still they are still named correctly).
Now in the big main 3D panel, you can not actually move anything in it, that panel is for viewing only, but it makes it much easier to get the right angles and such.
If you have Milkshape set up like I do, I keep the top left panel as front view, and use the panel under it to flip between right/left view and top/bottom view.
Now if you have the pelvis joint selected and you put your cursor into one of the smaller panels and click and drag, you will see the pelvis move in the direction you grabbed it. In order to get the pelvis in the correct position it will take a matter of adjusting between the panels seeing as only one direction is possible in each panel. For instance, in the "front view" panel the pelvis can only move left and right, and in the "right/left view" panel the pelvis can only move back and forth. Once you are satisfied with the angle and position of your pelvis, you can go back to the joints list and choose something else. It is best to start big and then work your way down to the fine details of fingers and toes. Now I can't really tell you what to do next, because that part is up to you! But I can give you some tips and tricks to make sure your poses are looking fabulous!
[edit] Tips and Tricks for fabulous poses!
Pay attention to those colored lines! - Those lines on the panels are there to help you. The purple line is the most important because it represents the floor in the game. If parts of the body go past that purple line, than in game the sim will sink into the ground. If the parts of the body that should be on the ground are not touching that purple line then in game, the sim will float and the game will not assign their body a shadow, and it will look very unnatural. To fix floating or sinking simply select the "Move" button from the model tab, and then select the "ROOT" joint and move your pose to line up with the purple line.
Test, test, and test some more! - The only way to make sure your poses are looking the best is to test them often in game. Unless you are a seasoned pose maker, it will be hard to tell if you've bent arms at the right angles and such. So put your pose into the game often, and don't wait until you're done to test it out because by that time there will be too many things to fix if just one arm is bent incorrectly! And the undo command stops undoing if you wait until you're done to fix something in the beginning.
Utilize the Creator Feedback forum! - There might be something that you missed, or something that looks a little weird that you may think looks fine. People on that forum are there to help and to make sure you make the best product possible. Many eyes are better than just yours. Always make sure to keep pictures of your poses in game and take screenshots of the pose from different angles.
Screenshots, best friend or enemy? - Obviously people will be using your poses primarily in photos of their sims. So to make a good pose, it's gotta be something they can use and looks good. You may have a stellar pose, but bad screenshots might stunt its greatness. Pick angles that flatter the pose and show off it's best qualities. Make sure to show the pose in good light, and have it fill as much of the screen as possible. When choosing hair and clothing make sure you pick clothes that show the shapes you've created and the hair doesn't hide or obscure any details of the pose. Good screenshots show off the pose and make it look its best. Avoid photoshopping because you could change important things that a mod would need to see, such as minor errors or missing shadows. Careless photoshopping will lead to your poses be rejected or sent back for changes.
To make facial expressions is pretty simple. - It must be done first though! Before you've made any changes to the body, basically directly from a_xevt_701. With the exception of posing eye positions, all other facial changes must be made before doing the rest of the body. That is the most important part. I'm just trying to stress this point haha. Okay, so now that that's pounded into your head, to pose the mouth, go all the way down the joints list to the mouth section. You will see right_mouth and left_mouth and a bunch of other lip joints. Let's say you're making a smile, choose right_mouth then go to the tab where rotate is located, and click on move. Lock the x and z axis by clicking them. They should turn white instead of blue. Now zoom in your view window, preferably your "front" view, that way you can see what you are doing. Now you can move the corner of the mouth up to make a smile. In the sims you probably have to really exaggerate the smile to make it look somewhat decent in game. I don't know why this is, but whatever. Okay so once you've put the right_mouth up where you want it, Choose the left mouth and do the same. You can then tweak the lip joints so that you get a realistic smile (because real people don't just smile with the corners of their mouths). For eyebrows it's the same deal, just find the joints and move them up or down. It helps to turn the skeleton on when doing eyebrows so you can see exactly where each of the three joints are, and to line them up with the other eyebrow. Now let's say you were going for a scream or laughing with the mouth open, you would choose the jaw joint, and then switch back to rotate and go to your "left" or "right" view port and rotate it so the mouth opens up. But any rotating of the face must come last after moving any of the joints. This is because if the face is rotated from it's original position, the movements of lips or eyebrows will be different because they might end up going into the skin or flying off of the face when you move them. Test this for yourself and you will see what I mean. Lastly to pose eyes, all you need to do is select one of the eye joints right_eye or left_eye and then choose rotate. Unlike other facial posing, moving the eyes can be done at any point in the process of making the pose. It helps if you have an eye texture on the eyeball so you can see where the eye is looking.
[edit] Getting your finished pose into the game
Once you are ready to test your pose in game, it is fairly easy to get the pose into the game. It can get tricky if you are not organized.
- In Milkshape, go to "Animate->Set Keyframe". This part is very important. Setting a keyframe tells Milkshape that your pose is the new pose rather than the one we started with. Once your keyframe is set, you can click the "Anim" button in the bottom right corner. The body should snap back to the original pose, and if you click the "Anim" button again the model should pop into your pose. If that happens, then congrats!
- Now go to "File->Export->Half-Life SMD" and save your new pose over your old one. A text box will pop up when you try to export, make sure that "Sequence" is ticked.
- You will now have to convert your file back to something the game can use. We have an SMD and we need a CLIP. So open up your Animtool and now you will press the "SMD->Clip" button, and choose your pose. Again, "No Errors" should be in the text box on the Animtool.
- You can either open another S3PE or choose "New" on the one you used to open fullbuild.0, however if you are planning on making many poses at one time, you are better off having two S3PE's open at once. So which ever you chose, go to "File->New". Then go to "Resource->Import->from file" and navigate to your pose folder. Choose the file that ends in .animation and import it. To make it easier to make sure you are choosing the right files, set your folder view to "details". Once all of your poses are imported, click on "File->Save as.." and name and save your package. Copy and paste your package file into your mods folder for The Sims 3.
- Once you load your game, place a Pose Player somewhere in the room and test out your pose!
And that's it!
