Difference between revisions of "Sims 3:Replacing Textures"
(→What Else Can I Do?) |
|||
| Line 43: | Line 43: | ||
==What Else Can I Do?== | ==What Else Can I Do?== | ||
| − | With the CTU, you can do way more than | + | With the CTU, you can do way more than change the base texture. |
Check out these other topics for more information: | Check out these other topics for more information: | ||
Revision as of 06:09, 12 July 2009
Contents |
Introduction
This tutorial explains how to replace the Base Texture (known previously as the Multiplier) of CAS parts using the CAS Texture Unitool (CTU). This tutorial will not teach you how to make a new base texture, see Creating A New Base Texture (coming soon) for that.
What Do I Need?
- Delphy's CAS Texture Unitool (CTU) found here
- A previously completed base texture saved in an acceptable .DDS compression (DXT5).
How Do I Do It?
Step 1
Open the CTU and create a new file (File → New)
Step 2
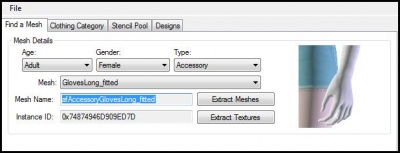
In the "Find A Mesh" tab, set the mesh details to the parameters of the mesh you wish to change the base texture of. (i.e. Adult-Female-Accessory) Next choose the mesh you want to use from the drop down list. For the purpose of this tutorial, the afAccessoryGlovesLong_fitted mesh will be used.
Step 3
Move over to the "Designs" tab and click "Add New Design".
Step 4
Under the "Other Details" sub-tab click the base texture key to highlight it.
Step 5
Being sure that the base texture key is highlighted, click "replace". Select your new base texture file and click Open. (Notice that the base texture key changes) Next hit "Commit".
Step 6
Make any other changes/additions to your package (if you don't have any, that's okay). Once you've finished, save your creation as a .package. Go to File → Save As, give your package a name, then hit save.
And that's it!
What Else Can I Do?
With the CTU, you can do way more than change the base texture.
Check out these other topics for more information:
- Creating Clothing Stencils
- Adding Custom Stencils
- Creating a New Base Texture (Coming Soon)


