Difference between revisions of "Tutorial: Complete Guide to Career Modding for Beginners!"
| Line 1: | Line 1: | ||
| − | + | == '''Welcome!''' == | |
| − | + | Welcome! I decided to write this guide, as I don’t see any proper easy to read and understand guide on career modding. This guide is quite long but I’ve tried to use understandable language for beginners so everything is fully explained. I’m still very much new to this myself and I take no credit for building any of the programs etc, in this guide; I am simply putting all the information together that I have learned from various places and some trial and error by myself to hopefully make it more understandable for anyone who wishes to do this. | |
| + | |||
| + | |||
| + | |||
| + | '''What does this guide attempt to explain?''' | ||
| + | |||
| + | This guide attempts to explain how to create a basic completely new rabbit hole career to your Sims 3 game. | ||
| + | |||
| + | |||
| + | |||
| + | '''What operating system am I working on?''' | ||
| + | |||
| + | I’m working on Windows 7 and so I’m sorry to all you Mac users and anyone else that this guide won’t apply to, as I have no idea if this will work on other systems. I did have quite a few messages about careers from Mac users in the past, so if anyone wants to translate this guide for other systems, feel free. | ||
| + | |||
| + | '''WARNING! – I TAKE NO RESPONICIBILITY FOR YOU BREAKING YOUR GAME, BUT IF YOU FOLLOW CORRECTLY YOU SHOULD BE FINE!''' | ||
| + | |||
| + | |||
| + | |||
| + | |||
| + | == '''Terminology''' == | ||
| + | |||
| + | '''What is a rabbit hole career?''' | ||
| + | |||
| + | A rabbit hole career is a career where your sim travels to work and enters a building, where he/she works for a set time period before returning home. Rabbit hole careers differ from the self-employed career added by the Ambitions expansion, because you cannot see what your sim is doing at work. They simply enter the building for a time period, leave with a pay cheque and return home. | ||
| + | |||
| + | |||
| + | '''What’s a .package file?''' | ||
| + | |||
| + | A .package file is the file used by the Sims games, and contains a lot of the game information. | ||
| + | |||
| + | |||
| + | |||
| + | |||
| + | == '''Sims Career Planning.''' == | ||
| + | |||
| + | '''Note before you start: If you have never coded before you should take note that letter case, and spaces make a difference in the code, so “MyCareer” is different from “myCareer” or “My Career” for example!''' | ||
| + | |||
| + | |||
| + | '''Step: 1 – Ideas:''' | ||
| + | |||
| + | It’s all well and good wanting to make a new career in the Sims 3, but just the basic concept of a new career can stop you from proceeding. Before you even begin to mod, you need to have some starting plan of what this new career shall be about. (Google Sims Career Ideas if you’re really stuck hehe) | ||
| + | The best thing to do at this point is open up a new notepad file and start writing down the basis for what this new career will involve. This is not just for planning purposes but it makes the modding stages later easier, by having the information at hand. | ||
| + | |||
| + | |||
| + | '''Note: For this whole tutorial I will make a Tennis Career for the Stadium as an example. | ||
| + | If you would like to download my Tennis Career file for comparison or to use, you can download it here:''' [http://www.mediafire.com/?gkulg1rhrdu0o9t Tennis Career Download Link] | ||
| + | |||
| + | |||
| + | You will need to decide the following and write them down in your notepad file, I have included screenshots to show where the text will appear in game: | ||
| + | |||
| + | |||
| + | '''Step: 2 –The basics:''' | ||
| + | |||
| + | '''Career Title –''' This will be the title that you will use in game, such as “Criminal” or “Professional Sports” | ||
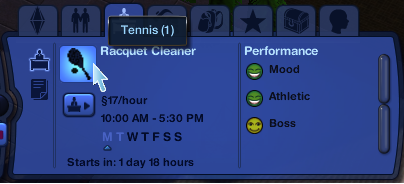
| + | I will use “Tennis” as my title. Do not put “career” after the title for example don’t put “Tennis Career”, this is because of a description text which will look very odd. (See Second Screen shot) | ||
| + | |||
| + | This is where the title will be used in game: | ||
| + | |||
| + | [[File:CareerTitle1.png]] | ||
| + | |||
| + | |||
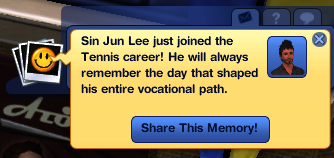
| + | This is why you should not put “Career” after the title, as the description automatically adds career after your title. If you did put “Career” as part of your title then it would come out as “Tennis Career career!” in this description. | ||
| + | |||
| + | [[File:CareerTitle2.png]] | ||
| + | |||
| + | |||
| + | |||
| + | '''Career Wages –''' This is a list of the wages that the sim will receive per hour, when working at each level of the career. Each level represents a level of promotion, with level 1 being the starting wage when you first join that career. | ||
| + | |||
| + | |||
| + | Here’s an example of my Tennis Career wages: | ||
| + | |||
| + | |||
| + | Wages: | ||
| + | |||
| + | 1:$17/hour | ||
| + | |||
| + | 2:$30/hour | ||
| + | |||
| + | 3:$40/hour | ||
| + | |||
| + | 4:$62/hour | ||
| + | |||
| + | 5:$80/hour | ||
| + | |||
| + | 6:$150/hour | ||
| + | |||
| + | 7:$250/hour | ||
| + | |||
| + | 8:$320/hour | ||
| + | |||
| + | 9:$520/hour | ||
| + | |||
| + | 10:$750/hour | ||
| + | |||
| + | |||
| + | '''Career Retirement Wage –''' This is the wage a sim will be paid each day when they are retired from the career. Again this is similar to the wage but paid per day not hour. | ||
| + | |||
| + | |||
| + | Here’s an example of my Tennis Career retirement wages: | ||
| + | |||
| + | |||
| + | Retirement Wage: | ||
| + | |||
| + | 1:$40 | ||
| + | |||
| + | 2:$66 | ||
| + | |||
| + | 3:$80 | ||
| + | |||
| + | 4:$120 | ||
| + | |||
| + | 5:$160 | ||
| + | |||
| + | 6:$220 | ||
| + | |||
| + | 7:$350 | ||
| + | |||
| + | 8:$420 | ||
| + | |||
| + | 9:$700 | ||
| + | |||
| + | 10:$1200 | ||
| + | |||
| + | |||
| + | '''Wake up times –''' This is the time your sims will be woken up if sleeping, by an alarm clock and is in 24hr clock format (E.g. 9 o’clock is 21). This is normally set 2 hours before your work start time. You will need one for each level in the career. | ||
| + | |||
| + | |||
| + | Here’s an example of my Tennis Career Wake up times: | ||
| + | |||
| + | |||
| + | Wake up times: | ||
| + | |||
| + | 1:8 | ||
| + | |||
| + | 2:8 | ||
| + | |||
| + | 3:8 | ||
| + | |||
| + | 4:7 | ||
| + | |||
| + | 5:7 | ||
| + | |||
| + | 6:6 | ||
| + | |||
| + | 7:6 | ||
| + | |||
| + | 8:6 | ||
| + | |||
| + | 9:6 | ||
| + | |||
| + | 10:6 | ||
| + | |||
| + | |||
| + | '''Work start time –''' This is the time that your sims start work at each promotion level. Again like the other settings you will need one for each level in the career. | ||
| + | |||
| + | |||
| + | Here’s an example of my Tennis Career work start times: | ||
| + | |||
| + | |||
| + | Start times: | ||
| + | |||
| + | 1:10 | ||
| + | |||
| + | 2:10 | ||
| + | |||
| + | 3:10 | ||
| + | |||
| + | 4:9 | ||
| + | |||
| + | 5:9 | ||
| + | |||
| + | 6:8 | ||
| + | |||
| + | 7:8 | ||
| + | |||
| + | 8:8 | ||
| + | |||
| + | 9:8 | ||
| + | |||
| + | 10:8 | ||
| + | |||
| + | |||
| + | |||
| + | '''Day length –''' This is the length that your sims work for each day when they start work in hours, you can have half hours too. | ||
| + | |||
| + | |||
| + | Here’s an example of my Tennis Career Day lengths: | ||
| + | |||
| + | |||
| + | Day lengths: | ||
| + | |||
| + | 1:7.5 | ||
| + | |||
| + | 2:7 | ||
| + | |||
| + | 3:7 | ||
| + | |||
| + | 4:7 | ||
| + | |||
| + | 5:7 | ||
| + | |||
| + | 6:6 | ||
| + | |||
| + | 7:6 | ||
| + | |||
| + | 8:6 | ||
| + | |||
| + | 9:5 | ||
| + | |||
| + | 10:5 | ||
| + | |||
| + | |||
| + | '''Days To Work –''' These are the days that your sim has to work. Days should be wrote in this format in capitals with no spaces, separated by commas: M,T,W,R,F,S,U | ||
| + | |||
| + | M = Monday | ||
| + | |||
| + | T = Tuesday | ||
| + | |||
| + | W = Wednesday | ||
| + | |||
| + | R = Thursday | ||
| + | |||
| + | F = Friday | ||
| + | |||
| + | S = Saturday | ||
| + | |||
| + | U = Sunday | ||
| + | |||
| + | |||
| + | So if you wish your sim to work on Monday, Tuesday, Thursday, Friday, Sunday for example, you would put: M,T,R,F,U | ||
| + | |||
| + | |||
| + | Here’s an example of my Tennis Career Work days: | ||
| + | |||
| + | |||
| + | Day lengths: | ||
| + | |||
| + | 1: W,R,F,S,U | ||
| + | |||
| + | 2: W,R,F,S,U | ||
| + | |||
| + | 3: W,R,F,S,U | ||
| + | |||
| + | 4: M,T,W,R,F | ||
| + | |||
| + | 5: M,T,W,R,F | ||
| + | |||
| + | 6: M,T,W,R,F | ||
| + | |||
| + | 7: M,T,R,F | ||
| + | |||
| + | 8: M,T,R,F | ||
| + | |||
| + | 9: M,T,R,F | ||
| + | |||
| + | 10: M,T,R,F | ||
| + | |||
| + | |||
| + | '''Car pool types –''' These are the cars that come to pick your sim up to go to work. They range from cheap cars up to the limo, and are set per promotion level. You need to decide what cars you want your sim to be picked up in at each level. | ||
| + | |||
| + | |||
| + | The car types you can choose from are as follows: | ||
| + | |||
| + | |||
| + | CarBusSchool | ||
| + | |||
| + | CarExpensive1 | ||
| + | |||
| + | CarExpensive2 | ||
| + | |||
| + | CarHatchback | ||
| + | |||
| + | CarLimoBlue | ||
| + | |||
| + | CarLimoPink | ||
| + | |||
| + | CarLimoWhite | ||
| + | |||
| + | CarNormal1 | ||
| + | |||
| + | CarPickup2door | ||
| + | |||
| + | CarPolice | ||
| + | |||
| + | CarSedan | ||
| + | |||
| + | CarServiceFiretruck | ||
| + | |||
| + | CarSports | ||
| + | |||
| + | CarUsed1 | ||
| + | |||
| + | CarUsed2 | ||
| + | |||
| + | CarVan4door | ||
| + | |||
| + | Limo | ||
| + | |||
| + | Taxi | ||
| + | |||
| + | |||
| + | I recommend using the CarUsed 1 & 2 in lower down levels working up to CarNormal1, and CarExpensive1 & 2 later on with final level careers using the Limo, but it’s entirely up to you. | ||
| + | |||
| + | |||
| + | Here’s an example of my Tennis Cars used per promotion level: | ||
| + | |||
| + | |||
| + | 1:CarUsed2 | ||
| + | |||
| + | 2: CarUsed2 | ||
| + | |||
| + | 3:CarHatchback | ||
| + | |||
| + | 4:CarHatchback | ||
| + | |||
| + | 5:CarNormal1 | ||
| + | |||
| + | 6:CarNormal1 | ||
| + | |||
| + | 7:CarExpensive2 | ||
| + | |||
| + | 8:CarExpensive2 | ||
| + | |||
| + | 9:CarExpensive1 | ||
| + | |||
| + | 10:Limo | ||
| + | |||
| + | |||
| + | |||
| + | '''Career Job Titles –''' These are the titles that your Sims receive at each level in the career: | ||
| + | |||
| + | |||
| + | Here’s an example of my Tennis Careers Job titles: | ||
| + | |||
| + | |||
| + | Job Titles per Level: | ||
| + | |||
| + | 1:Racquet Cleaner | ||
| + | |||
| + | 2:Ball Boy | ||
| + | |||
| + | 3:Lines Man | ||
| + | |||
| + | 4:Tennis Assistant | ||
| + | |||
| + | 5:Beginner Tennis | ||
| + | |||
| + | 6:Professional Player | ||
| + | |||
| + | 7:Challenger Tour Player | ||
| + | |||
| + | 8:250 and 500 Series Player | ||
| + | |||
| + | 9:Master 1000 Entry | ||
| + | |||
| + | 10:Grand Slam Champion | ||
| + | |||
| + | |||
| + | |||
| + | |||
| + | '''Note: Some characters don’t work in the job titles such as the & symbol, and an apostrophe ’ which produce errors, you can use the apostrophe if you are working in notepad, but not word.''' | ||
| + | |||
| + | |||
| + | |||
| + | '''Career Job Descriptions –''' These are the descriptions that pop up when your sim is promoted, and also when you hover over the job level title. You need to have an Entry level description this is just the description for level 1 in the career when your sim first joins, and also a promotion level description for every level including level 10: | ||
| + | |||
| + | |||
| + | Examples from my Tennis Career: | ||
| + | |||
| + | |||
| + | Entry level Description: This is the description that is used when you first join the career at job level 1. | ||
| + | |||
| + | [[File:EntryLevelCareerDescription.png]] | ||
| + | |||
| + | |||
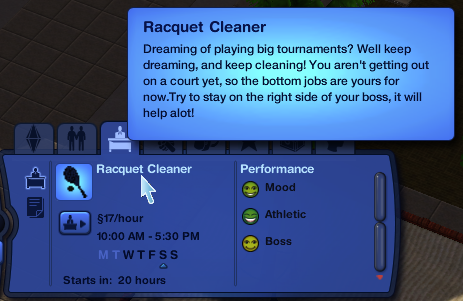
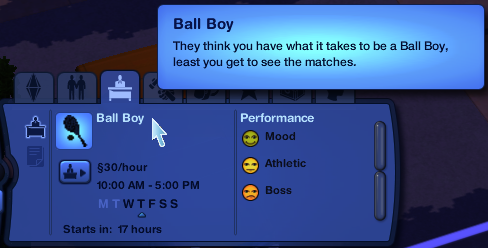
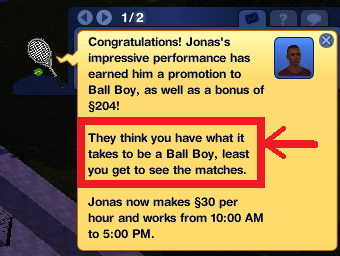
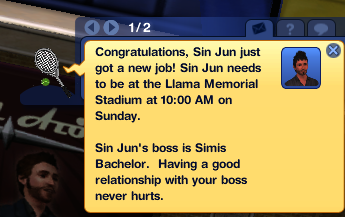
| + | Example of promotion level 2: This is the description used on the second level in the career, and also pops up in the promotion box, when your sim earns the promotion. (Same format for promotion 2 – 10) | ||
| + | |||
| + | [[File:CareerDescription3.png]] [[File:CareerDescription2.png]] | ||
| + | |||
| + | |||
| + | |||
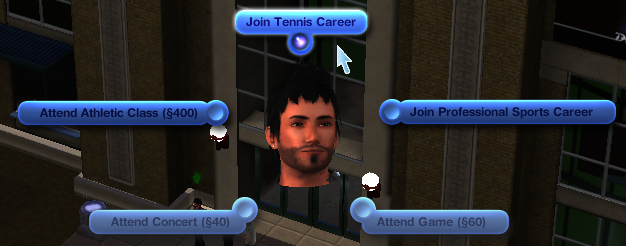
| + | '''Get Job title –''' This is the title that appears when you click on the building where your sim goes to join the career. For example “Join Tennis Career” | ||
| + | |||
| + | [[File:GetJobTitle.png]] | ||
| + | |||
| + | |||
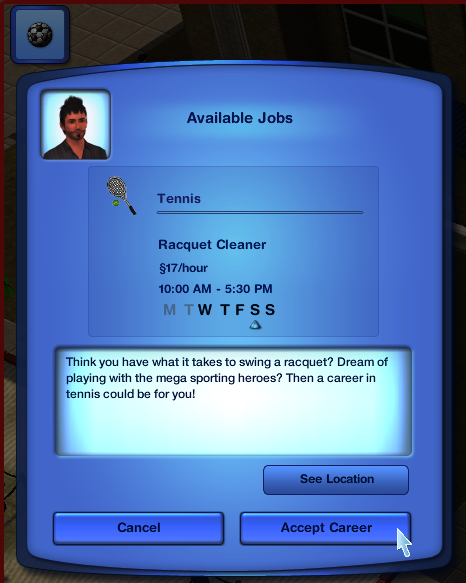
| + | '''Job Offer –''' This is the description for the career that appears when your sim goes to join the career. Tennis career example: “Think you have what it takes to swing a racquet? Dream of playing with the mega sporting heroes? Then a career in tennis could be for you!” | ||
| + | |||
| + | [[File:JobOffer.png]] | ||
| + | |||
| + | |||
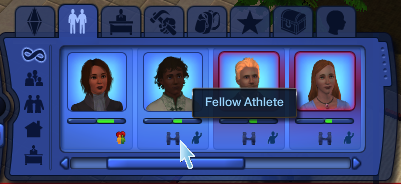
| + | '''Co-Worker title –''' This is the text that appears when you hover over a co-worker in the relationships panel. Tennis career example: “Fellow Athlete” | ||
| + | |||
| + | [[File:CoWorkerTitle.png]] | ||
| + | |||
| + | |||
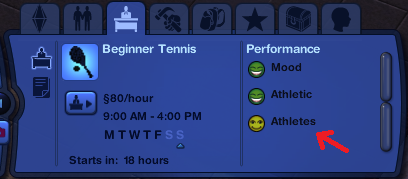
| + | '''Co-Worker Metric title –''' This is the title that your co-workers will appear as in the careers menu, when they show up as a requirement for promotion. Tennis career example “Athletes” | ||
| + | |||
| + | [[File:CoWorkerMetricTitle.png]] | ||
| + | |||
| + | |||
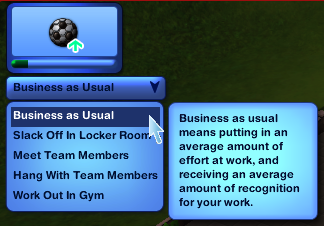
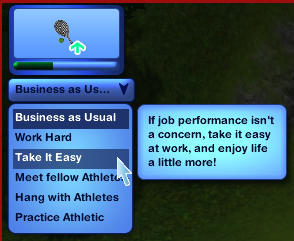
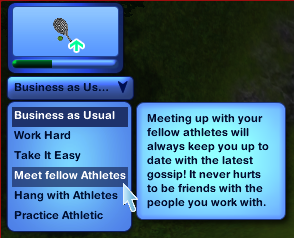
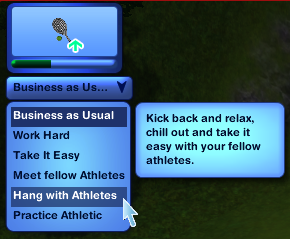
| + | '''Tones -''' The next thing you need to decide are what tones your career will have. You are probably asking what the hell is a tone? Well tones are the attributes assigned to the career, when your sim is working. The screen shot of the professional sports career tones below explains this better: | ||
| + | |||
| + | [[File:Tones-ProffSportBusinessAsUsual.png]] | ||
| + | |||
| + | |||
| + | The standard tones that are usually used are: | ||
| + | |||
| + | • Business as Usual – Normal work and effort. | ||
| + | |||
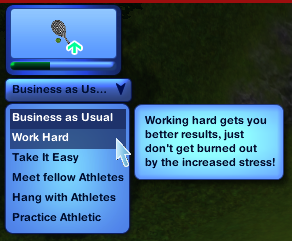
| + | • Work Hard – Hard work but extra stress (Decreases Fun mood). | ||
| + | |||
| + | • Take it easy – Decreases stress. | ||
| + | |||
| + | • Meet co-workers – Lets the sim meet co-workers if available. | ||
| + | |||
| + | • Hang with co-workers – Gives the sim increased relationship with co-workers. | ||
| + | |||
| + | • Suck up to boss – Gives the sim increased relationship with his boss, if he has a boss. | ||
| + | |||
| + | • “A Skill booster tone” – This is normally a tone that increases a skill related to the job promotion need. So on the professional sports screen shot for example, it says “Work Out In Gym” which is a skill booster tone as this increases the Athletic skill needed for the professional sports career. | ||
| + | |||
| + | |||
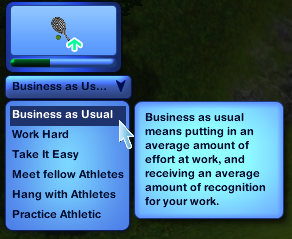
| + | Each tone also has a description that pops up at the side when you hover over with your cursor. These are the tones and their descriptions for my Tennis career: | ||
| + | |||
| + | |||
| + | '''Note: I don’t think it’s possible to NOT use the “Business as Usual” tone, which means this will always be the first tone that is used for any career. You can change any others.''' | ||
| + | |||
| + | [[File:Tones-TennisBusinessAsUsual.png]] [[File:Tones-TennisWorkHard.png]] [[File:Tones-TennisTakeItEasy.png]] [[File:Tones-TennisMeetFellowAthletes.png]] [[File:Tones-TennisHangWithAthletes.png]] [[File:Tones-TennisPracticeAthletic.png]] | ||
| + | |||
| + | Business as Usual - (Standard) | ||
| + | |||
| + | Work Hard – (Standard) | ||
| + | |||
| + | Take it Easy – (Standard) | ||
| + | |||
| + | Meet fellow Athletes – (Lets your sim meet co-workers) | ||
| + | |||
| + | Hang with Athletes – (Increases relationship with co-workers) | ||
| + | |||
| + | Practice Athletic – (Increases your Athletic skill which is relevant to what the sim needs for promotion) | ||
| + | |||
| + | |||
| + | You now need to write down what you want your career tones to be, with both titles and descriptions, but I suggest you don’t make too many, and normally include one “skill booster tone” depending on what skill or skills your career will require for promotion. You can of course just use the standard tones. | ||
| + | |||
| + | |||
| + | |||
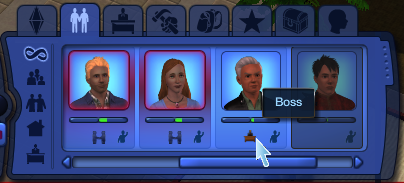
| + | '''Work Boss –''' The career you make can have either a boss or no boss for your sim. You need to decide whether you want any sims that join your career to have a boss, as it is needed later if you wish to include it as a requirement for promotion, as some careers you must have a good relationship with your sims boss to improve. This is not essential so it’s up to you. This can also be added as a tone such as suck up to boss. | ||
| + | |||
| + | [[File:BossTitle.png]] | ||
| + | |||
| + | |||
| + | '''Rabbit hole Type –''' This is the building where your sim goes to work and where your sim joins the career. You can choose any of the rabbit hole buildings that are used in the game by other careers. | ||
| + | |||
| + | Here’s a list of all the rabbit hole buildings you can set your career to and what jobs are already set there: | ||
| + | |||
| + | • Bookstore = (Part time job) | ||
| + | |||
| + | • BusinessAndJournalism = (Corporate tower, Business & Journalism) | ||
| + | |||
| + | • CityHall = (Self-employed careers & Political Career) | ||
| + | |||
| + | • Clothing | ||
| + | |||
| + | • ComboBookstoreDaySpa = (From ambitions Bridgeport map, Part time job) | ||
| + | |||
| + | • ComboBusinessRestaurant = (From ambitions Bridgeport map, Business & Journalism Career) | ||
| + | |||
| + | • ComboCityhallPoliceMilitary = (From ambitions Bridgeport map, Military Career & Political Career) | ||
| + | |||
| + | • DaySpa = (Part time jobs) | ||
| + | |||
| + | • Grocery = (Part time jobs) | ||
| + | |||
| + | • Hideout = (Abandoned Factory, criminal career) | ||
| + | |||
| + | • Hospital = (Medical Career) | ||
| + | |||
| + | • Mausoleum = (Part time jobs) | ||
| + | |||
| + | • MilitaryBase = (Military Career) | ||
| + | |||
| + | • MovieSet = (From ambitions Bridgeport map, Acting Career) | ||
| + | |||
| + | • PoliceStation = (Law enforcement career) | ||
| + | |||
| + | • Restaurant = (Culinary career) | ||
| + | |||
| + | • School = (Education career) | ||
| + | |||
| + | • ScienceLab = (Science Career) | ||
| + | |||
| + | • Stadium = (Professional sports career) | ||
| + | |||
| + | • Subway | ||
| + | |||
| + | • Theatre = (Music Career) | ||
| + | |||
| + | For my tennis career, I chose the “Stadium” as my rabbit hole type. So that’s where my sim will travel to work, and where I can join the career. | ||
| + | |||
| + | |||
| + | '''Step: 3 – Check List:''' | ||
| + | |||
| + | Before we move on here’s a check list of what you should have done so far: | ||
| + | |||
| + | 1. Thought of a good career! | ||
| + | 2. Opened a notepad file, and wrote down all the basic information from above for your career. | ||
| + | |||
| + | |||
| + | Now you have the basics of your career, you can now move onto the setup stage. | ||
| + | |||
| + | |||
| + | |||
| + | == '''Before you mod! – Setup Stage.''' == | ||
| + | |||
| + | '''Step: 1 – Folders:''' | ||
| + | |||
| + | Before you mod you must make a "Mod\Packages" folder, this enables your game to recognise your new mods, in this case your new career mod. | ||
| + | To do this, go to “C:\Users\[YOURNAME]\Documents\Electronic Arts\The Sims 3” and create a new folder called “Mods”, then create a sub-folder called “Packages” within the Mods folder. | ||
| + | |||
| + | |||
| + | So your new folder will look like this: | ||
| + | |||
| + | “C:\Users\[YOURNAME]\Documents\Electronic Arts\The Sims 3\Mods\Packages” | ||
| + | |||
| + | |||
| + | '''Step: 2 – Resource file:''' | ||
| + | |||
| + | Once you have created your folders you need a Resource.cfg file in your newly made “Mods” folder. | ||
| + | |||
| + | |||
| + | The Resource.cfg file can be downloaded here - [http://skuld.modthesims.info/Resource.cfg Resource.cfg Download Link] | ||
| + | |||
| + | |||
| + | Click “Save File”, DO NOT simply click Open. You should now have a “Mods” folder containing a Resource.cfg file, and a subfolder called “Packages” which is empty. | ||
| + | |||
| + | |||
| + | '''Note: The game will access any of your mods before it accesses the original files; this means that any changes you make to the original game should only be copies of the files, and not the actual originals. If you start modding your original files you could corrupt your game, and may have to re-install.''' | ||
| + | |||
| + | |||
| + | '''Step: 3 - Programs:''' | ||
| + | |||
| + | Before you can mod, you need a few programs if you havent already downloaded them from the Modding Careers Page you can get them here: | ||
| + | |||
| + | |||
| + | 1: S3PE (Sims 3 Package Editor) – This allows you to open and read the contents of .package files, which are the files that the Sims games are made from. | ||
| + | |||
| + | 2: STBL Creator – This program creates an STBL file containing all the strings used for your mod. (Strings are just the text used in game, like descriptions of objects for example.) | ||
| + | |||
| + | 3: Career Loader Mod – This mod links your original game with your new career mod. | ||
| + | |||
| + | 4: Bootstrap Creator – This mod also creates files needed for the new career mod. | ||
| + | |||
| + | 5: An extractor program (WinRAR, WinZip) – This is just to extract downloaded files. (Don’t bother downloading this if you already have an extractor program installed) | ||
| + | |||
| + | |||
| + | '''Note: Simply use the links below to download the programs, making sure to “Save files” not open them. It’s useful at this point to create a folder on your desktop named “Sims3 Modding” or anything along those lines, so you don’t get confused with the programs, then you can save all the zip files and extract them in one place.''' | ||
| + | |||
| + | |||
| + | '''Program Download links:''' | ||
| + | |||
| + | 1: S3PE - [http://dino.drealm.info/den/denforum/index.php?PHPSESSID=5uuc9pd868dg4ngp65j1er9nv0&topic=189.0 S3PE Download Link] | ||
| + | |||
| + | 2: STBL Creator - [http://nraas.wikispaces.com/file/view/STBL.zip STBL Creator Download Link] | ||
| + | |||
| + | 3: Career Loader Mod - [http://nraas.wikispaces.com/file/view/NRaas_Career_V64.zip Career Loader Mod Download Link] | ||
| + | |||
| + | 4: Bootstrap Creator - [http://nraas.wikispaces.com/file/view/BootStrapCreator.zip Bootstrap Creator Download Link] | ||
| + | |||
| + | 5: WinRAR Extractor - [http://www.rarlab.com/download.htm WinRAR Extractor Download Link] | ||
| + | |||
| + | |||
| + | If you have never used an extractor program before here’s a quick explanation: Download the S3PE, STBL Creator, Career Loader Mod and Bootstrap Creator, then “Right click” on each file, then select “Extract here” This will unpack the zipped downloaded files in the folder you are currently using. | ||
| + | |||
| + | |||
| + | '''Step: 4 – Check List:''' | ||
| + | |||
| + | Before we move on here’s a check list of what you should have done so far: | ||
| + | |||
| + | 1. Created a “Mods” and “Packages” folder in this directory “C:\Users\[YOURNAME]\Documents\Electronic Arts\The Sims 3\Mods\Packages” | ||
| + | 2. Added the “Resources.cfg” file to the “Mods” folder. | ||
| + | 3. Downloaded the follow programs, and extracted them from their Zip folders: | ||
| + | S3PE (Sims 3 Package Editor) | ||
| + | STBL Creator | ||
| + | Career Loader Mod | ||
| + | Bootstrap Creator[/INDENT] | ||
| + | |||
| + | You can now move onto creating the basic career. | ||
| + | |||
| + | |||
| + | |||
| + | == '''Modding the .dll file, Pic files and .Careers file.''' == | ||
| + | |||
| + | '''Step: 1 – Frame Work:''' | ||
| + | |||
| + | To make the whole modding process easier I have made a frame work which is just a blank career file that can be edited to become your new career. I recommend downloading this file to work from. | ||
| + | |||
| + | |||
| + | Blank Career: [http://www.mediafire.com/download.php?87tjwedtx89rk8t Blank Career file Download Link] | ||
| + | |||
| + | Click "Save file" and save the file to any location, and extract it. (Right click "extract here" for example WinRaR) | ||
| + | |||
| + | |||
| + | |||
| + | '''Step: 2 – Changing the id instances:''' | ||
| + | |||
| + | Firstly you need to rename the extracted "Blank_Career.package" file to whatever you wish, for example my tennis career file is called "Tennis_Career.package" | ||
| + | |||
| + | |||
| + | We need to first change the id instance numbers for the new career, so that it does not conflict with any other careers, or any future careers you add. Each career has its own unique id instance number. | ||
| + | |||
| + | |||
| + | To do this open up the S3PE (Sims 3 Package Editor) program you downloaded earlier, and click “File” then "Open" on the tool bar, then browse for "[YourCareer].package" file you downloaded and re-named from step 1, I shall browse for my "Tennis_Career.package" file for example and open it up. You will notice that the S3PE program is split into two main windows, the left showing files within the package, and the right shows the code within the files if you select one. | ||
| + | |||
| + | |||
| + | You should see the following files within the package: (You can order the files by clicking the "Name", “Tag”, "Type" etc. bars at the top) | ||
| + | |||
| + | |||
| + | 70214830780050.dll | ||
| + | |||
| + | 70214830780050.dll | ||
| + | |||
| + | Blank.Careers | ||
| + | |||
| + | Blank.Tones | ||
| + | |||
| + | Strings Blank English | ||
| + | |||
| + | Strings Blank UnhashedKeys | ||
| + | |||
| + | Blank_Pic | ||
| + | |||
| + | Blank_Pic_s | ||
| + | |||
| + | |||
| + | |||
| + | Double click on the "Blank.Careers" file, which will open up the resource details menu. Then change the name to what you wish for your career. Mine shall be "Tennis.Careers". Now click the FNV64 button which will change the instance id to the value it should be for your changed name. | ||
| + | |||
| + | |||
| + | Do the same for the "Blank.Tones" file. (My tones file is called Tennis.Tones) | ||
| + | |||
| + | |||
| + | I recommend saving your progress now in S3PE by going to “File” -> “Save”. | ||
| + | |||
| + | |||
| + | '''Step: 3 - Creating a unique .dll file:''' | ||
| + | |||
| + | You must now create a unique .dll file. The “70214830780050.dll” file that came in the "Blank_Career.package" must be replaced, do this by running the "BootStrap program" that you downloaded earlier. It will generate a random numbered new dll file, which will be unique for your career. | ||
| + | |||
| + | |||
| + | Go back to yourcareer.package in S3PE and find the “70214830780050.dll” file that has a S3SA Tag. | ||
| + | |||
| + | [[File:S3PE-DllFile.png]] | ||
| + | |||
| + | Now "Right click" this file and select "Import DLL", now browse for your new created .dll file that was created by the bootstrap program. | ||
| + | |||
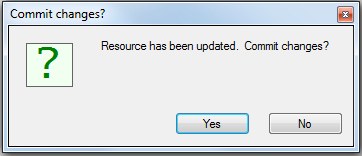
| + | You will be shown the following prompt: | ||
| + | |||
| + | [[File:S3PE-Changes1.png]] | ||
| + | |||
| + | Select “Yes” to continue. You will notice now in S3PE that the old .dll file has a line crossing it out, with the new file underneath: | ||
| + | |||
| + | [[File:S3PE-Changes3.png]] | ||
| + | |||
| + | This means that if you were to save the package you would be deleting the old file and keeping the new. Which I suggest you do now by going to “File” -> “Save”. | ||
| + | |||
| + | |||
| + | Now go back to your unique .dll file that was created by the Bootstrap and copy its full name. This includes the fullstop and dll extension) Easiest way to do this is to “Right click” then “Rename” and copy the whole name with “Ctrl + C” | ||
| + | |||
| + | |||
| + | Now head back into the S3PE program and double click on the first .dll file, which opens up the Resource Details menu again, now remove the “70214830780050.dll” name and paste in your copied .dll name (Ctrl + V) and press the FNV64 button which will change the instance id number to the hash version of your new name. | ||
| + | |||
| + | |||
| + | Then click “Ok” to save the changes. | ||
| + | |||
| + | |||
| + | Repeat the renaming for the second .dll file, by changing its name to your new unique .dll number, and pressing the FNV64 button. Again click “Ok” to save the changes. | ||
| + | |||
| + | |||
| + | '''Step: 4 – Editing your .dll file:''' | ||
| + | |||
| + | Now that you have changed the .dll names and instances, you can edit the file so it matches your career. Do this by selecting the [YourNumber].dll file that has a _XML Tag, then “Right click” and select “Notepad”. This will open the file in notepad allowing you to edit. The .dll file will contain the following code: | ||
| + | |||
| + | <?xml version="1.0"?> | ||
| + | <CareerFiles> | ||
| + | <CareerFile> | ||
| + | <Careers></Careers> | ||
| + | </CareerFile> | ||
| + | <CareerFile> | ||
| + | <Careers>BLANK.Careers</Careers> | ||
| + | </CareerFile> | ||
| + | <ToneFile> | ||
| + | <Tones></Tones> | ||
| + | </ToneFile> | ||
| + | <ToneFile> | ||
| + | <Tones>BLANK.Tones</Tones> | ||
| + | </ToneFile> | ||
| + | </CareerFiles> | ||
| + | |||
| + | You must now change the "BLANK"s in the code to match your career file. So for my tennis career I would change the “BLANK.Careers” to “Tennis.Careers” and “BLANK.Tones” to “Tennis.Tones”. | ||
| + | |||
| + | Once you have done this, save the file in notepad by going to “File” -> “Save” then closing down the file. You will then be prompted to "Commit Changes" again, so go ahead an press the "Yes" button, again the old .dll file has a line crossing it out, with the new file underneath. Now go to "File" -> "Save" in S3PE. | ||
| + | |||
| + | |||
| + | |||
| + | '''Step: 5 – Career Pictures:''' | ||
| + | You now need to edit your career pictures, these are the small icons used in game. Within your .package file there should be two files: “Blank_Pic” & “Blank_Pic_s” | ||
| + | |||
| + | |||
| + | Blank_Pic is the larger picture icon that appears when your sim joins the career next to the speech bubble, and also when they are at work: | ||
| + | |||
| + | |||
| + | Example of my tennis career (Racquet and ball): | ||
| + | |||
| + | '''Joined the career bubble.''' | ||
| + | |||
| + | [[File:LargeTennisPic.png]] | ||
| + | |||
| + | '''At work bubble.''' | ||
| + | |||
| + | [[File:LargeTennisPic2.png]] | ||
| + | |||
| + | |||
| + | The Blank_Pic_s is the small icon that is used in the careers information box: | ||
| + | |||
| + | Example of my tennis career (Racquet and ball small icon): | ||
| + | |||
| + | [[File:CareerTitle1.png]] | ||
| + | |||
| + | |||
| + | The best way to edit these files is to “Right click” them then go to “Export” -> “To file” and save them somewhere on your computer. You can then easily edit them in any image program, such as GIMP or paint for example. I would recommend not using paint, as you cannot delete the white background in paint whereas in GIMP you can have no background which looks a lot better in game, or else you end up with your picture in a white box. | ||
| + | |||
| + | |||
| + | If you wish to use GIMP (GNU Image Manipulation Program) you can download it here for free: [http://www.gimp.org/downloads/ GIMP Download Link] | ||
| + | |||
| + | '''Note: When editing the images the white box is the maximum size your image can be. Your new image must fit into the same space as the white box in the Blank_Pic files, if it is any larger then it will not fit in game.''' | ||
| + | |||
| + | |||
| + | Once you have finished editing your Blank_Pic files, go back into your package file in S3PE and “Right click” each “Blank_Pic” file and click “Replace”, then choose your modified image files. You need to then rename the files to something matching your career by double clicking each one, which opens up the resource details window again, and changing the name then remember to click the FNV64 button to change the instance id. | ||
| + | |||
| + | |||
| + | For example my tennis pic files are called “Tennis_Pic” & “Tennis_Pic_s”. | ||
| + | |||
| + | |||
| + | '''Step: 5 – Editing the .Careers file:''' | ||
| + | |||
| + | The .Careers file contains a lot of information and makes up the bulk of the code for the career. Open the .career file in notepad by “Right clicking” then selecting “Notepad”. | ||
| + | |||
| + | |||
| + | Here’s the code that is within the .career file, most of the code is pretty obvious if you look at it closely; what you need to do is go down the code and replace all of the highlighted “BLANK” words with your own info. Don’t change anything else unless you know what you are doing. | ||
| + | |||
| + | |||
| + | '''I have added notes into the code which I have put in bold which is NOT part of the code!''' | ||
| + | To make this part easier to understand we can break it down into sections, so we shall first look at the top section which has some of the basic information for the career. | ||
| + | |||
| + | <?xml version="1.0"?> | ||
| + | <Careers> | ||
| + | <CareerList> | ||
| + | <CareerName></CareerName> | ||
| + | <CareerDescription></CareerDescription> | ||
| + | <OvertimeHours>2</OvertimeHours> | ||
| + | <MissWorkPerf>-10</MissWorkPerf> | ||
| + | <OvertimePerf>6</OvertimePerf> | ||
| + | <MaxPerfFlow>14</MaxPerfFlow> | ||
| + | <MinPerfFlow>-8</MinPerfFlow> | ||
| + | <MaxPerfFlowMaxLevel>8</MaxPerfFlowMaxLevel> | ||
| + | <MinPerfFlowMaxLevel>-10</MinPerfFlowMaxLevel> | ||
| + | <BonusAmountInHours>12</BonusAmountInHours> | ||
| + | <RaisePercent>0.15</RaisePercent> | ||
| + | <RaisePercentMaxLevel>.1</RaisePercentMaxLevel> | ||
| + | <RaiseChanceMin>.01</RaiseChanceMin> | ||
| + | <RaiseChanceMax>.25</RaiseChanceMax> | ||
| + | <FunStressPerHour>-5</FunStressPerHour> | ||
| + | <MinCoworkers>BLANK</MinCoworkers> '''- Minimum number of co-workers your sim can have: e.g. “3”''' | ||
| + | <MaxCoworkers>BLANK</MaxCoworkers> '''- Maximum number of co-workers your sim can have: e.g. “5”''' | ||
| + | <WorkHardTone></WorkHardTone> | ||
| + | <TakeItEasyTone></TakeItEasyTone> | ||
| + | <MeetCoworkersTone></MeetCoworkersTone> | ||
| + | <HangWithCoworkersTone></HangWithCoworkersTone> | ||
| + | <SuckUpToBossTone></SuckUpToBossTone> | ||
| + | <SleepAtWorkTone></SleepAtWorkTone> | ||
| + | <ExtraTone1></ExtraTone1> | ||
| + | <ExtraTone2></ExtraTone2> | ||
| + | <ExtraTone3></ExtraTone3> | ||
| + | <ExtraTone4></ExtraTone4> | ||
| + | <ExtraTone5></ExtraTone5> | ||
| + | <FullClassName></FullClassName> | ||
| + | <Guid></Guid> | ||
| + | <AltGuid></AltGuid> | ||
| + | <TableName></TableName> | ||
| + | <Text_JobOffer></Text_JobOffer> | ||
| + | <Text_Retirement></Text_Retirement> | ||
| + | <Text_BranchOffer></Text_BranchOffer> | ||
| + | <Text_BranchName1></Text_BranchName1> | ||
| + | <Text_BranchName2></Text_BranchName2> | ||
| + | <SpeechBaloonImage></SpeechBaloonImage> | ||
| + | <WorkInteractionIcon></WorkInteractionIcon> | ||
| + | <Category>FullTime</Category> | ||
| + | <DreamsAndPromisesIcon></DreamsAndPromisesIcon> | ||
| + | <Topic></Topic> | ||
| + | <LearnedInfoText></LearnedInfoText> | ||
| + | <RabbitholeType></RabbitholeType> | ||
| + | <CoworkerPool>BLANK</CoworkerPool> '''- Should be your co-workers name with Pool added. e.g. “AthletesPool”''' | ||
| + | </CareerList> | ||
| + | <CareerList> | ||
| + | <CareerName>BLANK</CareerName> '''- Should be your career title: e.g. “Tennis”''' | ||
| + | <CareerDescription></CareerDescription> | ||
| + | <FunStressPerHour>-3</FunStressPerHour> | ||
| + | <MinCoworkers>BLANK</MinCoworkers> '''- Minimum number of co-workers your sim can have: e.g. “3” same as above.''' | ||
| + | <MaxCoworkers>BLANK</MaxCoworkers> '''- Maximum number of co-workers your sim can have: e.g. “5” same as above.''' | ||
| + | <WorkHardTone>BLANK</WorkHardTone> '''- Either your new tone name, or a standard tone name. e.g. “WorkHard” for standard tone name, or for a non-standard something like “ExtraWork” for example.''' | ||
| + | <TakeItEasyTone>BLANK</TakeItEasyTone> '''- Either your new tone name, or a standard tone name. e.g. “TakeItEasy” for standard tone name, or for a non-standard something like “SlackOffWork” for example.''' | ||
| + | <MeetCoworkersTone>BLANK</MeetCoworkersTone> '''- Either your new tone name, or a standard tone name. e.g. “MeetCoworkers” for standard tone name, or for a non-standard something like “MeetFellowAthletes” for example.''' | ||
| + | <HangWithCoworkersTone>BLANK</HangWithCoworkersTone> '''- Either your new tone name, or a standard tone name. e.g. “HangWithCoworkers” for standard tone name, or for a non-standard something like “HangWithFellowAthletes” for example.''' | ||
| + | <FullClassName>Sims3.Gameplay.Careers.Music, Sims3GameplaySystems</FullClassName> | ||
| + | <Guid>Music</Guid> | ||
| + | <AltGuid>BLANK</AltGuid> '''- Should be your career title: e.g. “Tennis”''' | ||
| + | <TableName>BLANK</TableName> '''- Should be your career title: e.g. “Tennis”''' | ||
| + | <Text_JobOffer>BLANK</Text_JobOffer> '''- Should be your career title with Offer added: e.g. “TennisOffer”''' | ||
| + | <Text_Retirement></Text_Retirement> | ||
| + | <SpeechBaloonImage>Career School</SpeechBaloonImage> | ||
| + | <WorkInteractionIcon>BLANK_Pic_s</WorkInteractionIcon> '''- Should be the name of your picture file: e.g. “Tennis_Pic_s”''' | ||
| + | <Category>FullTime</Category> | ||
| + | <DreamsAndPromisesIcon>BLANK_Pic</DreamsAndPromisesIcon> '''- Should be the name of your picture file: e.g. “Tennis_Pic”''' | ||
| + | <Topic></Topic> | ||
| + | <LearnedInfoText></LearnedInfoText> | ||
| + | <RabbitholeType>BLANK</RabbitholeType> '''- Should be the name of the rabbit hole you wish to use: e.g. “Stadium”''' | ||
| + | </CareerList> | ||
| + | <BLANK> '''- Should be your career tile: e.g. “Tennis”''' | ||
| + | <Title></Title> | ||
| + | <BasePay></BasePay> | ||
| + | <PensionPay></PensionPay> | ||
| + | <WakeupTime></WakeupTime> | ||
| + | <StartTime></StartTime> | ||
| + | <DayLength></DayLength> | ||
| + | <DaysToWork></DaysToWork> | ||
| + | <HasBoss>BLANK</HasBoss> '''- Either “True” or “False” depending if you want your career to have a boss.''' | ||
| + | <Level></Level> | ||
| + | <BranchName>Base</BranchName> | ||
| + | <BranchSource></BranchSource> | ||
| + | <Metric1>Mood</Metric1> | ||
| + | <Mappings1></Mappings1> | ||
| + | <Args1></Args1> | ||
| + | <Metric2></Metric2> | ||
| + | <Mappings2></Mappings2> | ||
| + | <Args2></Args2> | ||
| + | <Metric3></Metric3> | ||
| + | <Mappings3></Mappings3> | ||
| + | <Args3></Args3> | ||
| + | <Metric4></Metric4> | ||
| + | <Mappings4></Mappings4> | ||
| + | <Args4></Args4> | ||
| + | <PromotionRewardData></PromotionRewardData> | ||
| + | <ConsiderGiftingReward>0</ConsiderGiftingReward> | ||
| + | <OutfitMale></OutfitMale> | ||
| + | <OutfitFemale></OutfitFemale> | ||
| + | <OutfitMaleElder></OutfitMaleElder> | ||
| + | <OutfitFemaleElder></OutfitFemaleElder> | ||
| + | <Text_Promotion></Text_Promotion> | ||
| + | <Text_Promotion_Female></Text_Promotion_Female> | ||
| + | <CarpoolType>Taxi</CarpoolType> | ||
| + | <CoworkerTitle>BLANK</CoworkerTitle> '''- Should be your co-workers Title: e.g. “FellowAthletes”''' | ||
| + | <CoworkerMetricTitle>BLANK</CoworkerMetricTitle> '''- Should be your co-workers metric Title: e.g. “Athletes”''' | ||
| + | </BLANK> '''- Should be your career tile: e.g. “Tennis”''' | ||
| + | |||
| + | |||
| + | '''Step: 6 – Brew time:''' | ||
| + | |||
| + | Grab a cuppa tea :D | ||
| + | |||
| + | |||
| + | '''Step: 7 –Understanding Metrics:''' | ||
| + | |||
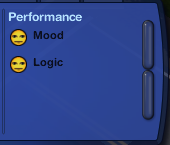
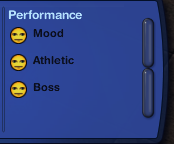
| + | Metrics are the requirements that your sim needs for promotion. You can have up to 4 metrics per job level at one time. If you still don’t know what I mean here’s some screen shots of different metric combinations: | ||
| + | |||
| + | [[File:Metric3.png]][[File:Metric1.png]][[File:Metric4.png]] | ||
| + | |||
| + | |||
| + | You need to decide what metrics you want for your career at each level of promotion. Now to fit this into our code you need to know a few lines of code that either matches a “Mood” metric, “Skill” metric or a “Relationship” metric. You can also include odd metrics that are specific to certain careers, such as report writing or meetings held etc. but these are harder to implement. | ||
| + | For each metric you also have to define what is classed as “Awful”, “Normal” and “Outstanding” you do this by defining the mapping settings. | ||
| + | |||
| + | |||
| + | Mappings are defined as 3 different numbers; the first number represents what is classed as “Awful” the second figure is “Normal” and the last figure is classed as “Outstanding” | ||
| + | |||
| + | |||
| + | This is an example of a mood metric with mapping: | ||
| + | |||
| + | |||
| + | <Metric1>Sims3.Gameplay.Careers.MetricMood, Sims3GameplaySystems</Metric1> | ||
| + | <Mappings1>-500,0,50</Mappings1> | ||
| + | |||
| + | |||
| + | |||
| + | The first line means this is the first metric “<Metric1>” meaning it would appear at the top. | ||
| + | The second line is “<Mappings1>” meaning that these mappings relate to metric 1, and the numbers -500, 0, 50 mean that a mood rating of -500 (Which is impossible) would be “awful”, a mood rating of 0 would be “normal”, and a mood rating of 50 would be “outstanding”. I believe that 100 is a full mood bar, and 0 is a completely empty mood bar. | ||
| + | |||
| + | Now for a skill metric you need an extra like of code here’s an example: | ||
| + | |||
| + | <Metric2>SkillX</Metric2> | ||
| + | <Mappings2>-2,0,3</Mappings2> | ||
| + | <Args2>Athletic</Args2> | ||
| + | |||
| + | |||
| + | The first line means it’s metric number 2 “<Metric2>” and is a skill “SkillX”. | ||
| + | The second line means that this mapping belongs to the metric 2, with “<Mappings2>” and the numbers -2,0,3 men that a skill level of -2 (which is impossible) is “awful”, skill level of 0 is “normal” and a skill level of 3 is “Outstanding”. | ||
| + | The third like “<Args2>” and “Athletic” means that skill would be the athletic skill, and relates to metric 2. | ||
| + | |||
| + | If you want to include a boss in your career, or a relationship with co-workers metric then this is the code: | ||
| + | |||
| + | |||
| + | Co-Workers relationship metric: | ||
| + | |||
| + | <Metric3>RelCoworkers</Metric3> | ||
| + | <Mappings3>-500,0,40</Mappings3> | ||
| + | |||
| + | |||
| + | Boss relationship metric: | ||
| + | |||
| + | <Metric3>RelBoss</Metric3> | ||
| + | <Mappings3>-500,0,40</Mappings3> | ||
| + | |||
| + | Again like the other metrics “<Metric3” means that this would be the third metric in the list, and RelBoss means that it’s a relationship with boss metric. | ||
| + | The second line mappings again is “<Mappings3>” referring to this being the third metric, and the numbers -500,0,40 referring to the relationship between your sim and your boss. I believe that 0 is no relationship, and 100 is a full bar of relationship. | ||
| + | |||
| + | |||
| + | The reason minus figures are used, for example -2,0,3 on the skill metric, would be so that when you join the career you can have 0 skill levels in a skill and still be classed as “Normal” performance. The minus figure just means that you won’t start a career and suddenly have awful skill progression, and so get negative promotion instead of increasing. | ||
| + | |||
| + | |||
| + | Here’s an example from my Tennis career, this is the first level metrics which are the ones that your sim needs for promotion when they first join the career. The following code produces the metrics shown in the screen shots: | ||
| + | |||
| + | <Level>1</Level> | ||
| + | <Metric1>Sims3.Gameplay.Careers.MetricMood, Sims3GameplaySystems</Metric1> | ||
| + | <Mappings1>-500,0,50</Mappings1> | ||
| + | <Metric2>SkillX</Metric2> | ||
| + | <Mappings2>-2,0,3</Mappings2> | ||
| + | <Args2>Athletic</Args2> | ||
| + | <Metric3>RelBoss</Metric3> | ||
| + | <Mappings3>-500,0,40</Mappings3> | ||
| + | |||
| + | |||
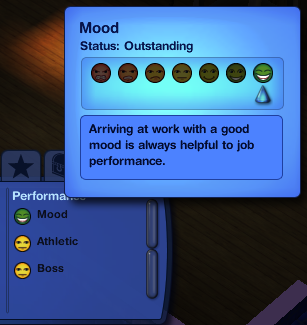
| + | The mood metric is first and with a full mood bar my mood is classed as “Outstanding” as I need a mood of 50 or over to be classed as outstanding from the code “<Mappings1>-500,0,50</Mappings1>”. | ||
| + | |||
| + | |||
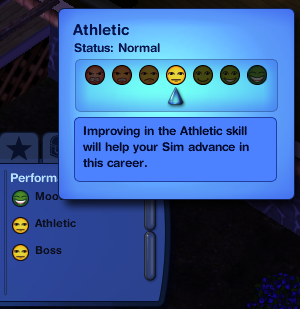
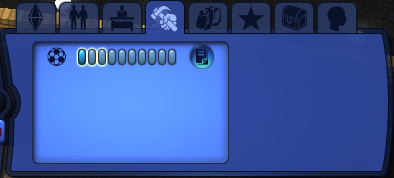
| + | The second on the list is the skill Athletic, which is classed as “Normal” as I’m only skill level 1. To be classed as outstanding I would need level 3 as shown by the screenshot of my skills, and is defined by the “<Mappings2>-2,0,3</Mappings2>” code. | ||
| + | |||
| + | |||
| + | The third is the boss relationship, which is also “Normal” as defined by the “<Mappings3>-500,0,40</Mappings3>” code, as I have yet to befriend my boss. | ||
| + | |||
| + | [[File:MoodBar.png]][[File:Metric5.png]][[File:Metric6.png]][[File:Skill1.png]] | ||
| + | |||
| + | |||
| + | |||
| + | '''Note: Remember you can add up to 4 metrics, by just adding the extra code for whatever you wish the other metric to be. You can also change the metrics around to be whatever you wish so you could just have 4 skills for example without mood, or relationships, or even just 1 metric.''' | ||
| + | |||
| + | |||
| + | '''Step: 8 – Editing the 2nd part of the .Careers file:''' | ||
| + | |||
| + | Ok so if you haven’t been swamped to death by code, here’s the second part of the careers file. This section represents the code for the promotion levels for the career. If you look at the code you can see it’s broken into small sections like this: | ||
| + | |||
| + | <BLANK> | ||
| + | <Title>BLANK</Title> | ||
| + | <BasePay>BLANK</BasePay> | ||
| + | <PensionPay>BLANK</PensionPay> | ||
| + | <WakeupTime>BLANK</WakeupTime> | ||
| + | <StartTime>BLANK</StartTime> | ||
| + | <DayLength>BLANK</DayLength> | ||
| + | <DaysToWork>M,T,W,R,F,S,U</DaysToWork> | ||
| + | <Level>1</Level> | ||
| + | <Metric1>BLANK</Metric1> | ||
| + | <Mappings1>BLANK</Mappings1> | ||
| + | <Metric2>BLANK</Metric2> | ||
| + | <Mappings2>BLANK</Mappings2> | ||
| + | <Args2>BLANK</Args2> | ||
| + | <Metric3>BLANK</Metric3> | ||
| + | <Mappings3>BLANK</Mappings3> | ||
| + | <Text_Promotion>Entrylevel</Text_Promotion> | ||
| + | <Text_Promotion_Female>EntryLevel_Female</Text_Promotion_Female> | ||
| + | <CarpoolType>BLANK</CarpoolType> | ||
| + | </BLANK> | ||
| + | |||
| + | |||
| + | There’s a total of 10 sections representing the 10 levels of promotion within the career, with the first being the starting level when you join the career. For this part you will need to have your notepad information that you wrote down earlier. | ||
| + | |||
| + | Here’s an example of my first level of my Tennis career: | ||
| + | |||
| + | <Tennis> | ||
| + | <Title>RacquetCleaner</Title> | ||
| + | <BasePay>17</BasePay> | ||
| + | <PensionPay>40</PensionPay> | ||
| + | <WakeupTime>8</WakeupTime> | ||
| + | <StartTime>10</StartTime> | ||
| + | <DayLength>7.5</DayLength> | ||
| + | <DaysToWork>W,R,F,S,U</DaysToWork> | ||
| + | <Level>1</Level> | ||
| + | <Metric1>Sims3.Gameplay.Careers.MetricMood, Sims3GameplaySystems</Metric1> | ||
| + | <Mappings1>-500,0,50</Mappings1> | ||
| + | <Metric2>SkillX</Metric2> | ||
| + | <Mappings2>-2,0,3</Mappings2> | ||
| + | <Args2>Athletic</Args2> | ||
| + | <Metric3>RelBoss</Metric3> | ||
| + | <Mappings3>-500,0,40</Mappings3> | ||
| + | <Text_Promotion>Entrylevel</Text_Promotion> | ||
| + | <Text_Promotion_Female>EntryLevel_Female</Text_Promotion_Female> | ||
| + | <CarpoolType>CarUsed2</CarpoolType> | ||
| + | </Tennis> | ||
| + | |||
| + | |||
| + | Now go down the code, and replace all the “BLANK”s with your information for each promotion level, I will add notes for the first level of promotion. Remember to “Save” in notepad, then “File -> Save” in S3PE and click “Yes” to commit the changes when prompted once you have finished editing your .Careers file. | ||
| + | '''Notes are again added in bold and are NOT part of the code!''' | ||
| + | |||
| + | |||
| + | <BLANK> '''- Should be your career tile: e.g. “Tennis”''' | ||
| + | <Title>BLANK</Title> '''- Should be your careers first promotion title e.g. “RacquetCleaner”''' | ||
| + | <BasePay>BLANK</BasePay> '''- Should be the pay for the first career level. e.g. “17”''' | ||
| + | <PensionPay>BLANK</PensionPay> '''- Should be the retirement wage for the first career level. e.g. “40”''' | ||
| + | <WakeupTime>BLANK</WakeupTime> '''- Should be the wake up time for the first career level. e.g. “8”''' | ||
| + | <StartTime>BLANK</StartTime> '''- Should be the start work time for the first career level. e.g. “10”''' | ||
| + | <DayLength>BLANK</DayLength> '''- Should be the day length time for the first career level. e.g. “7.5”''' | ||
| + | <DaysToWork>M,T,W,R,F,S,U</DaysToWork> '''- Change depending on what days you want your sim to work.''' | ||
| + | <Level>1</Level> | ||
| + | <Metric1>BLANK</Metric1> '''- These are the metrics that you can alter depending what you want the requirements for promotion to be. Add or delete them as you see fit.''' | ||
| + | <Mappings1>BLANK</Mappings1> | ||
| + | <Metric2>BLANK</Metric2> | ||
| + | <Mappings2>BLANK</Mappings2> | ||
| + | <Args2>BLANK</Args2> | ||
| + | <Metric3>BLANK</Metric3> | ||
| + | <Mappings3>BLANK</Mappings3> | ||
| + | <Text_Promotion>Entrylevel</Text_Promotion> | ||
| + | <Text_Promotion_Female>EntryLevel_Female</Text_Promotion_Female> | ||
| + | <CarpoolType>BLANK</CarpoolType> '''- Should be your car type you want for the first career level. e.g. “CarUsed2”''' | ||
| + | </BLANK> '''- Should be your career tile: e.g. “Tennis”''' | ||
| + | <BLANK> | ||
| + | <Title>BLANK</Title> | ||
| + | <BasePay>BLANK</BasePay> | ||
| + | <PensionPay>BLANK</PensionPay> | ||
| + | <WakeupTime>BLANK</WakeupTime> | ||
| + | <StartTime>BLANK</StartTime> | ||
| + | <DayLength>BLANK</DayLength> | ||
| + | <DaysToWork>M,T,W,R,F,S,U</DaysToWork> | ||
| + | <Level>2</Level> | ||
| + | <Metric1>BLANK</Metric1> | ||
| + | <Mappings1>BLANK</Mappings1> | ||
| + | <Metric2>BLANK</Metric2> | ||
| + | <Mappings2>BLANK</Mappings2> | ||
| + | <Args2>BLANK</Args2> | ||
| + | <Metric3>BLANK</Metric3> | ||
| + | <Mappings3>BLANK</Mappings3> | ||
| + | <Text_Promotion>PromotionLevel2</Text_Promotion> | ||
| + | <Text_Promotion_Female>PromotionLevel2_Female</Text_Promotion_Female> | ||
| + | <CarpoolType>BLANK</CarpoolType> | ||
| + | </BLANK> | ||
| + | <BLANK> | ||
| + | <Title>BLANK</Title> | ||
| + | <BasePay>BLANK</BasePay> | ||
| + | <PensionPay>BLANK</PensionPay> | ||
| + | <WakeupTime>BLANK</WakeupTime> | ||
| + | <StartTime>BLANK</StartTime> | ||
| + | <DayLength>BLANK</DayLength> | ||
| + | <DaysToWork>M,T,W,R,F,S,U</DaysToWork> | ||
| + | <Level>3</Level> | ||
| + | <Metric1>BLANK</Metric1> | ||
| + | <Mappings1>BLANK</Mappings1> | ||
| + | <Metric2>BLANK</Metric2> | ||
| + | <Mappings2>BLANK</Mappings2> | ||
| + | <Args2>BLANK</Args2> | ||
| + | <Metric3>BLANK</Metric3> | ||
| + | <Mappings3>BLANK</Mappings3> | ||
| + | <Text_Promotion>PromotionLevel3</Text_Promotion> | ||
| + | <Text_Promotion_Female>PromotionLevel3_Female</Text_Promotion_Female> | ||
| + | <CarpoolType>BLANK</CarpoolType> | ||
| + | </BLANK> | ||
| + | <BLANK> | ||
| + | <Title>BLANK</Title> | ||
| + | <BasePay>BLANK</BasePay> | ||
| + | <PensionPay>BLANK</PensionPay> | ||
| + | <WakeupTime>BLANK</WakeupTime> | ||
| + | <StartTime>BLANK</StartTime> | ||
| + | <DayLength>BLANK</DayLength> | ||
| + | <DaysToWork>M,T,W,R,F,S,U</DaysToWork> | ||
| + | <Level>4</Level> | ||
| + | <Metric1>BLANK</Metric1> | ||
| + | <Mappings1>BLANK</Mappings1> | ||
| + | <Metric2>BLANK</Metric2> | ||
| + | <Mappings2>BLANK</Mappings2> | ||
| + | <Args2>BLANK</Args2> | ||
| + | <Metric3>BLANK</Metric3> | ||
| + | <Mappings3>BLANK</Mappings3> | ||
| + | <Text_Promotion>PromotionLevel4</Text_Promotion> | ||
| + | <Text_Promotion_Female>promotionLevel4_Female</Text_Promotion_Female> | ||
| + | <CarpoolType>BLANK</CarpoolType> | ||
| + | </BLANK> | ||
| + | <BLANK> | ||
| + | <Title>BLANK</Title> | ||
| + | <BasePay>BLANK</BasePay> | ||
| + | <PensionPay>BLANK</PensionPay> | ||
| + | <WakeupTime>BLANK</WakeupTime> | ||
| + | <StartTime>BLANK</StartTime> | ||
| + | <DayLength>BLANK</DayLength> | ||
| + | <DaysToWork>M,T,W,R,F,S,U</DaysToWork> | ||
| + | <Level>5</Level> | ||
| + | <Metric1>BLANK</Metric1> | ||
| + | <Mappings1>BLANK</Mappings1> | ||
| + | <Metric2>BLANK</Metric2> | ||
| + | <Mappings2>BLANK</Mappings2> | ||
| + | <Args2>BLANK</Args2> | ||
| + | <Metric3>BLANK</Metric3> | ||
| + | <Mappings3>BLANK</Mappings3> | ||
| + | <Text_Promotion>promotionLevel5</Text_Promotion> | ||
| + | <Text_Promotion_Female>PromotionLevel5_Female</Text_Promotion_Female> | ||
| + | <CarpoolType>BLANK</CarpoolType> | ||
| + | </BLANK> | ||
| + | <BLANK> | ||
| + | <Title>BLANK</Title> | ||
| + | <BasePay>BLANK</BasePay> | ||
| + | <PensionPay>BLANK</PensionPay> | ||
| + | <WakeupTime>BLANK</WakeupTime> | ||
| + | <StartTime>BLANK</StartTime> | ||
| + | <DayLength>BLANK</DayLength> | ||
| + | <DaysToWork>M,T,W,R,F,S,U</DaysToWork> | ||
| + | <Level>6</Level> | ||
| + | <Metric1>BLANK</Metric1> | ||
| + | <Mappings1>BLANK</Mappings1> | ||
| + | <Metric2>BLANK</Metric2> | ||
| + | <Mappings2>BLANK</Mappings2> | ||
| + | <Args2>BLANK</Args2> | ||
| + | <Metric3>BLANK</Metric3> | ||
| + | <Mappings3>BLANK</Mappings3> | ||
| + | <Text_Promotion>promotionLevel6</Text_Promotion> | ||
| + | <Text_Promotion_Female>PromotionLevel6_Female</Text_Promotion_Female> | ||
| + | <CarpoolType>BLANK</CarpoolType> | ||
| + | </BLANK> | ||
| + | <BLANK> | ||
| + | <Title>BLANK</Title> | ||
| + | <BasePay>BLANK</BasePay> | ||
| + | <PensionPay>BLANK</PensionPay> | ||
| + | <WakeupTime>BLANK</WakeupTime> | ||
| + | <StartTime>BLANK</StartTime> | ||
| + | <DayLength>BLANK</DayLength> | ||
| + | <DaysToWork>M,T,W,R,F,S,U</DaysToWork> | ||
| + | <Level>7</Level> | ||
| + | <Metric1>BLANK</Metric1> | ||
| + | <Mappings1>BLANK</Mappings1> | ||
| + | <Metric2>BLANK</Metric2> | ||
| + | <Mappings2>BLANK</Mappings2> | ||
| + | <Args2>BLANK</Args2> | ||
| + | <Metric3>BLANK</Metric3> | ||
| + | <Mappings3>BLANK</Mappings3> | ||
| + | <Args3>BLANK</Args3> | ||
| + | <Metric4>BLANK</Metric4> | ||
| + | <Mappings4>BLANK</Mappings4> | ||
| + | <Text_Promotion>promotionLevel7</Text_Promotion> | ||
| + | <Text_Promotion_Female>PromotionLevel7_Female</Text_Promotion_Female> | ||
| + | <CarpoolType>BLANK</CarpoolType> | ||
| + | </BLANK> | ||
| + | <BLANK> | ||
| + | <Title>BLANK</Title> | ||
| + | <BasePay>BLANK</BasePay> | ||
| + | <PensionPay>BLANK</PensionPay> | ||
| + | <WakeupTime>BLANK</WakeupTime> | ||
| + | <StartTime>BLANK</StartTime> | ||
| + | <DayLength>BLANK</DayLength> | ||
| + | <DaysToWork>M,T,W,R,F,S,U</DaysToWork> | ||
| + | <Level>8</Level> | ||
| + | <Metric1>BLANK</Metric1> | ||
| + | <Mappings1>BLANK</Mappings1> | ||
| + | <Metric2>BLANK</Metric2> | ||
| + | <Mappings2>BLANK</Mappings2> | ||
| + | <Args2>BLANK</Args2> | ||
| + | <Metric3>BLANK</Metric3> | ||
| + | <Mappings3>BLANK</Mappings3> | ||
| + | <Args3>BLANK</Args3> | ||
| + | <Metric4>BLANK</Metric4> | ||
| + | <Mappings4>BLANK</Mappings4> | ||
| + | <Text_Promotion>promotionLevel8</Text_Promotion> | ||
| + | <Text_Promotion_Female>PromotionLevel8_Female</Text_Promotion_Female> | ||
| + | <CarpoolType>BLANK</CarpoolType> | ||
| + | </BLANK> | ||
| + | <BLANK> | ||
| + | <Title>BLANK</Title> | ||
| + | <BasePay>BLANK</BasePay> | ||
| + | <PensionPay>BLANK</PensionPay> | ||
| + | <WakeupTime>BLANK</WakeupTime> | ||
| + | <StartTime>BLANK</StartTime> | ||
| + | <DayLength>BLANK</DayLength> | ||
| + | <DaysToWork>M,T,W,R,F,S,U</DaysToWork> | ||
| + | <Level>9</Level> | ||
| + | <Metric1>BLANK</Metric1> | ||
| + | <Mappings1>BLANK</Mappings1> | ||
| + | <Metric2>BLANK</Metric2> | ||
| + | <Mappings2>BLANK</Mappings2> | ||
| + | <Args2>BLANK</Args2> | ||
| + | <Metric3>BLANK</Metric3> | ||
| + | <Mappings3>BLANK</Mappings3> | ||
| + | <Args3>BLANK</Args3> | ||
| + | <Metric4>BLANK</Metric4> | ||
| + | <Mappings4>BLANK</Mappings4> | ||
| + | <Text_Promotion>promotionLevel9</Text_Promotion> | ||
| + | <Text_Promotion_Female>PromotionLevel9_Female</Text_Promotion_Female> | ||
| + | <CarpoolType>BLANK</CarpoolType> | ||
| + | </BLANK> | ||
| + | <BLANK> | ||
| + | <Title>BLANK</Title> | ||
| + | <BasePay>BLANK</BasePay> | ||
| + | <PensionPay>BLANK</PensionPay> | ||
| + | <WakeupTime>BLANK</WakeupTime> | ||
| + | <StartTime>BLANK</StartTime> | ||
| + | <DayLength>BLANK</DayLength> | ||
| + | <DaysToWork>M,T,W,R,F,S,U</DaysToWork> | ||
| + | <Level>10</Level> | ||
| + | <Metric1>BLANK</Metric1> | ||
| + | <Mappings1>BLANK</Mappings1> | ||
| + | <Metric2>BLANK</Metric2> | ||
| + | <Mappings2>BLANK</Mappings2> | ||
| + | <Args2>BLANK</Args2> | ||
| + | <Metric3>BLANK</Metric3> | ||
| + | <Mappings3>BLANK</Mappings3> | ||
| + | <Args3>BLANK</Args3> | ||
| + | <Metric4>BLANK</Metric4> | ||
| + | <Mappings4>BLANK</Mappings4> | ||
| + | <Text_Promotion>promotionLevel10</Text_Promotion> | ||
| + | <Text_Promotion_Female>PromotionLevel10_Female</Text_Promotion_Female> | ||
| + | <CarpoolType>BLANK</CarpoolType> | ||
| + | </BLANK> | ||
| + | </Careers> | ||
| + | |||
| + | |||
| + | |||
| + | '''Step: 9 – Check List:''' | ||
| + | |||
| + | Before we move on here’s a check list of what you should have done so far: | ||
| + | |||
| + | 1. Downloaded the “Blank.Careers” package file. | ||
| + | 2. Changed the id instances. | ||
| + | 3. Created a unique .dll file. | ||
| + | 4. Edited your .dll file. | ||
| + | 5. Edited your Pic files. | ||
| + | 6. Edited your .Careers file. | ||
| + | |||
| + | |||
| + | |||
| + | |||
| + | == '''Modding the .Tones file and strings files.''' == | ||
| + | |||
| + | |||
| + | '''Step: 1 – The .Tones file:''' | ||
| + | |||
| + | Remember setting up your tones earlier? Well this is where we use the .Tones file to tell the game what we want the skill tones to actually do. | ||
| + | So for example one of my tones for my tennis career was “Practice Athletic” and when selected my sim would gain athletic skill. This is where the tone file comes into play. | ||
| + | |||
| + | [[File:Tones-TennisPracticeAthletic.png]] | ||
| + | |||
| + | |||
| + | Open up your .Tones file that you renamed earlier by “Right clicking” and then selecting “Notepad”, you will see the following code: | ||
| + | |||
| + | |||
| + | <?xml version="1.0"?> | ||
| + | <ToneList> | ||
| + | <Tone> | ||
| + | <ToneName></ToneName> | ||
| + | <FullClassName></FullClassName> | ||
| + | <ProductVersion>BaseGame</ProductVersion> | ||
| + | <CareerGuid></CareerGuid> | ||
| + | <SkillCount>0</SkillCount> | ||
| + | <Skill1></Skill1> | ||
| + | <SkillRate1></SkillRate1> | ||
| + | <MotiveCount>0</MotiveCount> | ||
| + | <Motive1></Motive1> | ||
| + | <MotiveRate1></MotiveRate1> | ||
| + | <MustHaveVisibleSkill>False</MustHaveVisibleSkill> | ||
| + | </Tone> | ||
| + | <Tone> | ||
| + | <ToneName>BLANK</ToneName> | ||
| + | <FullClassName>NRaas.Gameplay.Tones.CareerToneEx, NRaasCareer</FullClassName> | ||
| + | <CareerGuid>BLANK</CareerGuid> | ||
| + | <SkillCount>1</SkillCount> | ||
| + | <Skill1>BLANK</Skill1> | ||
| + | <SkillRate1>1</SkillRate1> | ||
| + | </Tone> | ||
| + | </ToneList> | ||
| + | |||
| + | |||
| + | The only part of the code you need to edit is the highlighted “BLANK”s with your information. | ||
| + | |||
| + | |||
| + | The <ToneName> should be:'''[YourCareerTitle]'''Tone.'''[YourCareerTitle]'''Career'''[YourToneTitle]''' | ||
| + | |||
| + | |||
| + | Tennis career example: | ||
| + | |||
| + | |||
| + | TennisTone.TennisCareerPracticeAthletic | ||
| + | |||
| + | |||
| + | The <CareerGuid> should be your career title. E.g. “Tennis” | ||
| + | |||
| + | |||
| + | And the <Skill1> should be the skill you wish the tone to increase. E.g. “Athletic” | ||
| + | |||
| + | |||
| + | This is the tone file for my tennis career: | ||
| + | |||
| + | |||
| + | <?xml version="1.0"?> | ||
| + | <ToneList> | ||
| + | <Tone> | ||
| + | <ToneName></ToneName> | ||
| + | <FullClassName></FullClassName> | ||
| + | <ProductVersion>BaseGame</ProductVersion> | ||
| + | <CareerGuid></CareerGuid> | ||
| + | <SkillCount>0</SkillCount> | ||
| + | <Skill1></Skill1> | ||
| + | <SkillRate1></SkillRate1> | ||
| + | <MotiveCount>0</MotiveCount> | ||
| + | <Motive1></Motive1> | ||
| + | <MotiveRate1></MotiveRate1> | ||
| + | <MustHaveVisibleSkill>False</MustHaveVisibleSkill> | ||
| + | </Tone> | ||
| + | <Tone> | ||
| + | <ToneName>TennisTone.TennisCareerPracticeAthletic</ToneName> | ||
| + | <FullClassName>NRaas.Gameplay.Tones.CareerToneEx, NRaasCareer</FullClassName> | ||
| + | <CareerGuid>Tennis</CareerGuid> | ||
| + | <SkillCount>1</SkillCount> | ||
| + | <Skill1>Athletic</Skill1> | ||
| + | <SkillRate1>1</SkillRate1> | ||
| + | </Tone> | ||
| + | </ToneList> | ||
| + | |||
| + | |||
| + | If you wish to add more than one skill tone for example you simply add the tone underneath like so: | ||
| + | |||
| + | |||
| + | <?xml version="1.0"?> | ||
| + | <ToneList> | ||
| + | <Tone> | ||
| + | <ToneName></ToneName> | ||
| + | <FullClassName></FullClassName> | ||
| + | <ProductVersion>BaseGame</ProductVersion> | ||
| + | <CareerGuid></CareerGuid> | ||
| + | <SkillCount>0</SkillCount> | ||
| + | <Skill1></Skill1> | ||
| + | <SkillRate1></SkillRate1> | ||
| + | <MotiveCount>0</MotiveCount> | ||
| + | <Motive1></Motive1> | ||
| + | <MotiveRate1></MotiveRate1> | ||
| + | <MustHaveVisibleSkill>False</MustHaveVisibleSkill> | ||
| + | </Tone> | ||
| + | <Tone> | ||
| + | <ToneName>TennisTone.TennisCareerPracticeAthletic</ToneName> | ||
| + | <FullClassName>NRaas.Gameplay.Tones.CareerToneEx, NRaasCareer</FullClassName> | ||
| + | <CareerGuid>Tennis</CareerGuid> | ||
| + | <SkillCount>1</SkillCount> | ||
| + | <Skill1>Athletic</Skill1> | ||
| + | <SkillRate1>1</SkillRate1> | ||
| + | </Tone> | ||
| + | <Tone> | ||
| + | <ToneName>TennisTone.TennisCareerPracticeLogic</ToneName> | ||
| + | <FullClassName>NRaas.Gameplay.Tones.CareerToneEx, NRaasCareer</FullClassName> | ||
| + | <CareerGuid>NRaasMobster</CareerGuid> | ||
| + | <CareerBranch>Tennis</CareerBranch> | ||
| + | <SkillCount>1</SkillCount> | ||
| + | <Skill1>Logic</Skill1> | ||
| + | <SkillRate1>1</SkillRate1> | ||
| + | </Tone> | ||
| + | </ToneList> | ||
| + | |||
| + | |||
| + | |||
| + | This would add a logic tone if you had one added in your tones. | ||
| + | |||
| + | |||
| + | Once you have modded your .Tone file as you see fit, make sure you once again “Save” in notepad, then “File -> Save” in S3PE. | ||
| + | |||
| + | |||
| + | '''Step: 2 – The string files:''' | ||
| + | |||
| + | The string files tell the game what text to show in game, such as career titles and descriptions. | ||
| + | |||
| + | |||
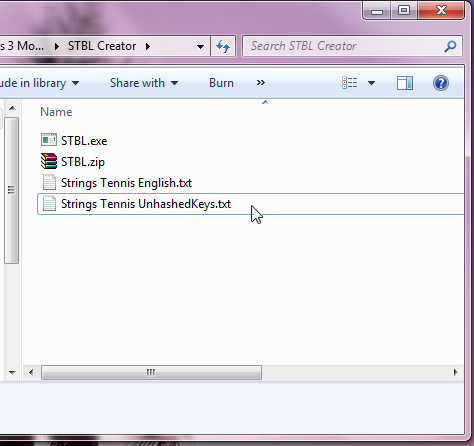
| + | We need to start by making an “UnhashedKey” file. Start by opening up a new notepad file. You now need to copy (Ctrl + C) and paste (Ctrl + V) the code below into the notepad file. Now go down the code and replace once again all the “BLANK”s with your information, and also delete any notes in bold I have added into the code at the side as the same as before. | ||
| + | |||
| + | |||
| + | For the time being ignore any <KEY>BLANK</KEY> as I will explain these later, for now just fill in the <STR> code. | ||
| + | |||
| + | |||
| + | |||
| + | <KEY>BLANK:</KEY> | ||
| + | <STR>Gameplay/Excel/Careers/CareerList:BLANK</STR> '''- Should be your career tile: e.g. “CareerList:Tennis”''' | ||
| + | <KEY>BLANK:</KEY> | ||
| + | <STR>Gameplay/Careers/GetJobInRabbitHole:JoinCareerNoCareer</STR> | ||
| + | <KEY>BLANK:</KEY> | ||
| + | <STR>Gameplay/Excel/Careers/CareerList:BLANKOffer</STR> '''- Should be your career title e.g “CareerList:TennisOffer”''' | ||
| + | <KEY>BLANK:</KEY> | ||
| + | <STR>Gameplay/Excel/Careers/BLANK:BLANK</STR> '''- Should be your career title followed by your co-worker title. E.g “Tennis:FellowAthlete”''' | ||
| + | <KEY>BLANK:</KEY> | ||
| + | <STR>Gameplay/Excel/Careers/BLANK:BLANK</STR> '''- Should be your career title followed by your co-worker metric title. E.g.”Tennis:Athletes”''' | ||
| + | <KEY>BLANK:</KEY> | ||
| + | <STR>Gameplay/Excel/Careers/CareerList:BLANK</STR> '''- Should be your 1st tone title. E.g “MeetFellowAthletes”''' | ||
| + | <KEY>BLANK:</KEY> | ||
| + | <STR>Gameplay/Excel/Careers/CareerList:BLANK</STR> '''- Should be your 1st tone title with Description added e.g “MeetFellowAthletesDescription”''' | ||
| + | <KEY>BLANK:</KEY> | ||
| + | <STR>Gameplay/Excel/Careers/CareerList:BLANK</STR> '''- Should be your 2nd tone title. E.g “HangWithFellowAthletes”''' | ||
| + | <KEY>BLANK:</KEY> | ||
| + | <STR>Gameplay/Excel/Careers/CareerList:BLANK</STR> '''- Should be your 2nd tone title with Description added e.g “HangWithFellowAthletesDescription”''' | ||
| + | '''You can also add or delete more tones if you wish, here depending on what you decided from earlier. Just copy the code layout from the others above.''' | ||
| + | '''(These are only the tone titles and descriptions for normal tones NOT skill boosting tones)''' | ||
| + | <KEY>BLANK:</KEY> | ||
| + | <STR>BLANK</STR> '''- Should be your 1st skill boosting tone title and is the same line of code used in your .Tone file. e.g “TennisTone.TennisCareerPracticeAthletic”''' | ||
| + | <KEY>BLANK:</KEY> | ||
| + | <STR>BLANK</STR> - Should be your 1st skill boosting tone title with Description added e.g “TennisTone.TennisCareerPracticeAthleticDescription” | ||
| + | '''Again you can also add or delete more skill booster tones if you wish, here depending on what you decided from earlier. Just copy the code layout from the others above.''' | ||
| + | '''This next section are all the career titles from levels 1 – 10.''' | ||
| + | <KEY>BLANK:</KEY> | ||
| + | <STR>Gameplay/Excel/Careers/BLANK:BLANK</STR> '''- Should be your career title followed by your first career job title e.g “Tennis:RaquetCleaner”''' | ||
| + | <KEY>BLANK:</KEY> | ||
| + | <STR>Gameplay/Excel/Careers/BLANK:EntryLevel</STR> '''- Should be your career title. E.g. “Tennis”''' | ||
| + | <KEY>BLANK:</KEY> | ||
| + | <STR>Gameplay/Excel/Careers/BLANK:EntryLevel_Female</STR> '''- Should be your career title. E.g. “Tennis”''' | ||
| + | <KEY>BLANK:</KEY> | ||
| + | <STR>Gameplay/Excel/Careers/BLANK:BLANK</STR> '''- Should be your career title followed by your second career job title e.g “Tennis:BallBoy”''' | ||
| + | <KEY>BLANK:</KEY> | ||
| + | <STR>Gameplay/Excel/Careers/BLANK:PromotionLevel2</STR> '''- Should be your career title. E.g. “Tennis”''' | ||
| + | <KEY>BLANK:</KEY> | ||
| + | <STR>Gameplay/Excel/Careers/BLANK:PromotionLevel2_Female</STR> '''- Should be your career title. E.g. “Tennis”''' | ||
| + | <KEY>BLANK:</KEY> | ||
| + | <STR>Gameplay/Excel/Careers/BLANK:BLANK</STR> '''- Should be your career title followed by your third career job title e.g “Tennis:LinesMan”''' | ||
| + | <KEY>BLANK:</KEY> | ||
| + | <STR>Gameplay/Excel/Careers/BLANK:PromotionLevel3</STR> '''- Should be your career title. E.g. “Tennis”''' | ||
| + | <KEY>BLANK:</KEY> | ||
| + | <STR>Gameplay/Excel/Careers/BLANK:PromotionLevel3_Female</STR> '''- Should be your career title. E.g. “Tennis”''' | ||
| + | <KEY>BLANK:</KEY> | ||
| + | <STR>Gameplay/Excel/Careers/BLANK:BLANK</STR> '''- Should be your career title followed by your fourth career job title e.g “Tennis:TennisAssistant”''' | ||
| + | <KEY>BLANK:</KEY> | ||
| + | <STR>Gameplay/Excel/Careers/BLANK:PromotionLevel4</STR> '''- Should be your career title. E.g. “Tennis”''' | ||
| + | <KEY>BLANK:</KEY> | ||
| + | <STR>Gameplay/Excel/Careers/BLANK:PromotionLevel4_Female</STR> '''- Should be your career title. E.g. “Tennis”''' | ||
| + | <KEY>BLANK:</KEY> | ||
| + | <STR>Gameplay/Excel/Careers/BLANK:BLANK</STR> '''- Should be your career title followed by your fifth career job title e.g “Tennis:BeginnerTennis”''' | ||
| + | <KEY>BLANK:</KEY> | ||
| + | <STR>Gameplay/Excel/Careers/BLANK:PromotionLevel5</STR> '''- Should be your career title. E.g. “Tennis”''' | ||
| + | <KEY>BLANK:</KEY> | ||
| + | <STR>Gameplay/Excel/Careers/BLANK:PromotionLevel5_Female</STR> '''- Should be your career title. E.g. “Tennis”''' | ||
| + | <KEY>BLANK:</KEY> | ||
| + | <STR>Gameplay/Excel/Careers/BLANK:BLANK</STR> '''- Should be your career title followed by your sixth career job title e.g “Tennis:ProfessionalPlayer”''' | ||
| + | <KEY>BLANK:</KEY> | ||
| + | <STR>Gameplay/Excel/Careers/BLANK:PromotionLevel6</STR> '''- Should be your career title. E.g. “Tennis”''' | ||
| + | <KEY>BLANK:</KEY> | ||
| + | <STR>Gameplay/Excel/Careers/BLANK:PromotionLevel6_Female</STR> '''- Should be your career title. E.g. “Tennis”''' | ||
| + | <KEY>BLANK:</KEY> | ||
| + | <STR>Gameplay/Excel/Careers/BLANK:BLANK</STR> '''- Should be your career title followed by your seventh career job title e.g “Tennis:ChallengeTourPlayer”''' | ||
| + | <KEY>BLANK:</KEY> | ||
| + | <STR>Gameplay/Excel/Careers/BLANK:PromotionLevel7</STR> '''- Should be your career title. E.g. “Tennis”''' | ||
| + | <KEY>BLANK:</KEY> | ||
| + | <STR>Gameplay/Excel/Careers/BLANK:PromotionLevel7_Female</STR> '''- Should be your career title. E.g. “Tennis”''' | ||
| + | <KEY>BLANK:</KEY> | ||
| + | <STR>Gameplay/Excel/Careers/BLANK:BLANK</STR> '''- Should be your career title followed by your eighth career job title e.g “Tennis:250and500SeriesPlayer”''' | ||
| + | <KEY>BLANK:</KEY> | ||
| + | <STR>Gameplay/Excel/Careers/BLANK:PromotionLevel8</STR> '''- Should be your career title. E.g. “Tennis”''' | ||
| + | <KEY>BLANK:</KEY> | ||
| + | <STR>Gameplay/Excel/Careers/BLANK:PromotionLevel8_Female</STR> '''- Should be your career title. E.g. “Tennis”''' | ||
| + | <KEY>BLANK:</KEY> | ||
| + | <STR>Gameplay/Excel/Careers/BLANK:BLANK</STR> '''- Should be your career title followed by your ninth career job title e.g “Tennis:Master1000Entry”''' | ||
| + | <KEY>BLANK:</KEY> | ||
| + | <STR>Gameplay/Excel/Careers/BLANK:PromotionLevel9</STR> '''- Should be your career title. E.g. “Tennis”''' | ||
| + | <KEY>BLANK:</KEY> | ||
| + | <STR>Gameplay/Excel/Careers/BLANK:PromotionLevel9_Female</STR> '''- Should be your career title. E.g. “Tennis”''' | ||
| + | <KEY>BLANK:</KEY> | ||
| + | <STR>Gameplay/Excel/Careers/BLANK:BLANK</STR> '''- Should be your career title followed by your tenth career job title e.g “Tennis:GrandSlamChampion”''' | ||
| + | <KEY>BLANK:</KEY> | ||
| + | <STR>Gameplay/Excel/Careers/BLANK:PromotionLevel10</STR> '''- Should be your career title. E.g. “Tennis”''' | ||
| + | <KEY>BLANK:</KEY> | ||
| + | <STR>Gameplay/Excel/Careers/BLANK:PromotionLevel10_Female</STR> '''- Should be your career title. E.g. “Tennis”''' | ||
| + | |||
| + | |||
| + | Now that you have edited all your <STR> lines, you must edit the <KEY> lines. The <KEY> lines are just hashed versions of the <STR> lines. So for example this would be the first <KEY> and <STR> lines for my tennis career. | ||
| + | |||
| + | <KEY> 0x12DBAAB750E72C1F:</KEY> | ||
| + | <STR>Gameplay/Excel/Careers/CareerList:Tennis </STR> | ||
| + | |||
| + | To find the <KEY> number you need to go to “Tools” then “FNV Hash…” in S3PE which will open the FNV Hash Window. Now copy and paste the <STR> line, don’t include the actual “<STR>” or “</STR>” so copy and paste: Gameplay/Excel/Careers/CareerList:Tennis into the “Text to Hash” box in the FNV Hash window. Then press the “Calculate” button. This will then calculate the Hash code for your Text, which will appear in the FNV64 box. Now copy and paste this number into the <KEY> section. You now have to go down the whole list and do the same for every STR line, by filling in the KEY values. | ||
| + | |||
| + | |||
| + | Once you have finished editing all the code, save the notepad file but save it as: | ||
| + | “Strings [YourCareerTile] UnhashedKeys” For example this is my file for my Tennis career: | ||
| + | “Strings Tennis UnhashedKeys” | ||
| + | |||
| + | |||
| + | Once you have sorted the first strings file, there is also a second strings file which must be edited which is easier to edit than the last, so you can breathe a bit easier. This second string file is what determines what descriptions are shown in game. | ||
| + | |||
| + | |||
| + | Start by opening another Notepad file like before, and copy and paste the following code into the file: | ||
| + | |||
| + | |||
| + | All the <KEY> lines in this file are exactly the same as your <STR> lines from your “UnhashedKeys” string file, so the easiest way is to just open the two files side by side, and copy and paste the lines over. Remember to only copy and paste what’s in between the <STR> and </STR>. | ||
| + | |||
| + | |||
| + | Now the “BLANK”s in this new notepad file in between the <STR>’s are the actual descriptions that show up in game. I’ll make notes in bold for what these descriptions are as I did before. Also ill include an example of my tennis career underneath for you to compare if you are confused. | ||
| + | |||
| + | |||
| + | <KEY>Gameplay/Excel/Careers/CareerList:BLANK</KEY> | ||
| + | <STR>BLANK</STR> '''- Should be your career title. E.g. “Tennis”''' | ||
| + | <KEY>Gameplay/Careers/GetJobInRabbitHole:JoinCareerNoCareer</KEY> | ||
| + | <STR>BLANK</STR> '''- Should be your get job title. E.g. “Join Tennis Career”''' | ||
| + | <KEY>Gameplay/Excel/Careers/CareerList:BLANKsOffer</KEY> | ||
| + | <STR>BLANK</STR> '''- Should be your job offer description.''' | ||
| + | <KEY>Gameplay/Excel/Careers/BLANK:BLANK</KEY> | ||
| + | <STR>BLANK</STR> '''- Should be your co-workers title. E.g. “Fellow Athlete”''' | ||
| + | <KEY>Gameplay/Excel/Careers/BLANK:BLANK</KEY> | ||
| + | <STR>BLANK</STR> '''- Should be your co-workers metric title. E.g. “Athletes”''' | ||
| + | <KEY>BLANKTone.BLANKCareerBLANK</KEY> | ||
| + | <STR>BLANK</STR> '''- Should be your 1st skill booster tone tile. E.g. “Practice Athletic”''' | ||
| + | <KEY>BLANKTone.BLANKCareerBLANKDescription</KEY> | ||
| + | <STR>BLANK</STR> '''- Should be your 1st skill booster tone description.''' | ||
| + | '''This is where you add any extra skill booster tones and descriptions using the same format, that is if you have added any extra in the other stings file.''' | ||
| + | <KEY>Gameplay/Excel/Careers/CareerList:BLANK</KEY> | ||
| + | <STR>BLANK</STR> '''- Should be your 1st tone tile. E.g. “Meet Fellow Athletes”''' | ||
| + | <KEY>Gameplay/Excel/Careers/CareerList:BLANKDescription</KEY> | ||
| + | <STR>BLANK</STR> '''- Should be your 1st tone description.''' | ||
| + | <KEY>Gameplay/Excel/Careers/CareerList:BLANK</KEY> | ||
| + | <STR>BLANK</STR> '''- Should be your 2nd tone tile. E.g. “Hang with Athletes”''' | ||
| + | <KEY>Gameplay/Excel/Careers/CareerList:BLANKDescription</KEY> | ||
| + | <STR>BLANK</STR> '''- Should be your 2nd tone description.''' | ||
| + | '''This is where you add extra tones and descriptions using the same format if you have any.''' | ||
| + | '''This next part is where all the career titles are added followed by the promotion descriptions for males, and females starting with the entry level going up to level 10.''' | ||
| + | '''If you wish the description to be the same for both male, and female sims, then simple use the same text.''' | ||
| + | <KEY>Gameplay/Excel/Careers/BLANK:BLANK</KEY> | ||
| + | <STR>BLANK</STR> '''- Should be your 1st job title. E.g “Racquet Cleaner”''' | ||
| + | <KEY>Gameplay/Excel/Careers/BLANK:EntryLevel</KEY> | ||
| + | <STR>BLANK</STR> '''- Should be your 1st job description for a male sim. (Entry level description)''' | ||
| + | <KEY>Gameplay/Excel/Careers/BLANK:EntryLevel_Female</KEY> | ||
| + | <STR>BLANK</STR> '''- Should be your 1st job description for a female sim. (Entry level description)''' | ||
| + | <KEY>Gameplay/Excel/Careers/BLANK:BLANK</KEY> | ||
| + | <STR>BLANK</STR> '''- Should be your 2nd job title. E.g “Ball Boy”''' | ||
| + | <KEY>Gameplay/Excel/Careers/BLANK:PromotionLevel2</KEY> | ||
| + | <STR>BLANK</STR> '''- Should be your 2nd job description for a male sim.''' | ||
| + | <KEY>Gameplay/Excel/Careers/BLANK:PromotionLevel2_Female</KEY> | ||
| + | <STR>BLANK</STR> '''- Should be your 2nd job description for a female sim.''' | ||
| + | '''Carry on down the list adding the job titles and descriptions per career level.''' | ||
| + | <KEY>Gameplay/Excel/Careers/BLANK:BLANK</KEY> | ||
| + | <STR>BLANK</STR> | ||
| + | <KEY>Gameplay/Excel/Careers/BLANK:PromotionLevel3</KEY> | ||
| + | <STR>BLANK</STR> | ||
| + | <KEY>Gameplay/Excel/Careers/BLANK:PromotionLevel3_Female</KEY> | ||
| + | <STR>BLANK</STR> | ||
| + | <KEY>Gameplay/Excel/Careers/BLANK:BLANK</KEY> | ||
| + | <STR>BLANK</STR> | ||
| + | <KEY>Gameplay/Excel/Careers/BLANK:PromotionLevel4</KEY> | ||
| + | <STR>BLANK</STR> | ||
| + | <KEY>Gameplay/Excel/Careers/BLANK:PromotionLevel4_Female</KEY> | ||
| + | <STR>BLANK</STR> | ||
| + | <KEY>Gameplay/Excel/Careers/BLANK:BLANK</KEY> | ||
| + | <STR>BLANK</STR> | ||
| + | <KEY>Gameplay/Excel/Careers/BLANK:PromotionLevel5</KEY> | ||
| + | <STR>BLANK</STR> | ||
| + | <KEY>Gameplay/Excel/Careers/BLANK:PromotionLevel5_Female</KEY> | ||
| + | <STR>BLANK</STR> | ||
| + | <KEY>Gameplay/Excel/Careers/BLANK:BLANK</KEY> | ||
| + | <STR>BLANK</STR> | ||
| + | <KEY>Gameplay/Excel/Careers/BLANK:PromotionLevel6</KEY> | ||
| + | <STR>BLANK</STR> | ||
| + | <KEY>Gameplay/Excel/Careers/BLANK:PromotionLevel6_Female</KEY> | ||
| + | <STR>BLANK</STR> | ||
| + | <KEY>Gameplay/Excel/Careers/BLANK:BLANK</KEY> | ||
| + | <STR>BLANK</STR> | ||
| + | <KEY>Gameplay/Excel/Careers/BLANK:PromotionLevel7</KEY> | ||
| + | <STR>BLANK</STR> | ||
| + | <KEY>Gameplay/Excel/Careers/BLANK:PromotionLevel7_Female</KEY> | ||
| + | <STR>BLANK</STR> | ||
| + | <KEY>Gameplay/Excel/Careers/BLANK:BLANK</KEY> | ||
| + | <STR>BLANK</STR> | ||
| + | <KEY>Gameplay/Excel/Careers/BLANK:PromotionLevel8</KEY> | ||
| + | <STR>BLANK</STR> | ||
| + | <KEY>Gameplay/Excel/Careers/BLANK:PromotionLevel8_Female</KEY> | ||
| + | <STR>BLANK</STR> | ||
| + | <KEY>Gameplay/Excel/Careers/BLANK:BLANK</KEY> | ||
| + | <STR>BLANK</STR> | ||
| + | <KEY>Gameplay/Excel/Careers/BLANK:PromotionLevel9</KEY> | ||
| + | <STR>BLANK</STR> | ||
| + | <KEY>Gameplay/Excel/Careers/BLANK:PromotionLevel9_Female</KEY> | ||
| + | <STR>BLANK</STR> | ||
| + | <KEY>Gameplay/Excel/Careers/BLANK:BLANK</KEY> | ||
| + | <STR>BLANK</STR> | ||
| + | <KEY>Gameplay/Excel/Careers/BLANK:PromotionLevel10</KEY> | ||
| + | <STR>BLANK</STR> | ||
| + | <KEY>Gameplay/Excel/Careers/BLANK:PromotionLevel10_Female</KEY> | ||
| + | <STR>BLANK</STR> | ||
| + | |||
| + | |||
| + | Once you have finished editing this string file, make sure you save in notepad, then rename the file if you haven’t already to “Strings [YourCareerTitle] English” for example my tennis career file is called “Strings Tennis English”. | ||
| + | |||
| + | |||
| + | '''Step: 3– The STBL Creator:''' | ||
| + | |||
| + | Once you have your two string files completed, you need to now use the STBL creator program which you downloaded at the start of the guide. To use this program you have to drag each strings file that you have made one by one onto the STBL.exe program. This creates a new file with the same name as your strings file but in STBL format. | ||
| + | |||
| + | Example screen shots: | ||
| + | |||
| + | 1) Both string files are in .txt format. | ||
| + | |||
| + | [[File:STBLCreator1.png]] | ||
| + | |||
| + | |||
| + | |||
| + | 2) Drag first string file onto the STBL.exe | ||
| + | |||
| + | [[File:STBLCreator2.png]] | ||
| + | |||
| + | |||
| + | |||
| + | 3) A copy of the strings file is created in STBL format. | ||
| + | |||
| + | [[File:STBLCreator3.png]] | ||
| + | |||
| + | |||
| + | |||
| + | 4) Drag second string file onto the STBL.exe | ||
| + | |||
| + | [[File:STBLCreator4.png]] | ||
| + | |||
| + | |||
| + | |||
| + | 5) Both string files now have a copy in STBL format. | ||
| + | |||
| + | [[File:STBLCreator5.png]] | ||
| + | |||
| + | |||
| + | '''Step: 4– Replacing the Blank String files:''' | ||
| + | |||
| + | Now that you have your string files in STBL format you need to replace the “Strings Blank English” and “Strings Blank UnhashedKeys” in your career package in S3PE. | ||
| + | |||
| + | To do this first “Right click” on the “Strings Blank English” file then select “Replace” and browse for your “Strings [YourCareerTile] English.stbl” so for my tennis career I would browse for my “Strings Tennis English.stbl” file then select “Open” to replace the blank file with your edited file. | ||
| + | |||
| + | |||
| + | '''Note: Make sure that you select the .stbl file not the .txt file when replacing.''' | ||
| + | |||
| + | |||
| + | Once you have replaced the file, you need to double click it again in S3PE which should open up the “Resource Details” window. Then press the FNV64 button to change the instance name to the hash version of your file. | ||
| + | |||
| + | |||
| + | Now because this is an English language file before you select “Ok” you need to delete the first two characters of the instance name and replace them with “00”. If your file is in a different language then the two numbers you must replace are different. | ||
| + | |||
| + | |||
| + | This is the FNV64 instance value for “Strings Tennis English”: 0x943DD0754861401E | ||
| + | |||
| + | |||
| + | So for example you would need to change this “0x943DD0754861401E” to “0x003DD0754861401E” so you can see I have changed the 94 to 00 at the start of the value. You must do this for your instance name. You can then click “Ok” to save the changes. | ||
| + | |||
| + | These are the numbers for different languages: | ||
| + | |||
| + | English = 00 | ||
| + | |||
| + | Chinese = 01 | ||
| + | |||
| + | Taiwanese = 02 | ||
| + | |||
| + | Czech = 03 | ||
| + | |||
| + | Danish = 04 | ||
| + | |||
| + | Dutch = 05 | ||
| + | |||
| + | Finnish = 06 | ||
| + | |||
| + | French = 07 | ||
| + | |||
| + | German = 08 | ||
| + | |||
| + | Greek = 09 | ||
| + | |||
| + | Hungarian = 0A | ||
| + | |||
| + | Italian = 0B | ||
| + | |||
| + | Japanese = 0C | ||
| + | |||
| + | Korean = 0D | ||
| + | |||
| + | Norwegian = 0E | ||
| + | |||
| + | Polish = 0F | ||
| + | |||
| + | PortugueseStandard = 10 | ||
| + | |||
| + | PortugueseBrazillian = 11 | ||
| + | |||
| + | Russian = 12 | ||
| + | |||
| + | SpanishStandard = 13 | ||
| + | |||
| + | SpanishMexican = 14 | ||
| + | |||
| + | Swedish = 15 | ||
| + | |||
| + | Thai = 16 | ||
| + | |||
| + | |||
| + | |||
| + | If you want your career package to support more than one language simply create a second strings file, containing the other language descriptions etc, and just as before use the stbl creator to convert the file. Then import the file into your package so you would have 2 string files. You can add every language if you wish that is supported on the list so you would have multiple string files in your package. | ||
| + | |||
| + | Now you need to replace the UnhashedKeys string file, to do this first “Right click” on the “Strings Blank UnhashedKeys” file then select “Replace” and browse for your “Strings [YourCareerTile] UnhashedKeys.stbl” so for my tennis career I would browse for my “Strings Tennis UnhashedKeys.stbl” file then select “Open” to replace the blank file with your edited file. You DO NOT need to replace the instance name for this file, so simply select “Ok” to accept the changes. | ||
| + | |||
| + | |||
| + | Now you need to “File” -> “Save” in S3PE to save all the changes you have made in S3PE to your package. | ||
| + | |||
| + | |||
| + | |||
| + | '''Step: 5 – Join Career title:''' | ||
| + | |||
| + | You have almost finished! Just a couple of small changes that need to be done now. | ||
| + | |||
| + | Start by closing down S3PE, now there’s two files you must place in the “Packages” folder you created earlier in this directory: “C:\Users\[YOURNAME]\Documents\Electronic Arts\The Sims 3\Mods\Packages” | ||
| + | |||
| + | You need to place your career .package and the career loader file that you downloaded in this folder. | ||
| + | |||
| + | Now run your Sims 3 game, and start playing with your character. When you go to the place of work where you would join your custom career, so for example when I click on the “Stadium” for my tennis career, you will notice it says: JoinCareer[RandomNumbers] | ||
| + | You need to make a note of these numbers! | ||
| + | |||
| + | |||
| + | Now close down your game, and open up your career .package file in S3PE again. Then go to “Tools” -> “FNV Hash” and in the FNV Hash window type: Gameplay/Careers/GetJobInRabbitHole:JoinCareer[YourNumbers] into the Text to Hash box. For example for my tennis career I would type: | ||
| + | |||
| + | |||
| + | Gameplay/Careers/GetJobInRabbitHole:JoinCareer842901641372242208 | ||
| + | |||
| + | |||
| + | Then press the “Calculate” button and make a note of the FNV64 value that appears. | ||
| + | |||
| + | |||
| + | Go back to S3PE and “Right click” on your UnhashedKeys string file, then go to “Edit STBL” this brings up the “STBL Resource Editor” window. Click on the second file in the left list, this should show: Gameplay/Careers/GetJobInRabbitHole:JoinCareerNoCareer in the right window and the value in the bottom box. You now need to replace the “NoCareer” part with your JoinCareer number that you wrote down from in game, and replace the value in the bottom to your FNV64 value that you wrote down too. | ||
| + | |||
| + | |||
| + | Then click “Save”, and “File” -> “Save” in S3PE to save the overall changes again to the package. | ||
| + | |||
| + | |||
| + | '''Congratulations you have made a custom career! Run your game and your career should function as normal!''' | ||
| + | |||
| + | |||
| + | |||
| + | |||
| + | |||
| + | == '''Credits.''' == | ||
| + | |||
| + | |||
| + | All credit goes to the creators of S3PE and twallan at NRaas Industries for creating the programs as I did not create them, I simply use them. I just put together the guide. | ||
| + | Please visit the NRaas Industries site as they have many more Mods and useful programs available: | ||
| + | |||
| + | |||
| + | [http://nraas.wikispaces.com/ NRaas Industries Site Link] | ||
| + | |||
| + | |||
| + | Happy Modding hope this tutorial can at least help someone! Any comments, bugs or suggestions please message me and I will update if possible. | ||
| + | |||
| + | |||
| + | Creon | ||
Revision as of 11:37, 24 February 2012
Contents |
Welcome!
Welcome! I decided to write this guide, as I don’t see any proper easy to read and understand guide on career modding. This guide is quite long but I’ve tried to use understandable language for beginners so everything is fully explained. I’m still very much new to this myself and I take no credit for building any of the programs etc, in this guide; I am simply putting all the information together that I have learned from various places and some trial and error by myself to hopefully make it more understandable for anyone who wishes to do this.
What does this guide attempt to explain?
This guide attempts to explain how to create a basic completely new rabbit hole career to your Sims 3 game.
What operating system am I working on?
I’m working on Windows 7 and so I’m sorry to all you Mac users and anyone else that this guide won’t apply to, as I have no idea if this will work on other systems. I did have quite a few messages about careers from Mac users in the past, so if anyone wants to translate this guide for other systems, feel free.
WARNING! – I TAKE NO RESPONICIBILITY FOR YOU BREAKING YOUR GAME, BUT IF YOU FOLLOW CORRECTLY YOU SHOULD BE FINE!
Terminology
What is a rabbit hole career?
A rabbit hole career is a career where your sim travels to work and enters a building, where he/she works for a set time period before returning home. Rabbit hole careers differ from the self-employed career added by the Ambitions expansion, because you cannot see what your sim is doing at work. They simply enter the building for a time period, leave with a pay cheque and return home.
What’s a .package file?
A .package file is the file used by the Sims games, and contains a lot of the game information.
Sims Career Planning.
Note before you start: If you have never coded before you should take note that letter case, and spaces make a difference in the code, so “MyCareer” is different from “myCareer” or “My Career” for example!
Step: 1 – Ideas:
It’s all well and good wanting to make a new career in the Sims 3, but just the basic concept of a new career can stop you from proceeding. Before you even begin to mod, you need to have some starting plan of what this new career shall be about. (Google Sims Career Ideas if you’re really stuck hehe) The best thing to do at this point is open up a new notepad file and start writing down the basis for what this new career will involve. This is not just for planning purposes but it makes the modding stages later easier, by having the information at hand.
Note: For this whole tutorial I will make a Tennis Career for the Stadium as an example.
If you would like to download my Tennis Career file for comparison or to use, you can download it here: Tennis Career Download Link
You will need to decide the following and write them down in your notepad file, I have included screenshots to show where the text will appear in game:
Step: 2 –The basics:
Career Title – This will be the title that you will use in game, such as “Criminal” or “Professional Sports” I will use “Tennis” as my title. Do not put “career” after the title for example don’t put “Tennis Career”, this is because of a description text which will look very odd. (See Second Screen shot)
This is where the title will be used in game:
This is why you should not put “Career” after the title, as the description automatically adds career after your title. If you did put “Career” as part of your title then it would come out as “Tennis Career career!” in this description.
Career Wages – This is a list of the wages that the sim will receive per hour, when working at each level of the career. Each level represents a level of promotion, with level 1 being the starting wage when you first join that career.
Here’s an example of my Tennis Career wages:
Wages:
1:$17/hour
2:$30/hour
3:$40/hour
4:$62/hour
5:$80/hour
6:$150/hour
7:$250/hour
8:$320/hour
9:$520/hour
10:$750/hour
Career Retirement Wage – This is the wage a sim will be paid each day when they are retired from the career. Again this is similar to the wage but paid per day not hour.
Here’s an example of my Tennis Career retirement wages:
Retirement Wage:
1:$40
2:$66
3:$80
4:$120
5:$160
6:$220
7:$350
8:$420
9:$700
10:$1200
Wake up times – This is the time your sims will be woken up if sleeping, by an alarm clock and is in 24hr clock format (E.g. 9 o’clock is 21). This is normally set 2 hours before your work start time. You will need one for each level in the career.
Here’s an example of my Tennis Career Wake up times:
Wake up times:
1:8
2:8
3:8
4:7
5:7
6:6
7:6
8:6
9:6
10:6
Work start time – This is the time that your sims start work at each promotion level. Again like the other settings you will need one for each level in the career.
Here’s an example of my Tennis Career work start times:
Start times:
1:10
2:10
3:10
4:9
5:9
6:8
7:8
8:8
9:8
10:8
Day length – This is the length that your sims work for each day when they start work in hours, you can have half hours too.
Here’s an example of my Tennis Career Day lengths:
Day lengths:
1:7.5
2:7
3:7
4:7
5:7
6:6
7:6
8:6
9:5
10:5
Days To Work – These are the days that your sim has to work. Days should be wrote in this format in capitals with no spaces, separated by commas: M,T,W,R,F,S,U
M = Monday
T = Tuesday
W = Wednesday
R = Thursday
F = Friday
S = Saturday
U = Sunday
So if you wish your sim to work on Monday, Tuesday, Thursday, Friday, Sunday for example, you would put: M,T,R,F,U
Here’s an example of my Tennis Career Work days:
Day lengths:
1: W,R,F,S,U
2: W,R,F,S,U
3: W,R,F,S,U
4: M,T,W,R,F
5: M,T,W,R,F
6: M,T,W,R,F
7: M,T,R,F
8: M,T,R,F
9: M,T,R,F
10: M,T,R,F
Car pool types – These are the cars that come to pick your sim up to go to work. They range from cheap cars up to the limo, and are set per promotion level. You need to decide what cars you want your sim to be picked up in at each level.
The car types you can choose from are as follows:
CarBusSchool
CarExpensive1
CarExpensive2
CarHatchback
CarLimoBlue
CarLimoPink
CarLimoWhite
CarNormal1
CarPickup2door
CarPolice
CarSedan
CarServiceFiretruck
CarSports
CarUsed1
CarUsed2
CarVan4door
Limo
Taxi
I recommend using the CarUsed 1 & 2 in lower down levels working up to CarNormal1, and CarExpensive1 & 2 later on with final level careers using the Limo, but it’s entirely up to you.
Here’s an example of my Tennis Cars used per promotion level:
1:CarUsed2
2: CarUsed2
3:CarHatchback
4:CarHatchback
5:CarNormal1
6:CarNormal1
7:CarExpensive2
8:CarExpensive2
9:CarExpensive1
10:Limo
Career Job Titles – These are the titles that your Sims receive at each level in the career:
Here’s an example of my Tennis Careers Job titles:
Job Titles per Level:
1:Racquet Cleaner
2:Ball Boy
3:Lines Man
4:Tennis Assistant
5:Beginner Tennis
6:Professional Player
7:Challenger Tour Player
8:250 and 500 Series Player
9:Master 1000 Entry
10:Grand Slam Champion
Note: Some characters don’t work in the job titles such as the & symbol, and an apostrophe ’ which produce errors, you can use the apostrophe if you are working in notepad, but not word.
Career Job Descriptions – These are the descriptions that pop up when your sim is promoted, and also when you hover over the job level title. You need to have an Entry level description this is just the description for level 1 in the career when your sim first joins, and also a promotion level description for every level including level 10:
Examples from my Tennis Career:
Entry level Description: This is the description that is used when you first join the career at job level 1.
Example of promotion level 2: This is the description used on the second level in the career, and also pops up in the promotion box, when your sim earns the promotion. (Same format for promotion 2 – 10)
Get Job title – This is the title that appears when you click on the building where your sim goes to join the career. For example “Join Tennis Career”
Job Offer – This is the description for the career that appears when your sim goes to join the career. Tennis career example: “Think you have what it takes to swing a racquet? Dream of playing with the mega sporting heroes? Then a career in tennis could be for you!”
Co-Worker title – This is the text that appears when you hover over a co-worker in the relationships panel. Tennis career example: “Fellow Athlete”
Co-Worker Metric title – This is the title that your co-workers will appear as in the careers menu, when they show up as a requirement for promotion. Tennis career example “Athletes”
Tones - The next thing you need to decide are what tones your career will have. You are probably asking what the hell is a tone? Well tones are the attributes assigned to the career, when your sim is working. The screen shot of the professional sports career tones below explains this better:
The standard tones that are usually used are:
• Business as Usual – Normal work and effort.
• Work Hard – Hard work but extra stress (Decreases Fun mood).
• Take it easy – Decreases stress.
• Meet co-workers – Lets the sim meet co-workers if available.
• Hang with co-workers – Gives the sim increased relationship with co-workers.
• Suck up to boss – Gives the sim increased relationship with his boss, if he has a boss.
• “A Skill booster tone” – This is normally a tone that increases a skill related to the job promotion need. So on the professional sports screen shot for example, it says “Work Out In Gym” which is a skill booster tone as this increases the Athletic skill needed for the professional sports career.
Each tone also has a description that pops up at the side when you hover over with your cursor. These are the tones and their descriptions for my Tennis career:
Note: I don’t think it’s possible to NOT use the “Business as Usual” tone, which means this will always be the first tone that is used for any career. You can change any others.
Business as Usual - (Standard)
Work Hard – (Standard)
Take it Easy – (Standard)
Meet fellow Athletes – (Lets your sim meet co-workers)
Hang with Athletes – (Increases relationship with co-workers)
Practice Athletic – (Increases your Athletic skill which is relevant to what the sim needs for promotion)
You now need to write down what you want your career tones to be, with both titles and descriptions, but I suggest you don’t make too many, and normally include one “skill booster tone” depending on what skill or skills your career will require for promotion. You can of course just use the standard tones.
Work Boss – The career you make can have either a boss or no boss for your sim. You need to decide whether you want any sims that join your career to have a boss, as it is needed later if you wish to include it as a requirement for promotion, as some careers you must have a good relationship with your sims boss to improve. This is not essential so it’s up to you. This can also be added as a tone such as suck up to boss.
Rabbit hole Type – This is the building where your sim goes to work and where your sim joins the career. You can choose any of the rabbit hole buildings that are used in the game by other careers.
Here’s a list of all the rabbit hole buildings you can set your career to and what jobs are already set there:
• Bookstore = (Part time job)
• BusinessAndJournalism = (Corporate tower, Business & Journalism)
• CityHall = (Self-employed careers & Political Career)
• Clothing
• ComboBookstoreDaySpa = (From ambitions Bridgeport map, Part time job)
• ComboBusinessRestaurant = (From ambitions Bridgeport map, Business & Journalism Career)
• ComboCityhallPoliceMilitary = (From ambitions Bridgeport map, Military Career & Political Career)
• DaySpa = (Part time jobs)
• Grocery = (Part time jobs)
• Hideout = (Abandoned Factory, criminal career)
• Hospital = (Medical Career)
• Mausoleum = (Part time jobs)
• MilitaryBase = (Military Career)
• MovieSet = (From ambitions Bridgeport map, Acting Career)
• PoliceStation = (Law enforcement career)
• Restaurant = (Culinary career)
• School = (Education career)
• ScienceLab = (Science Career)
• Stadium = (Professional sports career)
• Subway
• Theatre = (Music Career)
For my tennis career, I chose the “Stadium” as my rabbit hole type. So that’s where my sim will travel to work, and where I can join the career.
Step: 3 – Check List:
Before we move on here’s a check list of what you should have done so far:
   1. Thought of a good career!
   2. Opened a notepad file, and wrote down all the basic information from above for your career.
Now you have the basics of your career, you can now move onto the setup stage.
Before you mod! – Setup Stage.
Step: 1 – Folders:
Before you mod you must make a "Mod\Packages" folder, this enables your game to recognise your new mods, in this case your new career mod. To do this, go to “C:\Users\[YOURNAME]\Documents\Electronic Arts\The Sims 3” and create a new folder called “Mods”, then create a sub-folder called “Packages” within the Mods folder.
So your new folder will look like this:
“C:\Users\[YOURNAME]\Documents\Electronic Arts\The Sims 3\Mods\Packages”
Step: 2 – Resource file:
Once you have created your folders you need a Resource.cfg file in your newly made “Mods” folder.
The Resource.cfg file can be downloaded here - Resource.cfg Download Link
Click “Save File”, DO NOT simply click Open. You should now have a “Mods” folder containing a Resource.cfg file, and a subfolder called “Packages” which is empty.
Note: The game will access any of your mods before it accesses the original files; this means that any changes you make to the original game should only be copies of the files, and not the actual originals. If you start modding your original files you could corrupt your game, and may have to re-install.
Step: 3 - Programs:
Before you can mod, you need a few programs if you havent already downloaded them from the Modding Careers Page you can get them here:
1: S3PE (Sims 3 Package Editor) – This allows you to open and read the contents of .package files, which are the files that the Sims games are made from.
2: STBL Creator – This program creates an STBL file containing all the strings used for your mod. (Strings are just the text used in game, like descriptions of objects for example.)
3: Career Loader Mod – This mod links your original game with your new career mod.
4: Bootstrap Creator – This mod also creates files needed for the new career mod.
5: An extractor program (WinRAR, WinZip) – This is just to extract downloaded files. (Don’t bother downloading this if you already have an extractor program installed)
Note: Simply use the links below to download the programs, making sure to “Save files” not open them. It’s useful at this point to create a folder on your desktop named “Sims3 Modding” or anything along those lines, so you don’t get confused with the programs, then you can save all the zip files and extract them in one place.
Program Download links:
1: S3PE - S3PE Download Link
2: STBL Creator - STBL Creator Download Link
3: Career Loader Mod - Career Loader Mod Download Link
4: Bootstrap Creator - Bootstrap Creator Download Link
5: WinRAR Extractor - WinRAR Extractor Download Link
If you have never used an extractor program before here’s a quick explanation: Download the S3PE, STBL Creator, Career Loader Mod and Bootstrap Creator, then “Right click” on each file, then select “Extract here” This will unpack the zipped downloaded files in the folder you are currently using.
Step: 4 – Check List:
Before we move on here’s a check list of what you should have done so far:
   1. Created a “Mods” and “Packages” folder in this directory “C:\Users\[YOURNAME]\Documents\Electronic Arts\The Sims 3\Mods\Packages”
   2. Added the “Resources.cfg” file to the “Mods” folder.
   3. Downloaded the follow programs, and extracted them from their Zip folders:
         S3PE (Sims 3 Package Editor)
         STBL Creator
         Career Loader Mod
         Bootstrap Creator[/INDENT]
You can now move onto creating the basic career.
Modding the .dll file, Pic files and .Careers file.
Step: 1 – Frame Work:
To make the whole modding process easier I have made a frame work which is just a blank career file that can be edited to become your new career. I recommend downloading this file to work from.
Blank Career: Blank Career file Download Link
Click "Save file" and save the file to any location, and extract it. (Right click "extract here" for example WinRaR)
Step: 2 – Changing the id instances:
Firstly you need to rename the extracted "Blank_Career.package" file to whatever you wish, for example my tennis career file is called "Tennis_Career.package"
We need to first change the id instance numbers for the new career, so that it does not conflict with any other careers, or any future careers you add. Each career has its own unique id instance number.
To do this open up the S3PE (Sims 3 Package Editor) program you downloaded earlier, and click “File” then "Open" on the tool bar, then browse for "[YourCareer].package" file you downloaded and re-named from step 1, I shall browse for my "Tennis_Career.package" file for example and open it up. You will notice that the S3PE program is split into two main windows, the left showing files within the package, and the right shows the code within the files if you select one.
You should see the following files within the package: (You can order the files by clicking the "Name", “Tag”, "Type" etc. bars at the top)
70214830780050.dll
70214830780050.dll
Blank.Careers
Blank.Tones
Strings Blank English
Strings Blank UnhashedKeys
Blank_Pic
Blank_Pic_s
Double click on the "Blank.Careers" file, which will open up the resource details menu. Then change the name to what you wish for your career. Mine shall be "Tennis.Careers". Now click the FNV64 button which will change the instance id to the value it should be for your changed name.
Do the same for the "Blank.Tones" file. (My tones file is called Tennis.Tones)
I recommend saving your progress now in S3PE by going to “File” -> “Save”.
Step: 3 - Creating a unique .dll file:
You must now create a unique .dll file. The “70214830780050.dll” file that came in the "Blank_Career.package" must be replaced, do this by running the "BootStrap program" that you downloaded earlier. It will generate a random numbered new dll file, which will be unique for your career.
Go back to yourcareer.package in S3PE and find the “70214830780050.dll” file that has a S3SA Tag.
Now "Right click" this file and select "Import DLL", now browse for your new created .dll file that was created by the bootstrap program.
You will be shown the following prompt:
Select “Yes” to continue. You will notice now in S3PE that the old .dll file has a line crossing it out, with the new file underneath:
This means that if you were to save the package you would be deleting the old file and keeping the new. Which I suggest you do now by going to “File” -> “Save”.
Now go back to your unique .dll file that was created by the Bootstrap and copy its full name. This includes the fullstop and dll extension) Easiest way to do this is to “Right click” then “Rename” and copy the whole name with “Ctrl + C”
Now head back into the S3PE program and double click on the first .dll file, which opens up the Resource Details menu again, now remove the “70214830780050.dll” name and paste in your copied .dll name (Ctrl + V) and press the FNV64 button which will change the instance id number to the hash version of your new name.
Then click “Ok” to save the changes.
Repeat the renaming for the second .dll file, by changing its name to your new unique .dll number, and pressing the FNV64 button. Again click “Ok” to save the changes.
Step: 4 – Editing your .dll file:
Now that you have changed the .dll names and instances, you can edit the file so it matches your career. Do this by selecting the [YourNumber].dll file that has a _XML Tag, then “Right click” and select “Notepad”. This will open the file in notepad allowing you to edit. The .dll file will contain the following code:
<?xml version="1.0"?>
<CareerFiles>
 <CareerFile>
   <Careers></Careers>
 </CareerFile>
 <CareerFile>
   <Careers>BLANK.Careers</Careers>
 </CareerFile>
 <ToneFile>
   <Tones></Tones>
 </ToneFile>
 <ToneFile>
   <Tones>BLANK.Tones</Tones>
 </ToneFile>
</CareerFiles>
You must now change the "BLANK"s in the code to match your career file. So for my tennis career I would change the “BLANK.Careers” to “Tennis.Careers” and “BLANK.Tones” to “Tennis.Tones”.
Once you have done this, save the file in notepad by going to “File” -> “Save” then closing down the file. You will then be prompted to "Commit Changes" again, so go ahead an press the "Yes" button, again the old .dll file has a line crossing it out, with the new file underneath. Now go to "File" -> "Save" in S3PE.
Step: 5 – Career Pictures: You now need to edit your career pictures, these are the small icons used in game. Within your .package file there should be two files: “Blank_Pic” & “Blank_Pic_s”
Blank_Pic is the larger picture icon that appears when your sim joins the career next to the speech bubble, and also when they are at work:
Example of my tennis career (Racquet and ball):
Joined the career bubble.
At work bubble.
The Blank_Pic_s is the small icon that is used in the careers information box:
Example of my tennis career (Racquet and ball small icon):
The best way to edit these files is to “Right click” them then go to “Export” -> “To file” and save them somewhere on your computer. You can then easily edit them in any image program, such as GIMP or paint for example. I would recommend not using paint, as you cannot delete the white background in paint whereas in GIMP you can have no background which looks a lot better in game, or else you end up with your picture in a white box.
If you wish to use GIMP (GNU Image Manipulation Program) you can download it here for free: GIMP Download Link
Note: When editing the images the white box is the maximum size your image can be. Your new image must fit into the same space as the white box in the Blank_Pic files, if it is any larger then it will not fit in game.
Once you have finished editing your Blank_Pic files, go back into your package file in S3PE and “Right click” each “Blank_Pic” file and click “Replace”, then choose your modified image files. You need to then rename the files to something matching your career by double clicking each one, which opens up the resource details window again, and changing the name then remember to click the FNV64 button to change the instance id.
For example my tennis pic files are called “Tennis_Pic” & “Tennis_Pic_s”.
Step: 5 – Editing the .Careers file:
The .Careers file contains a lot of information and makes up the bulk of the code for the career. Open the .career file in notepad by “Right clicking” then selecting “Notepad”.
Here’s the code that is within the .career file, most of the code is pretty obvious if you look at it closely; what you need to do is go down the code and replace all of the highlighted “BLANK” words with your own info. Don’t change anything else unless you know what you are doing.
I have added notes into the code which I have put in bold which is NOT part of the code!
To make this part easier to understand we can break it down into sections, so we shall first look at the top section which has some of the basic information for the career.
<?xml version="1.0"?>
<Careers>
 <CareerList>
   <CareerName></CareerName>
   <CareerDescription></CareerDescription>
   <OvertimeHours>2</OvertimeHours>
   <MissWorkPerf>-10</MissWorkPerf>
   <OvertimePerf>6</OvertimePerf>
   <MaxPerfFlow>14</MaxPerfFlow>
   <MinPerfFlow>-8</MinPerfFlow>
   <MaxPerfFlowMaxLevel>8</MaxPerfFlowMaxLevel>
   <MinPerfFlowMaxLevel>-10</MinPerfFlowMaxLevel>
   <BonusAmountInHours>12</BonusAmountInHours>
   <RaisePercent>0.15</RaisePercent>
   <RaisePercentMaxLevel>.1</RaisePercentMaxLevel>
   <RaiseChanceMin>.01</RaiseChanceMin>
   <RaiseChanceMax>.25</RaiseChanceMax>
   <FunStressPerHour>-5</FunStressPerHour>
   <MinCoworkers>BLANK</MinCoworkers> - Minimum number of co-workers your sim can have: e.g. “3”
   <MaxCoworkers>BLANK</MaxCoworkers> - Maximum number of co-workers your sim can have: e.g. “5”
   <WorkHardTone></WorkHardTone>
   <TakeItEasyTone></TakeItEasyTone>
   <MeetCoworkersTone></MeetCoworkersTone>
   <HangWithCoworkersTone></HangWithCoworkersTone>
   <SuckUpToBossTone></SuckUpToBossTone>
   <SleepAtWorkTone></SleepAtWorkTone>
   <ExtraTone1></ExtraTone1>
   <ExtraTone2></ExtraTone2>
   <ExtraTone3></ExtraTone3>
   <ExtraTone4></ExtraTone4>
   <ExtraTone5></ExtraTone5>
   <FullClassName></FullClassName>
   <Guid></Guid>
   <AltGuid></AltGuid>
   <TableName></TableName>
   <Text_JobOffer></Text_JobOffer>
   <Text_Retirement></Text_Retirement>
   <Text_BranchOffer></Text_BranchOffer>
   <Text_BranchName1></Text_BranchName1>
   <Text_BranchName2></Text_BranchName2>
   <SpeechBaloonImage></SpeechBaloonImage>
   <WorkInteractionIcon></WorkInteractionIcon>
   <Category>FullTime</Category>
   <DreamsAndPromisesIcon></DreamsAndPromisesIcon>
   <Topic></Topic>
   <LearnedInfoText></LearnedInfoText>
   <RabbitholeType></RabbitholeType>
   <CoworkerPool>BLANK</CoworkerPool> - Should be your co-workers name with Pool added. e.g. “AthletesPool”
 </CareerList>
 <CareerList>
   <CareerName>BLANK</CareerName> - Should be your career title: e.g. “Tennis”
   <CareerDescription></CareerDescription>
   <FunStressPerHour>-3</FunStressPerHour>
   <MinCoworkers>BLANK</MinCoworkers> - Minimum number of co-workers your sim can have: e.g. “3” same as above.
   <MaxCoworkers>BLANK</MaxCoworkers> - Maximum number of co-workers your sim can have: e.g. “5” same as above.
   <WorkHardTone>BLANK</WorkHardTone> - Either your new tone name, or a standard tone name. e.g. “WorkHard” for standard tone name, or for a non-standard something like “ExtraWork” for example.
   <TakeItEasyTone>BLANK</TakeItEasyTone> - Either your new tone name, or a standard tone name. e.g. “TakeItEasy” for standard tone name, or for a non-standard something like “SlackOffWork” for example.
   <MeetCoworkersTone>BLANK</MeetCoworkersTone> - Either your new tone name, or a standard tone name. e.g. “MeetCoworkers” for standard tone name, or for a non-standard something like “MeetFellowAthletes” for example.
   <HangWithCoworkersTone>BLANK</HangWithCoworkersTone> - Either your new tone name, or a standard tone name. e.g. “HangWithCoworkers” for standard tone name, or for a non-standard something like “HangWithFellowAthletes” for example.
   <FullClassName>Sims3.Gameplay.Careers.Music, Sims3GameplaySystems</FullClassName>
   <Guid>Music</Guid>
   <AltGuid>BLANK</AltGuid> - Should be your career title: e.g. “Tennis”
   <TableName>BLANK</TableName> - Should be your career title: e.g. “Tennis”
   <Text_JobOffer>BLANK</Text_JobOffer> - Should be your career title with Offer added: e.g. “TennisOffer”
   <Text_Retirement></Text_Retirement>
   <SpeechBaloonImage>Career School</SpeechBaloonImage>
   <WorkInteractionIcon>BLANK_Pic_s</WorkInteractionIcon> - Should be the name of your picture file: e.g. “Tennis_Pic_s”
   <Category>FullTime</Category>
   <DreamsAndPromisesIcon>BLANK_Pic</DreamsAndPromisesIcon> - Should be the name of your picture file: e.g. “Tennis_Pic”
   <Topic></Topic>
   <LearnedInfoText></LearnedInfoText>
   <RabbitholeType>BLANK</RabbitholeType> - Should be the name of the rabbit hole you wish to use: e.g. “Stadium”
 </CareerList>
 <BLANK> - Should be your career tile: e.g. “Tennis”
   <Title></Title>
   <BasePay></BasePay>
   <PensionPay></PensionPay>
   <WakeupTime></WakeupTime>
   <StartTime></StartTime>
   <DayLength></DayLength>
   <DaysToWork></DaysToWork>
   <HasBoss>BLANK</HasBoss> - Either “True” or “False” depending if you want your career to have a boss.
   <Level></Level>
   <BranchName>Base</BranchName>
   <BranchSource></BranchSource>
   <Metric1>Mood</Metric1>
   <Mappings1></Mappings1>
   <Args1></Args1>
   <Metric2></Metric2>
   <Mappings2></Mappings2>
   <Args2></Args2>
   <Metric3></Metric3>
   <Mappings3></Mappings3>
   <Args3></Args3>
   <Metric4></Metric4>
   <Mappings4></Mappings4>
   <Args4></Args4>
   <PromotionRewardData></PromotionRewardData>
   <ConsiderGiftingReward>0</ConsiderGiftingReward>
   <OutfitMale></OutfitMale>
   <OutfitFemale></OutfitFemale>
   <OutfitMaleElder></OutfitMaleElder>
   <OutfitFemaleElder></OutfitFemaleElder>
   <Text_Promotion></Text_Promotion>
   <Text_Promotion_Female></Text_Promotion_Female>
   <CarpoolType>Taxi</CarpoolType>
   <CoworkerTitle>BLANK</CoworkerTitle> - Should be your co-workers Title: e.g. “FellowAthletes”
   <CoworkerMetricTitle>BLANK</CoworkerMetricTitle> - Should be your co-workers metric Title: e.g. “Athletes”
 </BLANK> - Should be your career tile: e.g. “Tennis”
Step: 6 – Brew time:
Grab a cuppa tea :D
Step: 7 –Understanding Metrics:
Metrics are the requirements that your sim needs for promotion. You can have up to 4 metrics per job level at one time. If you still don’t know what I mean here’s some screen shots of different metric combinations:
You need to decide what metrics you want for your career at each level of promotion. Now to fit this into our code you need to know a few lines of code that either matches a “Mood” metric, “Skill” metric or a “Relationship” metric. You can also include odd metrics that are specific to certain careers, such as report writing or meetings held etc. but these are harder to implement.
For each metric you also have to define what is classed as “Awful”, “Normal” and “Outstanding” you do this by defining the mapping settings.
Mappings are defined as 3 different numbers; the first number represents what is classed as “Awful” the second figure is “Normal” and the last figure is classed as “Outstanding”
This is an example of a mood metric with mapping:
<Metric1>Sims3.Gameplay.Careers.MetricMood, Sims3GameplaySystems</Metric1>
<Mappings1>-500,0,50</Mappings1>
The first line means this is the first metric “<Metric1>” meaning it would appear at the top. The second line is “<Mappings1>” meaning that these mappings relate to metric 1, and the numbers -500, 0, 50 mean that a mood rating of -500 (Which is impossible) would be “awful”, a mood rating of 0 would be “normal”, and a mood rating of 50 would be “outstanding”. I believe that 100 is a full mood bar, and 0 is a completely empty mood bar.
Now for a skill metric you need an extra like of code here’s an example:
<Metric2>SkillX</Metric2>
<Mappings2>-2,0,3</Mappings2>
<Args2>Athletic</Args2>
The first line means it’s metric number 2 “<Metric2>” and is a skill “SkillX”.
The second line means that this mapping belongs to the metric 2, with “<Mappings2>” and the numbers -2,0,3 men that a skill level of -2 (which is impossible) is “awful”, skill level of 0 is “normal” and a skill level of 3 is “Outstanding”.
The third like “<Args2>” and “Athletic” means that skill would be the athletic skill, and relates to metric 2.
If you want to include a boss in your career, or a relationship with co-workers metric then this is the code:
Co-Workers relationship metric:
<Metric3>RelCoworkers</Metric3>
<Mappings3>-500,0,40</Mappings3>
Boss relationship metric:
<Metric3>RelBoss</Metric3>
<Mappings3>-500,0,40</Mappings3>
Again like the other metrics “<Metric3” means that this would be the third metric in the list, and RelBoss means that it’s a relationship with boss metric. The second line mappings again is “<Mappings3>” referring to this being the third metric, and the numbers -500,0,40 referring to the relationship between your sim and your boss. I believe that 0 is no relationship, and 100 is a full bar of relationship.
The reason minus figures are used, for example -2,0,3 on the skill metric, would be so that when you join the career you can have 0 skill levels in a skill and still be classed as “Normal” performance. The minus figure just means that you won’t start a career and suddenly have awful skill progression, and so get negative promotion instead of increasing.
Here’s an example from my Tennis career, this is the first level metrics which are the ones that your sim needs for promotion when they first join the career. The following code produces the metrics shown in the screen shots:
<Level>1</Level>
<Metric1>Sims3.Gameplay.Careers.MetricMood, Sims3GameplaySystems</Metric1>
<Mappings1>-500,0,50</Mappings1>
<Metric2>SkillX</Metric2>
<Mappings2>-2,0,3</Mappings2>
<Args2>Athletic</Args2>
<Metric3>RelBoss</Metric3>
<Mappings3>-500,0,40</Mappings3>
The mood metric is first and with a full mood bar my mood is classed as “Outstanding” as I need a mood of 50 or over to be classed as outstanding from the code “<Mappings1>-500,0,50</Mappings1>”.
The second on the list is the skill Athletic, which is classed as “Normal” as I’m only skill level 1. To be classed as outstanding I would need level 3 as shown by the screenshot of my skills, and is defined by the “<Mappings2>-2,0,3</Mappings2>” code.
The third is the boss relationship, which is also “Normal” as defined by the “<Mappings3>-500,0,40</Mappings3>” code, as I have yet to befriend my boss.
Note: Remember you can add up to 4 metrics, by just adding the extra code for whatever you wish the other metric to be. You can also change the metrics around to be whatever you wish so you could just have 4 skills for example without mood, or relationships, or even just 1 metric.
Step: 8 – Editing the 2nd part of the .Careers file:
Ok so if you haven’t been swamped to death by code, here’s the second part of the careers file. This section represents the code for the promotion levels for the career. If you look at the code you can see it’s broken into small sections like this:
<BLANK>
   <Title>BLANK</Title>
   <BasePay>BLANK</BasePay>
   <PensionPay>BLANK</PensionPay>
   <WakeupTime>BLANK</WakeupTime>
   <StartTime>BLANK</StartTime>
   <DayLength>BLANK</DayLength>
   <DaysToWork>M,T,W,R,F,S,U</DaysToWork>
   <Level>1</Level>
   <Metric1>BLANK</Metric1>
   <Mappings1>BLANK</Mappings1>
   <Metric2>BLANK</Metric2>
   <Mappings2>BLANK</Mappings2>
   <Args2>BLANK</Args2>
   <Metric3>BLANK</Metric3>
   <Mappings3>BLANK</Mappings3>
   <Text_Promotion>Entrylevel</Text_Promotion>
   <Text_Promotion_Female>EntryLevel_Female</Text_Promotion_Female>
   <CarpoolType>BLANK</CarpoolType>
</BLANK>
There’s a total of 10 sections representing the 10 levels of promotion within the career, with the first being the starting level when you join the career. For this part you will need to have your notepad information that you wrote down earlier.
Here’s an example of my first level of my Tennis career:
<Tennis>
   <Title>RacquetCleaner</Title>
   <BasePay>17</BasePay>
   <PensionPay>40</PensionPay>
   <WakeupTime>8</WakeupTime>
   <StartTime>10</StartTime>
   <DayLength>7.5</DayLength>
   <DaysToWork>W,R,F,S,U</DaysToWork>
   <Level>1</Level>
   <Metric1>Sims3.Gameplay.Careers.MetricMood, Sims3GameplaySystems</Metric1>
   <Mappings1>-500,0,50</Mappings1>
   <Metric2>SkillX</Metric2>
   <Mappings2>-2,0,3</Mappings2>
   <Args2>Athletic</Args2>
   <Metric3>RelBoss</Metric3>
   <Mappings3>-500,0,40</Mappings3>
   <Text_Promotion>Entrylevel</Text_Promotion>
   <Text_Promotion_Female>EntryLevel_Female</Text_Promotion_Female>
   <CarpoolType>CarUsed2</CarpoolType>
</Tennis>
Now go down the code, and replace all the “BLANK”s with your information for each promotion level, I will add notes for the first level of promotion. Remember to “Save” in notepad, then “File -> Save” in S3PE and click “Yes” to commit the changes when prompted once you have finished editing your .Careers file.
Notes are again added in bold and are NOT part of the code!
<BLANK> - Should be your career tile: e.g. “Tennis”
   <Title>BLANK</Title> - Should be your careers first promotion title e.g. “RacquetCleaner”
   <BasePay>BLANK</BasePay> - Should be the pay for the first career level. e.g. “17”
   <PensionPay>BLANK</PensionPay> - Should be the retirement wage for the first career level. e.g. “40”
   <WakeupTime>BLANK</WakeupTime> - Should be the wake up time for the first career level. e.g. “8”
   <StartTime>BLANK</StartTime> - Should be the start work time for the first career level. e.g. “10”
   <DayLength>BLANK</DayLength> - Should be the day length time for the first career level. e.g. “7.5”
   <DaysToWork>M,T,W,R,F,S,U</DaysToWork> - Change depending on what days you want your sim to work.
   <Level>1</Level>
   <Metric1>BLANK</Metric1> - These are the metrics that you can alter depending what you want the requirements for promotion to be. Add or delete them as you see fit.
   <Mappings1>BLANK</Mappings1>
   <Metric2>BLANK</Metric2>
   <Mappings2>BLANK</Mappings2>
   <Args2>BLANK</Args2>
   <Metric3>BLANK</Metric3>
   <Mappings3>BLANK</Mappings3>
   <Text_Promotion>Entrylevel</Text_Promotion>
   <Text_Promotion_Female>EntryLevel_Female</Text_Promotion_Female>
   <CarpoolType>BLANK</CarpoolType> - Should be your car type you want for the first career level. e.g. “CarUsed2”
 </BLANK> - Should be your career tile: e.g. “Tennis”
 <BLANK>
   <Title>BLANK</Title>
   <BasePay>BLANK</BasePay>
   <PensionPay>BLANK</PensionPay>
   <WakeupTime>BLANK</WakeupTime>
   <StartTime>BLANK</StartTime>
   <DayLength>BLANK</DayLength>
   <DaysToWork>M,T,W,R,F,S,U</DaysToWork>
   <Level>2</Level>
   <Metric1>BLANK</Metric1>
   <Mappings1>BLANK</Mappings1>
   <Metric2>BLANK</Metric2>
   <Mappings2>BLANK</Mappings2>
   <Args2>BLANK</Args2>
   <Metric3>BLANK</Metric3>
   <Mappings3>BLANK</Mappings3>
   <Text_Promotion>PromotionLevel2</Text_Promotion>
   <Text_Promotion_Female>PromotionLevel2_Female</Text_Promotion_Female>
   <CarpoolType>BLANK</CarpoolType>
 </BLANK>
 <BLANK>
   <Title>BLANK</Title>
   <BasePay>BLANK</BasePay>
   <PensionPay>BLANK</PensionPay>
   <WakeupTime>BLANK</WakeupTime>
   <StartTime>BLANK</StartTime>
   <DayLength>BLANK</DayLength>
   <DaysToWork>M,T,W,R,F,S,U</DaysToWork>
   <Level>3</Level>
   <Metric1>BLANK</Metric1>
   <Mappings1>BLANK</Mappings1>
   <Metric2>BLANK</Metric2>
   <Mappings2>BLANK</Mappings2>
   <Args2>BLANK</Args2>
   <Metric3>BLANK</Metric3>
   <Mappings3>BLANK</Mappings3>
   <Text_Promotion>PromotionLevel3</Text_Promotion>
   <Text_Promotion_Female>PromotionLevel3_Female</Text_Promotion_Female>
   <CarpoolType>BLANK</CarpoolType>
 </BLANK>
 <BLANK>
   <Title>BLANK</Title>
   <BasePay>BLANK</BasePay>
   <PensionPay>BLANK</PensionPay>
   <WakeupTime>BLANK</WakeupTime>
   <StartTime>BLANK</StartTime>
   <DayLength>BLANK</DayLength>
   <DaysToWork>M,T,W,R,F,S,U</DaysToWork>
   <Level>4</Level>
   <Metric1>BLANK</Metric1>
   <Mappings1>BLANK</Mappings1>
   <Metric2>BLANK</Metric2>
   <Mappings2>BLANK</Mappings2>
   <Args2>BLANK</Args2>
   <Metric3>BLANK</Metric3>
   <Mappings3>BLANK</Mappings3>
   <Text_Promotion>PromotionLevel4</Text_Promotion>
   <Text_Promotion_Female>promotionLevel4_Female</Text_Promotion_Female>
   <CarpoolType>BLANK</CarpoolType>
 </BLANK>
 <BLANK>
   <Title>BLANK</Title>
   <BasePay>BLANK</BasePay>
   <PensionPay>BLANK</PensionPay>
   <WakeupTime>BLANK</WakeupTime>
   <StartTime>BLANK</StartTime>
   <DayLength>BLANK</DayLength>
   <DaysToWork>M,T,W,R,F,S,U</DaysToWork>
   <Level>5</Level>
   <Metric1>BLANK</Metric1>
   <Mappings1>BLANK</Mappings1>
   <Metric2>BLANK</Metric2>
   <Mappings2>BLANK</Mappings2>
   <Args2>BLANK</Args2>
   <Metric3>BLANK</Metric3>
   <Mappings3>BLANK</Mappings3>
   <Text_Promotion>promotionLevel5</Text_Promotion>
   <Text_Promotion_Female>PromotionLevel5_Female</Text_Promotion_Female>
   <CarpoolType>BLANK</CarpoolType>
 </BLANK>
 <BLANK>
   <Title>BLANK</Title>
   <BasePay>BLANK</BasePay>
   <PensionPay>BLANK</PensionPay>
   <WakeupTime>BLANK</WakeupTime>
   <StartTime>BLANK</StartTime>
   <DayLength>BLANK</DayLength>
   <DaysToWork>M,T,W,R,F,S,U</DaysToWork>
   <Level>6</Level>
   <Metric1>BLANK</Metric1>
   <Mappings1>BLANK</Mappings1>
   <Metric2>BLANK</Metric2>
   <Mappings2>BLANK</Mappings2>
   <Args2>BLANK</Args2>
   <Metric3>BLANK</Metric3>
   <Mappings3>BLANK</Mappings3>
   <Text_Promotion>promotionLevel6</Text_Promotion>
   <Text_Promotion_Female>PromotionLevel6_Female</Text_Promotion_Female>
   <CarpoolType>BLANK</CarpoolType>
 </BLANK>
 <BLANK>
   <Title>BLANK</Title>
   <BasePay>BLANK</BasePay>
   <PensionPay>BLANK</PensionPay>
   <WakeupTime>BLANK</WakeupTime>
   <StartTime>BLANK</StartTime>
   <DayLength>BLANK</DayLength>
   <DaysToWork>M,T,W,R,F,S,U</DaysToWork>
   <Level>7</Level>
   <Metric1>BLANK</Metric1>
   <Mappings1>BLANK</Mappings1>
   <Metric2>BLANK</Metric2>
   <Mappings2>BLANK</Mappings2>
   <Args2>BLANK</Args2>
   <Metric3>BLANK</Metric3>
   <Mappings3>BLANK</Mappings3>
   <Args3>BLANK</Args3>
   <Metric4>BLANK</Metric4>
   <Mappings4>BLANK</Mappings4>
   <Text_Promotion>promotionLevel7</Text_Promotion>
   <Text_Promotion_Female>PromotionLevel7_Female</Text_Promotion_Female>
   <CarpoolType>BLANK</CarpoolType>
 </BLANK>
 <BLANK>
   <Title>BLANK</Title>
   <BasePay>BLANK</BasePay>
   <PensionPay>BLANK</PensionPay>
   <WakeupTime>BLANK</WakeupTime>
   <StartTime>BLANK</StartTime>
   <DayLength>BLANK</DayLength>
   <DaysToWork>M,T,W,R,F,S,U</DaysToWork>
   <Level>8</Level>
   <Metric1>BLANK</Metric1>
   <Mappings1>BLANK</Mappings1>
   <Metric2>BLANK</Metric2>
   <Mappings2>BLANK</Mappings2>
   <Args2>BLANK</Args2>
   <Metric3>BLANK</Metric3>
   <Mappings3>BLANK</Mappings3>
   <Args3>BLANK</Args3>
   <Metric4>BLANK</Metric4>
   <Mappings4>BLANK</Mappings4>
   <Text_Promotion>promotionLevel8</Text_Promotion>
   <Text_Promotion_Female>PromotionLevel8_Female</Text_Promotion_Female>
   <CarpoolType>BLANK</CarpoolType>
 </BLANK>
 <BLANK>
   <Title>BLANK</Title>
   <BasePay>BLANK</BasePay>
   <PensionPay>BLANK</PensionPay>
   <WakeupTime>BLANK</WakeupTime>
   <StartTime>BLANK</StartTime>
   <DayLength>BLANK</DayLength>
   <DaysToWork>M,T,W,R,F,S,U</DaysToWork>
   <Level>9</Level>
   <Metric1>BLANK</Metric1>
   <Mappings1>BLANK</Mappings1>
   <Metric2>BLANK</Metric2>
   <Mappings2>BLANK</Mappings2>
   <Args2>BLANK</Args2>
   <Metric3>BLANK</Metric3>
   <Mappings3>BLANK</Mappings3>
   <Args3>BLANK</Args3>
   <Metric4>BLANK</Metric4>
   <Mappings4>BLANK</Mappings4>
   <Text_Promotion>promotionLevel9</Text_Promotion>
   <Text_Promotion_Female>PromotionLevel9_Female</Text_Promotion_Female>
   <CarpoolType>BLANK</CarpoolType>
 </BLANK>
 <BLANK>
   <Title>BLANK</Title>
   <BasePay>BLANK</BasePay>
   <PensionPay>BLANK</PensionPay>
   <WakeupTime>BLANK</WakeupTime>
   <StartTime>BLANK</StartTime>
   <DayLength>BLANK</DayLength>
   <DaysToWork>M,T,W,R,F,S,U</DaysToWork>
   <Level>10</Level>
   <Metric1>BLANK</Metric1>
   <Mappings1>BLANK</Mappings1>
   <Metric2>BLANK</Metric2>
   <Mappings2>BLANK</Mappings2>
   <Args2>BLANK</Args2>
   <Metric3>BLANK</Metric3>
   <Mappings3>BLANK</Mappings3>
   <Args3>BLANK</Args3>
   <Metric4>BLANK</Metric4>
   <Mappings4>BLANK</Mappings4>
   <Text_Promotion>promotionLevel10</Text_Promotion>
   <Text_Promotion_Female>PromotionLevel10_Female</Text_Promotion_Female>
   <CarpoolType>BLANK</CarpoolType>
 </BLANK>
</Careers>
Step: 9 – Check List:
Before we move on here’s a check list of what you should have done so far:
   1. Downloaded the “Blank.Careers” package file.
   2. Changed the id instances.
   3. Created a unique .dll file.
   4. Edited your .dll file.
   5. Edited your Pic files.
   6. Edited your .Careers file.
Modding the .Tones file and strings files.
Step: 1 – The .Tones file:
Remember setting up your tones earlier? Well this is where we use the .Tones file to tell the game what we want the skill tones to actually do. So for example one of my tones for my tennis career was “Practice Athletic” and when selected my sim would gain athletic skill. This is where the tone file comes into play.
Open up your .Tones file that you renamed earlier by “Right clicking” and then selecting “Notepad”, you will see the following code:
<?xml version="1.0"?>
<ToneList>
 <Tone>
   <ToneName></ToneName>
   <FullClassName></FullClassName>
   <ProductVersion>BaseGame</ProductVersion>
   <CareerGuid></CareerGuid>
   <SkillCount>0</SkillCount>
   <Skill1></Skill1>
   <SkillRate1></SkillRate1>
   <MotiveCount>0</MotiveCount>
   <Motive1></Motive1>
   <MotiveRate1></MotiveRate1>
   <MustHaveVisibleSkill>False</MustHaveVisibleSkill>
 </Tone>
 <Tone>
   <ToneName>BLANK</ToneName>
   <FullClassName>NRaas.Gameplay.Tones.CareerToneEx, NRaasCareer</FullClassName>
   <CareerGuid>BLANK</CareerGuid>
   <SkillCount>1</SkillCount>
   <Skill1>BLANK</Skill1>
   <SkillRate1>1</SkillRate1>
 </Tone>
</ToneList>
The only part of the code you need to edit is the highlighted “BLANK”s with your information.
The <ToneName> should be:[YourCareerTitle]Tone.[YourCareerTitle]Career[YourToneTitle]
Tennis career example:
TennisTone.TennisCareerPracticeAthletic
The <CareerGuid> should be your career title. E.g. “Tennis”
And the <Skill1> should be the skill you wish the tone to increase. E.g. “Athletic”
This is the tone file for my tennis career:
<?xml version="1.0"?>
<ToneList>
 <Tone>
   <ToneName></ToneName>
   <FullClassName></FullClassName>
   <ProductVersion>BaseGame</ProductVersion>
   <CareerGuid></CareerGuid>
   <SkillCount>0</SkillCount>
   <Skill1></Skill1>
   <SkillRate1></SkillRate1>
   <MotiveCount>0</MotiveCount>
   <Motive1></Motive1>
   <MotiveRate1></MotiveRate1>
   <MustHaveVisibleSkill>False</MustHaveVisibleSkill>
 </Tone>
 <Tone>
   <ToneName>TennisTone.TennisCareerPracticeAthletic</ToneName>
   <FullClassName>NRaas.Gameplay.Tones.CareerToneEx, NRaasCareer</FullClassName>
   <CareerGuid>Tennis</CareerGuid>
   <SkillCount>1</SkillCount>
   <Skill1>Athletic</Skill1>
   <SkillRate1>1</SkillRate1>
 </Tone>
</ToneList>
If you wish to add more than one skill tone for example you simply add the tone underneath like so:
<?xml version="1.0"?>
<ToneList>
 <Tone>
   <ToneName></ToneName>
   <FullClassName></FullClassName>
   <ProductVersion>BaseGame</ProductVersion>
   <CareerGuid></CareerGuid>
   <SkillCount>0</SkillCount>
   <Skill1></Skill1>
   <SkillRate1></SkillRate1>
   <MotiveCount>0</MotiveCount>
   <Motive1></Motive1>
   <MotiveRate1></MotiveRate1>
   <MustHaveVisibleSkill>False</MustHaveVisibleSkill>
 </Tone>
 <Tone>
   <ToneName>TennisTone.TennisCareerPracticeAthletic</ToneName>
   <FullClassName>NRaas.Gameplay.Tones.CareerToneEx, NRaasCareer</FullClassName>
   <CareerGuid>Tennis</CareerGuid>
   <SkillCount>1</SkillCount>
   <Skill1>Athletic</Skill1>
   <SkillRate1>1</SkillRate1>
 </Tone>
 <Tone>
   <ToneName>TennisTone.TennisCareerPracticeLogic</ToneName>
   <FullClassName>NRaas.Gameplay.Tones.CareerToneEx, NRaasCareer</FullClassName>
   <CareerGuid>NRaasMobster</CareerGuid>
   <CareerBranch>Tennis</CareerBranch>
   <SkillCount>1</SkillCount>
   <Skill1>Logic</Skill1>
   <SkillRate1>1</SkillRate1>
 </Tone>
</ToneList>
This would add a logic tone if you had one added in your tones.
Once you have modded your .Tone file as you see fit, make sure you once again “Save” in notepad, then “File -> Save” in S3PE.
Step: 2 – The string files:
The string files tell the game what text to show in game, such as career titles and descriptions.
We need to start by making an “UnhashedKey” file. Start by opening up a new notepad file. You now need to copy (Ctrl + C) and paste (Ctrl + V) the code below into the notepad file. Now go down the code and replace once again all the “BLANK”s with your information, and also delete any notes in bold I have added into the code at the side as the same as before.
For the time being ignore any <KEY>BLANK</KEY> as I will explain these later, for now just fill in the <STR> code.
<KEY>BLANK:</KEY>
<STR>Gameplay/Excel/Careers/CareerList:BLANK</STR> - Should be your career tile: e.g. “CareerList:Tennis”
<KEY>BLANK:</KEY>
<STR>Gameplay/Careers/GetJobInRabbitHole:JoinCareerNoCareer</STR>
<KEY>BLANK:</KEY>
<STR>Gameplay/Excel/Careers/CareerList:BLANKOffer</STR> - Should be your career title e.g “CareerList:TennisOffer”
<KEY>BLANK:</KEY>
<STR>Gameplay/Excel/Careers/BLANK:BLANK</STR> - Should be your career title followed by your co-worker title. E.g “Tennis:FellowAthlete”
<KEY>BLANK:</KEY>
<STR>Gameplay/Excel/Careers/BLANK:BLANK</STR> - Should be your career title followed by your co-worker metric title. E.g.”Tennis:Athletes”
<KEY>BLANK:</KEY>
<STR>Gameplay/Excel/Careers/CareerList:BLANK</STR> - Should be your 1st tone title. E.g “MeetFellowAthletes”
<KEY>BLANK:</KEY>
<STR>Gameplay/Excel/Careers/CareerList:BLANK</STR> - Should be your 1st tone title with Description added e.g “MeetFellowAthletesDescription”
<KEY>BLANK:</KEY>
<STR>Gameplay/Excel/Careers/CareerList:BLANK</STR> - Should be your 2nd tone title. E.g “HangWithFellowAthletes”
<KEY>BLANK:</KEY>
<STR>Gameplay/Excel/Careers/CareerList:BLANK</STR> - Should be your 2nd tone title with Description added e.g “HangWithFellowAthletesDescription”
You can also add or delete more tones if you wish, here depending on what you decided from earlier. Just copy the code layout from the others above.
(These are only the tone titles and descriptions for normal tones NOT skill boosting tones)
<KEY>BLANK:</KEY>
<STR>BLANK</STR> - Should be your 1st skill boosting tone title and is the same line of code used in your .Tone file. e.g “TennisTone.TennisCareerPracticeAthletic”
<KEY>BLANK:</KEY>
<STR>BLANK</STR> - Should be your 1st skill boosting tone title with Description added e.g “TennisTone.TennisCareerPracticeAthleticDescription”
Again you can also add or delete more skill booster tones if you wish, here depending on what you decided from earlier. Just copy the code layout from the others above.
This next section are all the career titles from levels 1 – 10.
<KEY>BLANK:</KEY>
<STR>Gameplay/Excel/Careers/BLANK:BLANK</STR> - Should be your career title followed by your first career job title e.g “Tennis:RaquetCleaner”
<KEY>BLANK:</KEY>
<STR>Gameplay/Excel/Careers/BLANK:EntryLevel</STR> - Should be your career title. E.g. “Tennis”
<KEY>BLANK:</KEY>
<STR>Gameplay/Excel/Careers/BLANK:EntryLevel_Female</STR> - Should be your career title. E.g. “Tennis”
<KEY>BLANK:</KEY>
<STR>Gameplay/Excel/Careers/BLANK:BLANK</STR> - Should be your career title followed by your second career job title e.g “Tennis:BallBoy”
<KEY>BLANK:</KEY>
<STR>Gameplay/Excel/Careers/BLANK:PromotionLevel2</STR> - Should be your career title. E.g. “Tennis”
<KEY>BLANK:</KEY>
<STR>Gameplay/Excel/Careers/BLANK:PromotionLevel2_Female</STR> - Should be your career title. E.g. “Tennis”
<KEY>BLANK:</KEY>
<STR>Gameplay/Excel/Careers/BLANK:BLANK</STR> - Should be your career title followed by your third career job title e.g “Tennis:LinesMan”
<KEY>BLANK:</KEY>
<STR>Gameplay/Excel/Careers/BLANK:PromotionLevel3</STR> - Should be your career title. E.g. “Tennis”
<KEY>BLANK:</KEY>
<STR>Gameplay/Excel/Careers/BLANK:PromotionLevel3_Female</STR> - Should be your career title. E.g. “Tennis”
<KEY>BLANK:</KEY>
<STR>Gameplay/Excel/Careers/BLANK:BLANK</STR> - Should be your career title followed by your fourth career job title e.g “Tennis:TennisAssistant”
<KEY>BLANK:</KEY>
<STR>Gameplay/Excel/Careers/BLANK:PromotionLevel4</STR> - Should be your career title. E.g. “Tennis”
<KEY>BLANK:</KEY>
<STR>Gameplay/Excel/Careers/BLANK:PromotionLevel4_Female</STR> - Should be your career title. E.g. “Tennis”
<KEY>BLANK:</KEY>
<STR>Gameplay/Excel/Careers/BLANK:BLANK</STR> - Should be your career title followed by your fifth career job title e.g “Tennis:BeginnerTennis”
<KEY>BLANK:</KEY>
<STR>Gameplay/Excel/Careers/BLANK:PromotionLevel5</STR> - Should be your career title. E.g. “Tennis”
<KEY>BLANK:</KEY>
<STR>Gameplay/Excel/Careers/BLANK:PromotionLevel5_Female</STR> - Should be your career title. E.g. “Tennis”
<KEY>BLANK:</KEY>
<STR>Gameplay/Excel/Careers/BLANK:BLANK</STR> - Should be your career title followed by your sixth career job title e.g “Tennis:ProfessionalPlayer”
<KEY>BLANK:</KEY>
<STR>Gameplay/Excel/Careers/BLANK:PromotionLevel6</STR> - Should be your career title. E.g. “Tennis”
<KEY>BLANK:</KEY>
<STR>Gameplay/Excel/Careers/BLANK:PromotionLevel6_Female</STR> - Should be your career title. E.g. “Tennis”
<KEY>BLANK:</KEY>
<STR>Gameplay/Excel/Careers/BLANK:BLANK</STR> - Should be your career title followed by your seventh career job title e.g “Tennis:ChallengeTourPlayer”
<KEY>BLANK:</KEY>
<STR>Gameplay/Excel/Careers/BLANK:PromotionLevel7</STR> - Should be your career title. E.g. “Tennis”
<KEY>BLANK:</KEY>
<STR>Gameplay/Excel/Careers/BLANK:PromotionLevel7_Female</STR> - Should be your career title. E.g. “Tennis”
<KEY>BLANK:</KEY>
<STR>Gameplay/Excel/Careers/BLANK:BLANK</STR> - Should be your career title followed by your eighth career job title e.g “Tennis:250and500SeriesPlayer”
<KEY>BLANK:</KEY>
<STR>Gameplay/Excel/Careers/BLANK:PromotionLevel8</STR> - Should be your career title. E.g. “Tennis”
<KEY>BLANK:</KEY>
<STR>Gameplay/Excel/Careers/BLANK:PromotionLevel8_Female</STR> - Should be your career title. E.g. “Tennis”
<KEY>BLANK:</KEY>
<STR>Gameplay/Excel/Careers/BLANK:BLANK</STR> - Should be your career title followed by your ninth career job title e.g “Tennis:Master1000Entry”
<KEY>BLANK:</KEY>
<STR>Gameplay/Excel/Careers/BLANK:PromotionLevel9</STR> - Should be your career title. E.g. “Tennis”
<KEY>BLANK:</KEY>
<STR>Gameplay/Excel/Careers/BLANK:PromotionLevel9_Female</STR> - Should be your career title. E.g. “Tennis”
<KEY>BLANK:</KEY>
<STR>Gameplay/Excel/Careers/BLANK:BLANK</STR> - Should be your career title followed by your tenth career job title e.g “Tennis:GrandSlamChampion”
<KEY>BLANK:</KEY>
<STR>Gameplay/Excel/Careers/BLANK:PromotionLevel10</STR> - Should be your career title. E.g. “Tennis”
<KEY>BLANK:</KEY>
<STR>Gameplay/Excel/Careers/BLANK:PromotionLevel10_Female</STR> - Should be your career title. E.g. “Tennis”
Now that you have edited all your <STR> lines, you must edit the <KEY> lines. The <KEY> lines are just hashed versions of the <STR> lines. So for example this would be the first <KEY> and <STR> lines for my tennis career.
<KEY> 0x12DBAAB750E72C1F:</KEY> <STR>Gameplay/Excel/Careers/CareerList:Tennis </STR>
To find the <KEY> number you need to go to “Tools” then “FNV Hash…” in S3PE which will open the FNV Hash Window. Now copy and paste the <STR> line, don’t include the actual “<STR>” or “</STR>” so copy and paste: Gameplay/Excel/Careers/CareerList:Tennis into the “Text to Hash” box in the FNV Hash window. Then press the “Calculate” button. This will then calculate the Hash code for your Text, which will appear in the FNV64 box. Now copy and paste this number into the <KEY> section. You now have to go down the whole list and do the same for every STR line, by filling in the KEY values.
Once you have finished editing all the code, save the notepad file but save it as:
“Strings [YourCareerTile] UnhashedKeys” For example this is my file for my Tennis career:
“Strings Tennis UnhashedKeys”
Once you have sorted the first strings file, there is also a second strings file which must be edited which is easier to edit than the last, so you can breathe a bit easier. This second string file is what determines what descriptions are shown in game.
Start by opening another Notepad file like before, and copy and paste the following code into the file:
All the <KEY> lines in this file are exactly the same as your <STR> lines from your “UnhashedKeys” string file, so the easiest way is to just open the two files side by side, and copy and paste the lines over. Remember to only copy and paste what’s in between the <STR> and </STR>.
Now the “BLANK”s in this new notepad file in between the <STR>’s are the actual descriptions that show up in game. I’ll make notes in bold for what these descriptions are as I did before. Also ill include an example of my tennis career underneath for you to compare if you are confused.
<KEY>Gameplay/Excel/Careers/CareerList:BLANK</KEY>
<STR>BLANK</STR>  - Should be your career title. E.g. “Tennis”
<KEY>Gameplay/Careers/GetJobInRabbitHole:JoinCareerNoCareer</KEY>
<STR>BLANK</STR>  - Should be your get job title. E.g. “Join Tennis Career”
<KEY>Gameplay/Excel/Careers/CareerList:BLANKsOffer</KEY>
<STR>BLANK</STR> - Should be your job offer description.
<KEY>Gameplay/Excel/Careers/BLANK:BLANK</KEY>
<STR>BLANK</STR> - Should be your co-workers title. E.g. “Fellow Athlete”
<KEY>Gameplay/Excel/Careers/BLANK:BLANK</KEY>
<STR>BLANK</STR> - Should be your co-workers metric title. E.g. “Athletes”
<KEY>BLANKTone.BLANKCareerBLANK</KEY>
<STR>BLANK</STR> - Should be your 1st skill booster tone tile. E.g. “Practice Athletic”
<KEY>BLANKTone.BLANKCareerBLANKDescription</KEY>
<STR>BLANK</STR> - Should be your 1st skill booster tone description.
This is where you add any extra skill booster tones and descriptions using the same format, that is if you have added any extra in the other stings file.
<KEY>Gameplay/Excel/Careers/CareerList:BLANK</KEY>
<STR>BLANK</STR> - Should be your 1st tone tile. E.g. “Meet Fellow Athletes”
<KEY>Gameplay/Excel/Careers/CareerList:BLANKDescription</KEY>
<STR>BLANK</STR> - Should be your 1st tone description.
<KEY>Gameplay/Excel/Careers/CareerList:BLANK</KEY>
<STR>BLANK</STR> - Should be your 2nd tone tile. E.g. “Hang with Athletes”
<KEY>Gameplay/Excel/Careers/CareerList:BLANKDescription</KEY>
<STR>BLANK</STR> - Should be your 2nd tone description.
This is where you add extra tones and descriptions using the same format if you have any.
This next part is where all the career titles are added followed by the promotion descriptions for males, and females starting with the entry level going up to level 10.
If you wish the description to be the same for both male, and female sims, then simple use the same text.
<KEY>Gameplay/Excel/Careers/BLANK:BLANK</KEY>
<STR>BLANK</STR> - Should be your 1st job title. E.g “Racquet Cleaner”
<KEY>Gameplay/Excel/Careers/BLANK:EntryLevel</KEY>
<STR>BLANK</STR> - Should be your 1st job description for a male sim. (Entry level description)
<KEY>Gameplay/Excel/Careers/BLANK:EntryLevel_Female</KEY>
<STR>BLANK</STR> - Should be your 1st job description for a female sim. (Entry level description)
<KEY>Gameplay/Excel/Careers/BLANK:BLANK</KEY>
<STR>BLANK</STR> - Should be your 2nd job title. E.g “Ball Boy”
<KEY>Gameplay/Excel/Careers/BLANK:PromotionLevel2</KEY>
<STR>BLANK</STR> - Should be your 2nd job description for a male sim.
<KEY>Gameplay/Excel/Careers/BLANK:PromotionLevel2_Female</KEY>
<STR>BLANK</STR> - Should be your 2nd job description for a female sim.
Carry on down the list adding the job titles and descriptions per career level.
<KEY>Gameplay/Excel/Careers/BLANK:BLANK</KEY>
<STR>BLANK</STR>
<KEY>Gameplay/Excel/Careers/BLANK:PromotionLevel3</KEY>
<STR>BLANK</STR>
<KEY>Gameplay/Excel/Careers/BLANK:PromotionLevel3_Female</KEY>
<STR>BLANK</STR>
<KEY>Gameplay/Excel/Careers/BLANK:BLANK</KEY>
<STR>BLANK</STR>
<KEY>Gameplay/Excel/Careers/BLANK:PromotionLevel4</KEY>
<STR>BLANK</STR>
<KEY>Gameplay/Excel/Careers/BLANK:PromotionLevel4_Female</KEY>
<STR>BLANK</STR>
<KEY>Gameplay/Excel/Careers/BLANK:BLANK</KEY>
<STR>BLANK</STR>
<KEY>Gameplay/Excel/Careers/BLANK:PromotionLevel5</KEY>
<STR>BLANK</STR>
<KEY>Gameplay/Excel/Careers/BLANK:PromotionLevel5_Female</KEY>
<STR>BLANK</STR>
<KEY>Gameplay/Excel/Careers/BLANK:BLANK</KEY>
<STR>BLANK</STR>
<KEY>Gameplay/Excel/Careers/BLANK:PromotionLevel6</KEY>
<STR>BLANK</STR>
<KEY>Gameplay/Excel/Careers/BLANK:PromotionLevel6_Female</KEY>
<STR>BLANK</STR>
<KEY>Gameplay/Excel/Careers/BLANK:BLANK</KEY>
<STR>BLANK</STR>
<KEY>Gameplay/Excel/Careers/BLANK:PromotionLevel7</KEY>
<STR>BLANK</STR>
<KEY>Gameplay/Excel/Careers/BLANK:PromotionLevel7_Female</KEY>
<STR>BLANK</STR>
<KEY>Gameplay/Excel/Careers/BLANK:BLANK</KEY>
<STR>BLANK</STR>
<KEY>Gameplay/Excel/Careers/BLANK:PromotionLevel8</KEY>
<STR>BLANK</STR>
<KEY>Gameplay/Excel/Careers/BLANK:PromotionLevel8_Female</KEY>
<STR>BLANK</STR>
<KEY>Gameplay/Excel/Careers/BLANK:BLANK</KEY>
<STR>BLANK</STR>
<KEY>Gameplay/Excel/Careers/BLANK:PromotionLevel9</KEY>
<STR>BLANK</STR>
<KEY>Gameplay/Excel/Careers/BLANK:PromotionLevel9_Female</KEY>
<STR>BLANK</STR>
<KEY>Gameplay/Excel/Careers/BLANK:BLANK</KEY>
<STR>BLANK</STR>
<KEY>Gameplay/Excel/Careers/BLANK:PromotionLevel10</KEY>
<STR>BLANK</STR>
<KEY>Gameplay/Excel/Careers/BLANK:PromotionLevel10_Female</KEY>
<STR>BLANK</STR>
Once you have finished editing this string file, make sure you save in notepad, then rename the file if you haven’t already to “Strings [YourCareerTitle] English” for example my tennis career file is called “Strings Tennis English”.
Step: 3– The STBL Creator:
Once you have your two string files completed, you need to now use the STBL creator program which you downloaded at the start of the guide. To use this program you have to drag each strings file that you have made one by one onto the STBL.exe program. This creates a new file with the same name as your strings file but in STBL format.
Example screen shots:
1) Both string files are in .txt format.
2) Drag first string file onto the STBL.exe
3) A copy of the strings file is created in STBL format.
4) Drag second string file onto the STBL.exe
5) Both string files now have a copy in STBL format.
Step: 4– Replacing the Blank String files:
Now that you have your string files in STBL format you need to replace the “Strings Blank English” and “Strings Blank UnhashedKeys” in your career package in S3PE.
To do this first “Right click” on the “Strings Blank English” file then select “Replace” and browse for your “Strings [YourCareerTile] English.stbl” so for my tennis career I would browse for my “Strings Tennis English.stbl” file then select “Open” to replace the blank file with your edited file.
Note: Make sure that you select the .stbl file not the .txt file when replacing.
Once you have replaced the file, you need to double click it again in S3PE which should open up the “Resource Details” window. Then press the FNV64 button to change the instance name to the hash version of your file.
Now because this is an English language file before you select “Ok” you need to delete the first two characters of the instance name and replace them with “00”. If your file is in a different language then the two numbers you must replace are different.
This is the FNV64 instance value for “Strings Tennis English”: 0x943DD0754861401E
So for example you would need to change this “0x943DD0754861401E” to “0x003DD0754861401E” so you can see I have changed the 94 to 00 at the start of the value. You must do this for your instance name. You can then click “Ok” to save the changes.
These are the numbers for different languages:
English = 00
Chinese = 01
Taiwanese = 02
Czech = 03
Danish = 04
Dutch = 05
Finnish = 06
French = 07
German = 08
Greek = 09
Hungarian = 0A
Italian = 0B
Japanese = 0C
Korean = 0D
Norwegian = 0E
Polish = 0F
PortugueseStandard = 10
PortugueseBrazillian = 11
Russian = 12
SpanishStandard = 13
SpanishMexican = 14
Swedish = 15
Thai = 16
If you want your career package to support more than one language simply create a second strings file, containing the other language descriptions etc, and just as before use the stbl creator to convert the file. Then import the file into your package so you would have 2 string files. You can add every language if you wish that is supported on the list so you would have multiple string files in your package.
Now you need to replace the UnhashedKeys string file, to do this first “Right click” on the “Strings Blank UnhashedKeys” file then select “Replace” and browse for your “Strings [YourCareerTile] UnhashedKeys.stbl” so for my tennis career I would browse for my “Strings Tennis UnhashedKeys.stbl” file then select “Open” to replace the blank file with your edited file. You DO NOT need to replace the instance name for this file, so simply select “Ok” to accept the changes.
Now you need to “File” -> “Save” in S3PE to save all the changes you have made in S3PE to your package.
Step: 5 – Join Career title:
You have almost finished! Just a couple of small changes that need to be done now.
Start by closing down S3PE, now there’s two files you must place in the “Packages” folder you created earlier in this directory: “C:\Users\[YOURNAME]\Documents\Electronic Arts\The Sims 3\Mods\Packages”
You need to place your career .package and the career loader file that you downloaded in this folder.
Now run your Sims 3 game, and start playing with your character. When you go to the place of work where you would join your custom career, so for example when I click on the “Stadium” for my tennis career, you will notice it says: JoinCareer[RandomNumbers] You need to make a note of these numbers!
Now close down your game, and open up your career .package file in S3PE again. Then go to “Tools” -> “FNV Hash” and in the FNV Hash window type: Gameplay/Careers/GetJobInRabbitHole:JoinCareer[YourNumbers] into the Text to Hash box. For example for my tennis career I would type:
Gameplay/Careers/GetJobInRabbitHole:JoinCareer842901641372242208
Then press the “Calculate” button and make a note of the FNV64 value that appears.
Go back to S3PE and “Right click” on your UnhashedKeys string file, then go to “Edit STBL” this brings up the “STBL Resource Editor” window. Click on the second file in the left list, this should show: Gameplay/Careers/GetJobInRabbitHole:JoinCareerNoCareer in the right window and the value in the bottom box. You now need to replace the “NoCareer” part with your JoinCareer number that you wrote down from in game, and replace the value in the bottom to your FNV64 value that you wrote down too.
Then click “Save”, and “File” -> “Save” in S3PE to save the overall changes again to the package.
Congratulations you have made a custom career! Run your game and your career should function as normal!
Credits.
All credit goes to the creators of S3PE and twallan at NRaas Industries for creating the programs as I did not create them, I simply use them. I just put together the guide. Please visit the NRaas Industries site as they have many more Mods and useful programs available:
Happy Modding hope this tutorial can at least help someone! Any comments, bugs or suggestions please message me and I will update if possible.
Creon
