Difference between revisions of "MTS2:Creator Guidelines/Lots and Houses"
(→Screenshots) |
(→Screenshots) |
||
| Line 93: | Line 93: | ||
If your lot is based on a real building (for example, a particular castle, a particular chain of supermarket, a house from a movie), then please include a comparison picture of the real building. | If your lot is based on a real building (for example, a particular castle, a particular chain of supermarket, a house from a movie), then please include a comparison picture of the real building. | ||
| + | |||
===Screenshots as Packaged=== | ===Screenshots as Packaged=== | ||
Please make sure your screenshots show your lot as you have packaged it. Downloaders want to see what they're actually getting. You may show an additional shot or two of the lot fully furnished if you have uploaded it unfurnished, but make sure you mention that those are not how the lot is packaged, and include a list of the items you show in your furnished pictures so people may get those items if they like. Make sure not to include pay content in any of your screenshots or in your packaged lot. | Please make sure your screenshots show your lot as you have packaged it. Downloaders want to see what they're actually getting. You may show an additional shot or two of the lot fully furnished if you have uploaded it unfurnished, but make sure you mention that those are not how the lot is packaged, and include a list of the items you show in your furnished pictures so people may get those items if they like. Make sure not to include pay content in any of your screenshots or in your packaged lot. | ||
| + | |||
===Enough Light=== | ===Enough Light=== | ||
Revision as of 17:59, 26 April 2008
Lots and Houses
Introduction
So you want to share your lot that you've slaved over decorating and building for all to bask in your greatness? It's easy to do as long as you comply with all the necessary requirements. The less guesswork, the better! Please take the time to read through these guidelines as some key items have changed and may affect your upload. Pay close attention to what is required, and your upload will spend less time in the moderation queue and the more likely it is to get approved. Thanks!
Quality
Uniqueness/Effort
Is your lot special, unique, and different? Is it something that anyone could build?
This is probably the hardest one to quantify, but it's something that is obvious whenever upload moderators look at an upload: have you really expended some serious time and effort on your lot? You can't just crank out a bunch of stuff in a short amount of time and expect it to be good. Nor can you spend a while just fiddling with something but not really trying and expect a good result either.
Most good creators spend hours upon hours on even simple creations. We understand that not everything has to be that difficult, but we do expect you to not just slap together something in 15 minutes and upload it and expect it to get accepted. Really try to put some serious effort into what you create, and it will show through in the quality.
Aesthetics
Does your lot look nice? Does it have a good flow to it? Is the way it's laid out attractive, interesting, and enjoyable to look at?
Playability
Is your lot going to be good to play with? Does it have a good layout that won't have sims stomping and complaining every few seconds? Strive to make lots that are not only nice to look at, but actually good to play with. Remember that while a lot may look big and grand, it may be extremely frustrating to players that sims have to spend two sim hours hiking from the front door to the kitchen just to make a sandwich.
Exceptions to this rule are lots that are not meant to be played with - mazes, lots designed primarily as decoration for neighborhoods, and movie or picture sets.
Realism
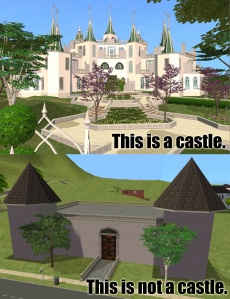
Does your lot look like what it's supposed to look like? Not all lots have to be realistic, and fanciful ones certainly shouldn't look like your everyday house, but if your lot is based on a real building or real type of building, it should look like what it's supposed to look like.For example, a castle should not just be a huge building with stone walls, but should look like an actual castle, and supermarket should look like an actual supermarket. You can look up pictures of the type of lot you're trying to build on Google Image Search for some good ideas.
Roofing
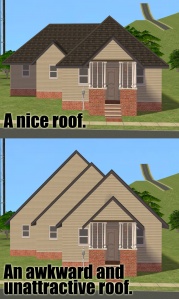
Though roofing is usually one of the more difficult parts of building, your roof should look right for the lot, and pleasing to the eye. Sometimes you may have to redesign part of a lot, or choose a different type of roof to make a roof that looks right. Don't just use the autoroof tool all the time - actually work on designing your own roofs using the different roof tools. And if you have later expansions, you can use cheats to change the angle of your roof so it's not so steep.
Landscaping
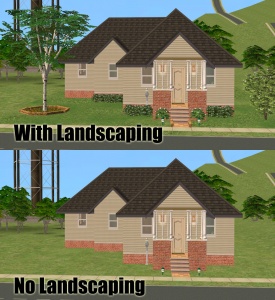
With the exception of starter lots, all lots should have some type of landscaping - and even starters can deal with a tree or maybe a shrub and a little bit of work with terrain paints. A few trees, flowers, or bushes plus a bit of work with the terrain paints can make all the difference. This doesn't mean just throwing down a tree or two randomly to just have some landscaping, but taking care and making it work with the lot. Look at some real landscaping websites for ideas.
Screenshots
People want to see what they're downloading! Your screenshots sell your upload - if people don't like the look of your screenshots, they're not going to download - and if your screenshots are too bad, you won't get your upload approved.
All of the screenshot images below can be clicked for larger versions. You wouldn't want to upload them with as small of pics as are displaying here anyway - we're just using smaller pics so this thread loads quickly and is easy to read.
Screenshot Basics
For instructions on:
- Taking large, clear pictures (bigger than the game will allow)
- Changing your in-game settings for best graphics quality
- Camera controls
See: Screenshot Basics
You need to make sure you have nice big, clear pictures that show off what you've made. They can't be too blurry or pixellated, and you need to know how to use the game's camera controls properly, so make sure you review the information on that link thoroughly before continuing.
Big Enough
Your pics should be large enough to see the detail of what you've made. Remember, MTS2 allows images up to 1280x1024 pixels and 195 kilobytes so you should be able to upload nice big pictures. See the information above under "Screenshot Basics" for info on taking larger pics than the game will normally allow.
And please don't take smaller pics and just make them larger in your graphics program - this just gives you a blurry pic that's bigger in dimensions with no additional detail.
Required Screenshots
We require certain screenshots for lot uploads - if you do not include these screenshots, your lot will not be approved!
Exterior Shot
Show the entire lot from the outside. Make sure you show it with all levels visible, and the roof on.
Interior Floor Plans
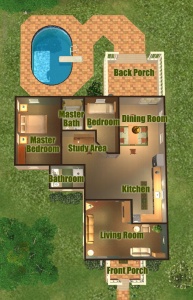
Show a basic layout or floor plan of the lot. This is best done with an overhead shot. You may label each room so it is obvious that a particular room is meant as the master bedroom, another as a bathroom, etc.Make sure you show the floor plan for each level if your lot has more than one floor.
Comparison Picture
If your lot is based on a real building (for example, a particular castle, a particular chain of supermarket, a house from a movie), then please include a comparison picture of the real building.
Screenshots as Packaged
Please make sure your screenshots show your lot as you have packaged it. Downloaders want to see what they're actually getting. You may show an additional shot or two of the lot fully furnished if you have uploaded it unfurnished, but make sure you mention that those are not how the lot is packaged, and include a list of the items you show in your furnished pictures so people may get those items if they like. Make sure not to include pay content in any of your screenshots or in your packaged lot.
Enough Light
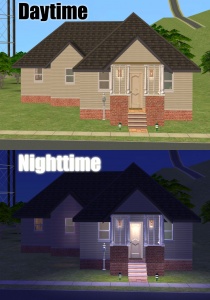
Daytime shots preferred for your screenshots, as it is much easier to see what your lot looks like during the day. We will only accept nighttime screenshots if they are sufficiently light enough to see your lot clearly, and you should include daytime shots anyway. Nighttime shots should be additional, extra screenshots, not your main shots. Make sure to place lights on the lot if you try a nighttime shot and turn them on. If you click the "Day/Night" toggle and place lights during the night they will automatically be switched on.
Close Enough
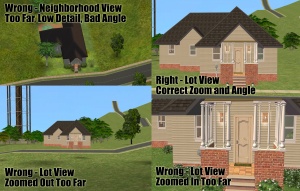
Please take your screenshots on the lot, not zoomed out too far or zoomed in too close.Screenshots of lots taken from neighborhood view are low detail and often have holes in the walls and are missing objects. They have a poor angle, too high up, and really don't show off your lot very well.
Screenshots taken on the lot should show the whole lot, at a sufficient zoom level that the lot is centered in your view. You shouldn't have a lot of blank space on the sides, and you shouldn't have the edges of the lot cut off in your picture because you're zoomed in too far.
Centered
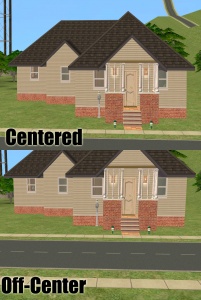
Make sure that your building is the main focus of your screenshots, and adjust your camera angle show that the lot fills the whole image, in the center of the image. Don't take your pictures at an angle that shows something irrelevant like the sky, the street, or the house next door, while cutting off your lot.
Angle
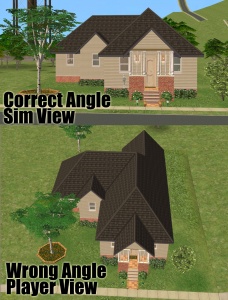
When taking your pictures, drop down to a low level with the camera, so that you are taking your pictures basically from a sim's perspective. Many beginners make the mistake of taking pictures from high above the lot, from the normal perspective one would have as a player. This gives mostly a picture of the roof and not the lot itself, and really doesn't show off the lot very well.
Shadows Off
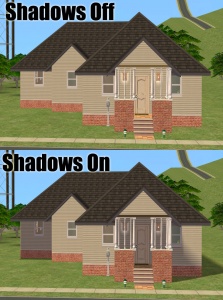
Before taking your screenshots, go into your Game Options under Graphic Options and turn the Shadows option Off. While shadows may look nice for some things, usually having shadows off creates a much cleaner, nicer look for your lot.
No Gridlines or User Interface
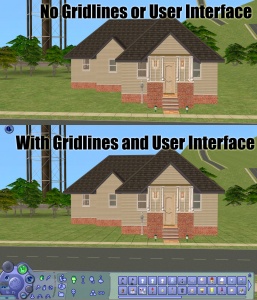
When taking your screenshots, you should take them in Cameraman Mode (using the TAB key) so that you don't get the User Interface (the blue control panel) in your shots. You also have better control of the camera in Cameraman Mode.If you press R on your keyboard before hitting Tab, it will also temporarily remove the gridlines, making for a much better screenshot.
Detail Pictures
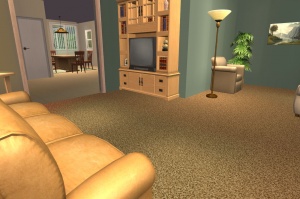
Detail pictures are not required for your upload to be approved, but they can help show downloaders what your lot will look like a bit better. These pictures don't show the whole lot, but show individual rooms through a "sim's eye view."
Packaging Your Lot
Once you have finished building your lot in the game, you will need to save it, and then exit the lot to return to the neighborhood view to package it to a file.
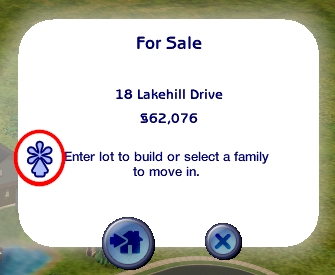
To package the lot, simply click on the lot from Neighborhood view, and click the * button as indicated in the screen shot below:
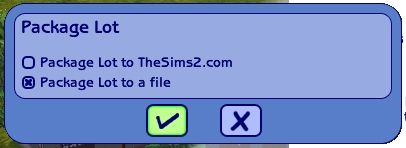
Then select "Package lot to a file" and click the check mark:
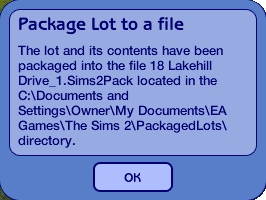
You'll get a confirmation screen telling you the name of the file, and that the file has been saved to your: My Documents\EA Games\The Sims 2\PackagedLots directory.
Congratulations! You have packaged your lot into a Sims2Pack file.
Credits and Links for Included or Pictured Content
Check/Remove Content with Clean Installer
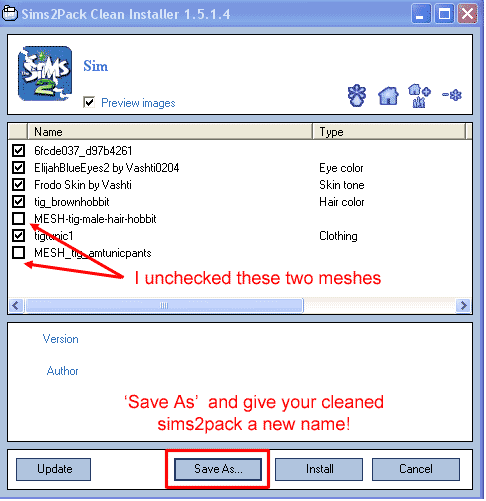
Before uploading your lot, you MUST scan it with Clean Installer. Many people do not realize that by having custom content in your Downloads folder, it can attach itself to your lot files -- even if you didn't USE that content in the lot itself! Clean Installer can scan your file, list the contents of it, and allow you to remove those contents.
The image above is demonstrating using a sim in a sims2pack but the same works for lots - uncheck the unwanted content (in our example two unwanted meshes are being removed) and then click Save As and save a new sims2pack file with a new name.
Never save over your original sims2pack file - there's a bug in Clean Installer with that and you'll just end up with a corrupt file.
For more information on using Clean Installer, please see the guide on the Clean Installer site, here. If you are having trouble using Clean Installer, including errors or issues with empty packages, please see MTS2's Clean Installer Support Forums for help.
- If you cannot use Clean Installer: Using a Mac? On Vista and it won't run? Your options are, unfortunately, pretty limited. You can ask a friend who can use Clean Installer to clean the lot for you (and hope they do it right) or take out your Downloads folder when building lots and make them with no custom content so you don't have to worry about things being included (see the below info under "Clean Lot" for more info on why this actually may be a good thing. We're very sorry if you're stuck in this situation and would like to use custom content in your lots, but we cannot allow users to freely upload lots with whatever content happens to have been included.
Content that CANNOT be Included
Please use Clean Installer to remove all items of the below types from your sims2pack file before uploading.
- Hacks: Lots containing hacks are not accepted. Most Sims 2 players do not realize that lots can contain hacks. Usually they are meant for just one game version and can cause problems if users have later expansions that the hack(s) are incompatible with. Users also usually do not want hacks they did not mean to download as they can change major elements of gameplay in undesired ways.
- Careers: Lots containing careers are not accepted. They can cause similar problems to hacks due to incompatibility, and users generally want to download only the careers they want - not ones you happened to pack along with your house.
- Pay Items: As per the news item July 2007, do not use pay items in your lots. A pay item is an item that if you went to the original creator's website, you would have to donate money for access to the item (it doesn't matter if you can get it for free through a file sharing site - it's still a pay item). Do not use pay items in your photos of the lots, even if they are not included. Links for "optional" or "recommended" content may be included as long as they are free sites only. See this news item for more details: Site News - New Creator Rules re: Paysite recolours, General Rules and Others
- This includes ALL items from TSR - whether they are currently free or not - due to the regular changes of what is free or pay on TSR. Featured Artists are under paid subscription, and Select Artists or Non-Select Artists have their own terms of distribution, most of which are not clearly posted. Select Artists or Non-Select Artists can become Featured Artists at anytime, therefore preventing their items from being downloaded freely in the future. This includes all FA's free items. If a TSR artist has uploaded the same/similar item here or elsewhere, and they have allowed redistribution, please credit the appropriate thread and not the profile. This is subject to change in the future.
- Non-Redistributable Content: Even if an item is free, certain creators do not wish their content included in lot/house uploads. This may be due to the content being experimental, problematic, or requiring additional instruction, or they may simply not wish to have their content distributed that way. It is your responsibility to check the policies of each and every creator whose content you are including to see if it may be included. Items where their policy is not clear/does not exist are not allowed - if you get specific permission from the creator for such items you need to state it in the text of your post. If you cannot include an item due to policies, lack of permission, or ambiguity in the policies, you need to remove it, even if it's free. Free, non-redistributable items MAY be linked to in the post in a section you can put in bold called "Required but Not Included" - if you remove these items from the sims2pack file and then link downloaders to where they can be found, if they download and install the required items, they will show up properly on your lot. For a quick list of policies for a lot of major sites, see: Creator Policies
- Sims: Lots containing sims are not accepted. If your lot has a family in it, please remove it with Clean Installer. Most people don't want to download a lot that is infested with someone else's sims, and there's actually a lot of problems that can come along with downloading other peoples' sims if they have not had their memories cleaned properly before packaging. If people want to download sims, they can download them separately.
- Redundant Recolours: If you scan your lot with Clean Installer and find that it has 50 recolors for the same item, remove the recolors that are not used in the lot. When you use other people's custom content, remember that you are literally borrowing it from them. Don't borrow 50 recolors when you're only actually using one. There's also no need to give someone tons more files than they need to fill up their Downloads folders - they can do that just fine on their own.
- Items You Cannot Credit/Link: If you cannot remember where you got an item and cannot provide a link to it, you can try asking at our Where Can I Find? Forum on Sims2Community (sister site of MTS2 - separate registration required) to see if anyone knows where the item is from - make sure to provide a picture and a description of the item so people can help you track it down. If you still cannot find where it was from, you should remove it from the sims2pack. After doing this, please verify that it is not an item that is required for your house to look right - temporarily cut and paste the contents of your Downloads folder elsewhere, double-click on the sims2pack file to install it, and see what it looks like in-game after you have removed the content. If the lot looks different without the content you removed, you should replace it with something else - either a Maxis item or something you can include, and re-take your screenshots. Remember, what people see is what they need to get, or what they can get following your links! If you don't know where it came from, use something else!
- Please see the below note under "Content that CAN be Included" under "Terrain Paints" for the exception to this rule!
Content that CAN be Included
You may include items of the following types with your lot/house upload:
- Free, Redistributable Content: If a creator says that you may include their items in lot/housing uploads, and the item is a free download, you are welcome to include that item in your sims2pack file for upload on MTS2 if you have used it on the lot. For a quick list of policies for a lot of major sites, see: Creator Policies
- Content You Have Made Yourself: If you have made content yourself that you have used in the lot, you certainly may include that item in the lot as well. If it is a new mesh you need to include all of the regular information in the text of your post (poly counts, where it shows in the catalog, etc.) you would expect for a new mesh.
- Terrain Paints: Do NOT remove any terrain paints from your sims2pack. This is the one exception to the non-redistributable policies/pay/must provide credit rules. If you remove terrain paints from a lot it can cause it to crash for downloaders. Due to this, all terrain paint creators should expect their content to be included no matter what. Please provide a link and credit for these items whenever possible, if a terrain paint is not clearly marked with a creator's name/website, you may still include it and it will not be grounds for rejection.
If your lot contains custom content, you MUST include a LINK and CREDIT for EACH and EVERY custom content file included in the upload.
When uploading to MTS2 the custom content wizard will require that you indicate the creator of each item, enter a description, and provide a link to the creator's site, profile, or original upload thread. The beauty of this system is that once one person has entered the info for an item (or if it was uploaded to MTS2 originally) then nobody else has to enter that info again - it automatically gets added as credit if that item is included later. You are, however, responsible for making sure the links and credits are correct, even if the custom content wizard fills in the wrong information (due to someone before you entering the wrong info).
As builders, we must all show the utmost respect for the people who create our furnishings for us. Providing a simple credit and link is the least we can do to show our appreciation for including someone else's hard work in our files. Nobody wants their work stolen, used without permission, or used without being credited.
Keep in mind that if your lot contains content that someone else made, and that artist does not approve due to their policies not allowing your usage, your lot will be removed at their request. You would be allowed to upload a new version of the lot that does not contain their content. For a quick list of policies for a lot of major sites (including an easy reference on ones that freely allow including their content), see: Creator Policies
Clean Lots
It's sometimes easier if people choose to upload clean lots. A clean lot, simply, is a lot with no custom content whatsoever - or a bare minimum of custom content.
Why upload a clean lot?
- If you've only used a small amount of custom content but you couldn't include it, so a small shopping list will be easy for downloaders to follow
- If the content you have used is very popular content - stuff from Holy Simoly, or MaryLou's Independent Expressions expander set windows for example, and everyone already has it anyway, or will want to go get it, and the rest of the set.
- If you are on a Mac or cannot use Clean Installer so you cannot be sure your lots are free of unshareable/unwanted custom content.
- Many users prefer downloading clean lots as they like to download custom content separately, and tend to remodel/redecorate houses when they get them anyway. They'd prefer a nice, well-built clean slate that they can customize without a bunch of random custom content that they aren't going to use anyway.
- The files are smaller so it's quicker for you to upload and quicker for people to download.
- It's a lot easier on you in uploading - you don't have to check a ton of policies and track down links for everything.
- It's a lot easier on the staff that moderate house uploads - it takes a lot of time to check all the content links and policies and stuff on included content, and houses with little to no custom content often get approved quicker as a result.
To create a clean lot, use Clean Installer to rid your lot of ALL custom content - except terrain paints (see above under "Content that CAN be Included" under "Terrain Paints"!). OR you can simply remove your Downloads folder before building and use all Maxis items. If you intend to create clean lots this second option is likely best in most circumstances.
If you remove content from the sims2pack, you still need to provide links and credits for all those items which are Required but Not Included for your lot when it was built. Basically, you'll need to make a shopping list for downloaders. Otherwise, if you used custom wallpapers and floors they'll have bare walls and floors - and if you used custom objects they'll have Maxis defaults in place of those objects (random statues and plants and ugly Maxis furniture everywhere! eeww!). Downloaders want to get what they came for - tell them what they'll need so the lot will look as you intended it! If you've used a lot of custom content, you don't want to have a HUGE shopping list for downloaders so please don't pack your lot with tons of custom content, remove it with Clean Installer, and then make people download a whole bunch of stuff separately - they're likely to just skip past your lot to find something easier to download.
Right Info and Right Files
Checklist
Screenshots
Screenshot Don'ts
Don't make any of these mistakes when preparing and uploading your screenshots.
Neighborhood View: Please do not include screenshots taken from Neighborhood view. Screenshots taken from Neighborhood view are low detail and distorted, making it difficult for people to see what your lot actually looks like.
Thumbnails/Small Pics: If you are using the game's camera to take pictures, please upload "Screenshots", not "Thumbnails" from your Storytelling folders. Small thumbnails leave out the fine detail that larger screenshots can show, and they are not clickable for larger versions.
More than 8 Pics: There is a limit of 8 attached screenshots per thread. Please plan your pics accordingly. You can still include 4 additional pics hosted elsewhere inline (see below) and you may combine several screenshots into one image by making a collage.
More than 4 Inline Pics: If you want to include images via the IMG tags (inline pics), please limit it to 4 images. This is being courteous to members who are still on dial-up or slower broadband connections. You may include a link to your photobucket or imageshack account if you wish to show off more images. Remember, you can still attach up to 8 images via Manage Attachments but regardless of if you use the attached images or from elsewhere, the maximum allowed inline is 4 - for a total of 12 possible pics.
- The maximum size for inline pics is 800x600 pixels, so the page will display properly and not scroll horizontally for people with lower resolutions.
- You can always have those pics link to larger pics, if you so choose, which you can host at an image site hosting service.
HUD: Please no screenshots containing the game HUD (Heads Up Display, or the blue in-game menu).
