MTS2:Creator Guidelines/Body Shop
Contents |
Creator Guidelines - Body Shop
Uploading sim content? This guide will walk you through every step of what we require on MTS2. Please make sure you read these guidelines carefully, as our standards have changed over the years, and there may be some items you weren't aware of before.
At the end of the guidelines after full explanations of each item is a checklist, so you can make sure you've done everything you need to.
Quality
The first thing moderators look for when moderating uploads is quality - simply, is the item good or not?
Highlights and Shadows
Your textures should have some detail to them - not just a flat single-colour bucket fill, but with highlights and shadows in the right places, to give the appearance of folds, ripples, etc. - even fabric that would be skin-tight is going to have some shading and highlighting.
- For a tutorial on a simple technique for adding shading and highlighting to a garment, see: How to Add Shadows and Highlights.
Photoskinning
"Photoskinning" means using textures from a photograph to make an item. While photoskinning is a common practice, doing it well takes a lot of effort. You need to make sure you are using high-quality source images that aren't too small so that they get pixellated or blurry when you size them to your texture. You also usually can't just copy-paste the whole thing in one go and have it look right - you will need to cut the image into pieces to make sure things like seams, zippers, pockets, etc., end up in the right place on your garment. And you will need to make sure your source images are appropriate, too - a pair of jeans sort of rumpled and wrinkled up laying on a table will not photoskin properly into a pair of jeans on a sim.
- For a basic tutorial on photoskinning, see: How to Make a Top Out of a Picture.
- For more tips on photoskinning, see this thread on MTS2: Photoskinning.
- And if you are using Photoshop, you may find that displacement mapping works better than Photoskinning: Beyond Photoskinning: Transformation and Displacement Mapping in Photoshop.
Not Too Bright
When creating an item that is brightly-coloured or neon, you need to keep in mind the way the game renders colour... Creating something that looks truly neon-bright in your graphics program will look blindingly bright in-game - as if it's actually illuminated, rather than just brightly-coloured. You can always turn down the saturation on your texture if it's looking too bright.
- For a good example of neon textures done well, not too bright, see: Harajuku Inspired Outfits.
Black and White
When making something that's black or white, you never use -actual- true black or white. For black you use dark grey, and for white you use light grey. That way you can still add lighter or darker for shadows and highlights, and your item will look right in the game - true black just looks like a dark hole, and true white is far too bright.
- For tips on making black and white clothing look right in-game (including suggested settings), see: Tiptorial: Making Black and White Clothing the Right Way.
Crisp/Unpixellated
You need to make sure, also, that your textures are crisp and clear. There shouldn't be any blurriness or pixellation to your textures. They should look as clear and crisp as Maxis textures. If you're using an image for texturing (photoskinning or otherwise), make sure you're not scaling up your image - if it's a logo or design, you should have to shrink it to fit on your texture, not make it bigger.
- If you find your textures are nice and crisp in your graphics program but suddenly look blurry in Body Shop, that's likely a problem with Body Shop's settings. See here for information on fixing that: Game Help:Blurry Body Shop Projects
- If your textures are nice and crisp in your graphics program and Body Shop, but they look blurry in-game (and everything else does too) that's probably your game's graphics settings. In the game, under options (...), in graphic options (monitor icon) turn Texture Detail up to High and click Apply Changes.
Bump Mapping
If you're not aware of what the term "bump mapping" means, or if you don't know if you can view bump maps in your game, first, see here: Game Help:Bump Maps and Shaders. There are also instructions there on enabling bump maps if you don't have them.
Simply put, bump maps are a way for the game to add the appearance of dimension to your textures even when those parts aren't actually 3D. Well-done bump maps can add a nice detail to buttons, hems, edges, belts, zippers, sweater textures, etc.
However, you cannot rely on bump maps to add detail - your textures should look good without bump maps. Bear in mind that many people cannot view bump maps, so if your textures don't look good without them, your creation will not look good for a vast number of people. Also keep in mind that it's better to have no bump maps at all than to have badly done ones.
If you cannot view bump maps, you need to remove them from your creation - do a bucket fill of 50% grey (RGB value 128.128.128) in the bump map texture to create a neutral bump map (no bump map).
- For more tips on bump maps and doing them right, see this thread on MTS2: Basic Bump Map Question
No Simple Slider Changes
If you're going to make something for sims, don't just grab a Maxis texture and change the colour on it - making a slightly paler Maxis skin, for instance, or making a blue shirt green. This is something that anyone can do, and really isn't worth uploading. Take the time to create a unique texture, add some new details, and make it something worth uploading (and downloading).
- For tutorials on adding textures, logos, and doing more than just a simple slider change, see: Tutorials:Body Shop Recolouring Tutorials.
Screenshots
People want to see what they're downloading! Your screenshots sell your upload - if people don't like the look of your screenshots, they're not going to download - and if your screenshots are too bad, you won't get your upload approved.
All of the screenshot images below can be clicked for larger versions. You wouldn't want to upload them with as small of pics as are displaying here anyway - we're just using smaller pics so this thread loads quickly and is easy to read.
Screenshot Basics
For instructions on:
- Taking large, clear pictures (bigger than the game will allow)
- Changing your in-game settings for best graphics quality
- Camera controls
See: Screenshot Basics
You need to make sure you have nice big, clear pictures that show off what you've made. They can't be too blurry or pixellated, and you need to know how to use the game's camera controls properly, so make sure you review the information on that link thoroughly before continuing.
In-Game
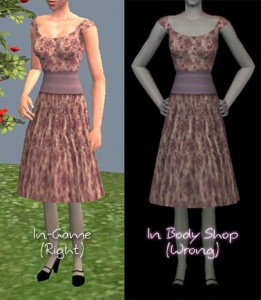
In order to see what your creation looks like in-game, we require in-game screenshots. You must actually load the game and take your screenshots there. We do not accept Body Shop pics, texture pics, SimPose, 3D program pics, etc., without the required in-game pics too. Please don't try to cut out backgrounds or fake in-game pics. We can definitely tell the difference.For best results, put your item on a sim on a lot. Create-a-Sim screenshots are acceptable, but the lighting in CAS is pretty bright and you may not be able to get detail pics and that sort of thing, too.
Poses
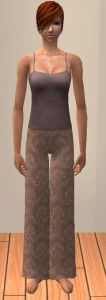
If you are uploading clothing, your sims need to be in a pose that shows off your clothing properly. The best way to do this is simply to have your sim stand there, doing nothing, arms at their sides. You can also just have your sim walk normally - click "go here" and have them walk.Please don't use that twisty-torso model walk as it distorts the sim's body, or model-type poses that really don't show what you've made very well. It may be artistic and interesting for contests and the like, but remember, you're showing off your creation, not the sim or your posing skills.
Big Enough
Your pics should be large enough to see the detail of what you've made. Remember, MTS2 allows images up to 1280x1024 pixels and 185 kilobytes so you should be able to upload nice big, pictures, without having them too small. See the information above under "Screenshot Basics" for info on taking larger pics than the game will normally allow.
And please don't take smaller pics and just make them larger in your graphics program - this just gives you a blurry pic that's bigger in dimensions with no additional detail.
Show the Whole Thing
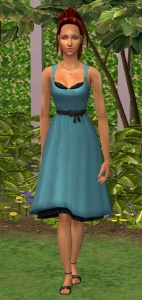
Make sure that your screenshots show the whole item - for clothing or skins, this needs to be a head-to-toe shot. Don't crop or leave out important details like hands, feet, etc., even if you haven't done anything with them - people want to know that the cute bathing suit they're downloading doesn't have heels, for instance.You CAN use cropped or closer pictures to show detail and/or for your thumbnail shot, but make sure you have at least one pic that shows everything.
Detail Pics
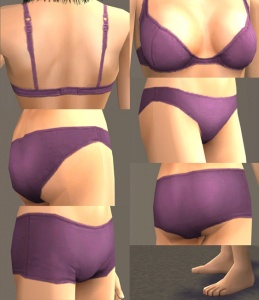
For an upload with special details that cannot be clearly seen from a full-body shot, it's a good idea to show detail pics. You can get some nice close-up shots this way that really show the interesting bits. Make sure these are in addition to (not instead of) your full body shot.
Close Enough
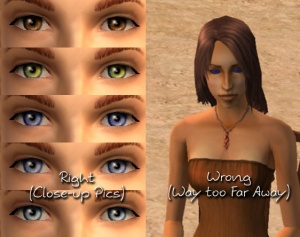
Take your pics from close up! Don't take your pics from across the lot or far away - this won't show what you've made. Get nice and close, on the same level as the sim.For things like makeup and eyes, this is especially important! You want to make sure people have a very clear idea of what they're getting, so you can't take your pics from too far away or your creation simply won't be visible.
Multiple Angles
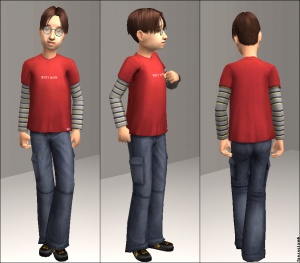
Especially with things like clothing, skintones, or hair, it can be very helpful to not only show the item from the front, but also the sides and the back. People downloading want to know that what they're downloading doesn't just look good from one angle, but from all sides.
Enough Light
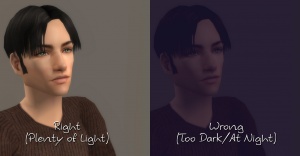
Don't take your pics at night or in a dark room! Take your sim outside in the sunlight (make sure they're facing the sun - light comes from a certain direction on the lot!) or put them in a well-lit room. At the same time, make sure you don't use too much light: Create-a-Sim screenshots can sometimes be too bright to show things like freckles on a light skintone, or if you put a sim in something light-coloured under a bright light, it can wash out and lose a lot of the detail of what you've made.
Try Neutral Backgrounds
For best results, use a simple plain backdrop for your screenshots. While it may be tempting to do a really complex set, what you're showing in your screenshots is what you're uploading, and something simple and plain is the best way to show off what you've made. If you're uploading something mostly dark-coloured, make sure to use a light backdrop (and vice versa - darker backdrop for light stuff) so it doesn't get lost in the background.
This is not an absolute -requirement- and for some things like historical clothing and the like you may do better with a simple basic set, and a nice garden scene can look nice too - just make sure that what you're doing in the background doesn't detract or distract from what you're actually uploading.
All Items in Set
If you are uploading a set of items with multiple colours or styles, you must include in-game screenshots of every item in the set! You can't just upload a single in-game pic and then show the other colours it comes in, or texture swatches, or whatever. It may be time-consuming to take pictures of a large set, but it gives downloaders a much better idea of what they're getting.
Obscured Skintones
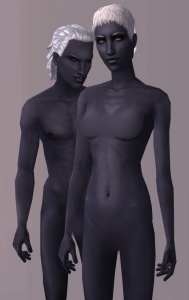
Because MTS2 is not an adult site, you need to take special care when uploading skintone files. Not only must your skintones not have too much "adult" detail on the actual skins themselves (please see the special note below regarding skintones) but you must obscure your screenshots.This means you need to cover the female breasts, the crotches on both genders, and the butt crack of both genders. You may do this by putting your sims in skimpy underwear, by covering those areas in a black bar, or, probably the best way to do so without your obscuring getting in the way of your texturing, selecting those areas in your graphics program of choice and applying a blur or pixellation filter to them.
Adult Content/Nudity
MTS2 is not an adult site. We do have an adult site affiliated with MTS2, Sexy Sims 2 where adult content may be uploaded. But because MTS2 is a PG-13 site, no adult content may be uploaded to MTS2 itself.
Skintones
Skintones uploaded to MTS2 must be completely "barbie" below the waist. That is, you cannot include genitals or pubic hair for either gender. Skintones uploaded to MTS2 may include female nipples, or you may leave them off if you prefer, for a Maxis-like skintone that is completely "barbie."
You must obscure your skintones even if they are completely "barbie." Please see the section under Screenshots, Obscured Skintones, for exact details on what you must obscure, and how to do so.
Other Adult Content
Content with swear/curse words or sexually suggestive themes may not be uploaded to MTS2. Please upload these items to the adult site instead.
Items relating to illegal drugs do not belong on MTS2. You -may- post items relating to prescription and over-the-counter drugs, as well as alcohol and tobacco on MTS2, but items related to illegal drugs should go on our adult site.
"Nude clothing" uploads are not allowed on MTS2 - that sort of thing needs to go on the adult site.
For more information and a further list of items we do not allow on MTS2, see: Uploads Not Allowed on MTS2.
Right Info/Right Files
- know the mesh - include it if it's hosted elsewhere/shareable, otherwise link directly as possible and/or give directions
- Screenshots - in-game, showing the whole body, big enough, not Body Shop, detail pics if needed - shots of all items.
- Right files - not from projects, zip/rar
Checklist:
Screenshots:
If you are uploading clothing, genetics or Skinning items.
- All uploads must include a screen shot taken from with in the game. Body Shop photos are NOT allowed. Close ups are good things. If you make eyes be sure to get a close up of the eyes. As well as make up and the like.
- Clothing downloads should not look pixelated or blurry. If your clothing appears blurry please use the sharpen tool while you are creating to make your image cleaner. You may also want to read through some of the wonderful tutorials on the site to make your clothing as perfect as possible.
Faylen's Clothing tutorial is a great place to start.
Clothing Tutorials
- Any clothing with sexual or adult language should be uploaded to the adults forum. Please do not include photos that show nudity.
- If you are creating new clothing, it must be unique in the sense that taking a paint tool and coloring a pair of jeans bright solid red is not good quality and will be rejected as well. Again if you use a new clothing mesh and make a recolor you can not include the mesh with your clothing. Leave a link for people to obtain the mesh and post only your recolor.
- Please remember that pictures will sell your upload. Be sure to take close up shots of your items, in well lit areas, so people have a great idea of how your item is going to look in their game.
For some great tips on taking pictures please read Screeshots 101 - Better Picture Taking
The Perfect Post
Not sure of how to create your post? Here is an EXAMPLE of a PERFECT clothing post
Category-Downloads>Clothing>Clothing Recolors>Female>Adult
(Make sure you select the correct gender and age group for clothing)
Title - Cute Pink Summer Dress
(Be descriptive in your title)
Description: (Make a cute little description here of your item) An outfit for you here today. This is a Beautiful dress for Adult Female sims. Will show in Everyday and Formal categories. It was made from an original Maxis mesh and will work on all versions of the game.
Note: Be sure to mention which version of the game the item was made from so people know whether it is compatible or not with their game, and state the age and categories your clothing will show up in. In addition-If you have recolored a mesh someone else has made, be sure to give credit to the original mesh creator and a link to the mesh so people can download that. Otherwise your recolor will not show up in their game*
Pictures to Include
- A full shot of the item IN GAME
- A close up to show the detail work as well.
Take your photos outside of your sim homes to allow the best possible lighting.
If you follow the guidelines posted above, you will guarantee yourself an approval. If you receive a rejection of any kind, it is because a certain criteria was not met. In that event, please re-read the guidelines.
Skins and Eyes
For skins, make up and eyes, pictures are VERY IMPORTANT. You want to be as close as possible and in well lit areas.
Note for Skins: You want to make sure to let people know if your skin is for all ages or which specific ages you've recolored. And you want to show how the skin appears on all ages of a sim.
These are pictures taken from posts here at MTS2 that are a perfect example of what to include with your uploads.
Credits
Dayseis for the original article.
