Tutorials:Unimesh 2 - Editing and UV Mapping
| Tutorials by Category | |
|---|---|
|
Body Shop: Recolouring | Meshing | Modding | Sims Objects: Object Creation | Recolouring Building: Building | Landscaping | Walls & Floors | Other: Careers & Majors | Hacks and Game Mods |
Overview
| Unimesh 2 - Editing and UV Mapping | |
|---|---|
Base Game | |
| Author | HystericalParoxysm |
What this tutorial will teach you
This tutorial builds on the techniques learned in the Unimesh 1 - New Mesh Basics tutorial. Once you have learned the skills taught in that tutorial (creating a new mesh, doing a simple edit on it in Milkshape, and getting it to show up properly in Body Shop/in-game), you can begin doing more complex edits as explained in this tutorial.
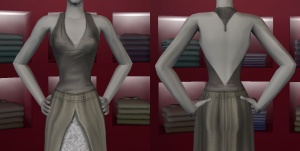
Here, we will be doing a simple edit to a dress: making the hem longer, and flaring the bottom of the skirt. We will also be learning how to adjust the uv/texture mapping so that the textures are not distorted on our edited mesh. We will also learn how to do the same edit to the fat morph at the same time when doing simple edits.
Warning!
Meshing is difficult! Meshing is hard! Meshing is time consuming and frustrating! This is not an easy process. Though everything will be fully explained, it's possible that you may miss something or it won't work the first time. If that happens, start over from the beginning after taking a break and try again. There is no easy 5 minute meshing technique that we're not telling you - this really is the easiest, best way to do it.
If you get completely stuck, scroll to the bottom - there's a "Having trouble?" section which goes over common mistakes and errors you might get in doing this tutorial, and how to fix them.
Prerequisites
You MUST have prior knowledge of creating clothing using Body Shop. This is not for absolute beginners at Body Shop - experience in creating clothing recolours/retextures will serve you well going forward. We will not be going over how to make new textures or change colours on your new mesh - you should already know all that stuff! If you do not have that preexisting knowledge, do not continue with this tutorial. Instead...
![]() See: Body Shop Recolouring Tutorials
See: Body Shop Recolouring Tutorials
You MUST also have gone through the first Unimesh tutorial! This tutorial builds on the techniques learned in the first tutorial. This tutorial will -not- teach you the basics of making a new mesh as that is taught in the first tutorial - I will be mostly skipping over those parts as you should already know how to do them. If you have not already completed the first Unimesh tutorial, you -must- do that tutorial before attempting this one or you will be completely and utterly lost.
![]() See: Unimesh 1 - New Mesh Basics
See: Unimesh 1 - New Mesh Basics
Special Thanks
This tutorial is a revised version of Tiggerypum's Unimesh 2 tutorial. It utilizes updated tools to make the editing easier, but still does the same project and builds on what she wrote originally. Many thanks to Tig for her original tutorial, and everything she's taught me about meshing.
What you will need:
You must download and install all of the following programs and utilities before beginning this tutorial. If you are having any trouble or questions on installing them, please look for info on their individual sites/pages.
You SHOULD already have most of these from the first tutorial (except Vertex/Normal Data Merge), but in case you've uninstalled them or whatever since, here's the links again:
- Milkshape - Current version as of this writing is 1.8.3. We will be doing our mesh editing in Milkshape. This is not a free program! It will allow you to use it free for 1 month, but after that you will need to pay $25 to register it. It is worth the money. There is no version of this tutorial using free programs - nothing else uses Unimesh and allows you to make major edits for such a low price.
- Unimesh Plugin for Milkshape - Current version as of this writing is 4.09. This plugin allows proper import/export of Sims 2 meshes into Milkshape. Unimesh is free. Read the included "UniMeshReadMe.txt" file for installation instructions.
- SimPE - Current version as of this writing is 0.68. Get whatever the latest version is. SimPE allows creation of a new mesh package linking the mesh to a recolour file.
- Needed Software to Run SimPE - This is listed as a heading on the SimPE download page with links there. You will need both the Microsoft .NET Framework Version 2.0 (this is different from .NET 1.0!) and Managed DirectX 9c (this is different from regular DirectX!) - make sure to download and install both or you will get errors on the SimPE parts.
- Vertex Data Merge/Normal Data Merge Plugins for Milkshape - A great little plugin by Wes_H which will make the edit we're doing much, much easier. You should also follow Wes's instructions on how to set up the plugins as shortcuts in Milkshape before continuing as it will be much easier to use them as keyboard shortcuts than through the menu.
- 1-3 Hours to complete this tutorial, assuming you do it right the first time. It may be quicker or slower depending on how fast you read and work.
The Tutorial:
You may click on any image below for a larger version. Images are shown thumbnailed here for faster page loading, but all images will display full-size if clicked.
Part 1 - Create a Recolour
As in the first tutorial, we will need to start by creating a recolour in Body Shop of the base mesh we want to edit. We will then use this recolour to find its associated mesh, and will link to it for our modified mesh in subsequent steps.
As with the first tutorial, please follow along using the same mesh that is shown here - it will make it much easier for you to complete this tutorial. Do not attempt to use a custom mesh - please use the original Maxis mesh which is being used here.
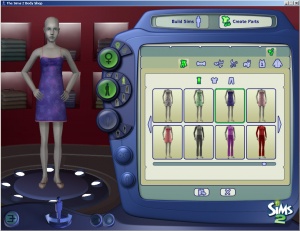
1. Run Body Shop, and Make a New Project: Open Body Shop, and once it's open, click Create Parts - Create Clothing - Everyday. Then make sure to select the teen female age group - we're going to be editing a teen female dress this time. Scroll toward the end of the catalog until you find the dress pictured. It comes in several clothing options, but I'm choosing the blue one with babies, mainly because I find it confusing and creepy, but also because it will be good to show whether our texture is distorted in subsequent steps. Click on the button at the bottom to Export Selected Textures.
2. Name Your Project: Let's call this project "TutorialDressTwo".
3. Tooltip and Import: Type a tooltip for your project. "TutorialDressTwo" is a good tooltip. You can leave it as everyday clothing. Then click the button at the bottom to Import to Game.
4. Close Body Shop.
Okay, now we have our recolour ready...
Part 2 - Create a Folder
Again, as we did in the first tutorial, we're going to be editing, importing, and exporting a lot of different files, and we need to keep them organized. So as you did in the first tutorial, make a new folder on your computer's Desktop, or whereever you can easily find it. Don't use the same folder as the first tutorial - create a new, empty folder so we can keep all our parts straight.
Call your new folder "TutorialDressTwo Files".
Part 3 - Assemble a Mesh Package
Now it's time to put together our mesh package, using the mesh used by the recolour we just made. This should be familiar from the first tutorial, but here's a quick overview.
1. Run SimPE.
2. Create a New File: File - New to create a new, empty file.
3. Run PJSE Mesh Tool: Tools - PJSE - Body Mesh Tool - Extracting Stage
4. Browse for Your Recolour: In the popup you get, click on the Browse button. In the next popup, browse to your My Documents\EA Games\The Sims 2\SavedSims\ and find your recolour file - it should be named something like "5f9567f5_TutorialDressTwo.package" - Select it and click Open. PJSE Body Mesh Tool will find the four parts for your mesh and put them in your new file. You will see a GMDC, GMND, SHPE, and CRES once it's finished.
5. Fix Integrity: Make this mesh file a new, unique mesh by giving it a name in Fix Integrity. Tools - Object Tools - Fix Integrity. In the box at the top, type a name for your project. Call it "TutorialDressTwo_YourNameHere" and then click Update. The entries should all change names. Then click OK. You now have a new, unique mesh file.
6. Save Your Mesh: File - Save As and save your mesh file into your "TutorialDressTwo Files" folder you made in Part 2. Call your file "TutorialDressTwo_MeshFile.package" so you know exactly what it is.
Part 4 - Link the Mesh to the Recolour
And as in the first tutorial, we now need to link our new, unique mesh made in Part 3 to the recolour file we made in Part 1.
1. Open the Recolour File: In SimPE, open the recolour file you made in Part 1. Remember, it should be in My Documents\EA Games\The Sims 2\SavedSims\ and called something like "5f9567f5_TutorialDressTwo.package".
2. Look at the 3DIR: Select the 3DIR (3d ID Referencing File) in the Resource List. This is the resource which contains the information that links your recolour file to your mesh.
3. Use PJSE Body Mesh Tool - Linking Stage: With the 3DIR still selected, click on Tools - PJSE - Body Mesh Tool - Linking Stage. Click OK to the warning message popup you get. In the Open dialog, titled "Select Custom Mesh Package" browse to your "TutorialDressTwo Files" folder you made in Part 2. Select your mesh file that you made in Part 3., which is called "TutorialDressTwo_MeshFile.package" and click Open. You'll get a popup telling you to not to commit, but to select any other resource. Click OK, and click on any other resource besides the 3DIR in the Resource List.
4: Save: File - Save to save changes to your recolour file. Your recolour file should now be linked to your new, custom mesh.
5: Copy Mesh File to Downloads: Copy your "TutorialDressTwo_MeshFile.package" file from your "TutorialDressTwo Files" folder to your My Documents\EA Games\The Sims 2\Downloads folder.
6: Check in Body Shop: Run Body Shop, go to Create Parts - Start New Project - Create Clothing - Everyday - Teen Female. Your recolour should be the first thing showing up, with your "TutorialDressTwo" tooltip. When you select it, it should look like the same dress it was before. That means your linking has worked properly. Close Body Shop.
Part 5 - Extract the 3D Model
The last step before editing is to extract the GMDC (mesh file) so we can import it into Milkshape.
1. Open Your Mesh File in SimPE: Open SimPE if it's not already still open and browse to your "TutorialDressTwo Files" folder. Select your "TutorialDressTwo_MeshFile.package" file and open it.
2. Extract the GMDC: In the Resource List, right-click on the GMDC resource and choose Extract.
3. Save the GMDC: Save the GMDC to your "TutorialDressTwo Files" folder. Call it "Extracted_GMDC" - then close SimPE.
Part 6 - Edit the Mesh in Milkshape
Now, we're going to edit the mesh. This time, we'll be lengthening the skirt, and making it flare outward. We'll also need to edit the UV Map to compensate for that edit, so the textures aren't distorted. Let's get started...
1. Run Milkshape.
2. Use Unimesh Import: Make sure Smooth All (on the Groups tab) is still unchecked. Then File - Import - Sims 2 UniMesh Import v4.09. Browse to your "TutorialDressTwo Files" folder and select your "Extracted_GMDC.simpe" file. Click Open.
3. Answer Popups: You will get two popups as you did in the first tutorial. The first is "Create blend groups?" Say Yes - this will import the fat morph. The second popup will say "Some Skin Weights do not equal 100%. Do you want these corrected?" Click Yes to this one to fix any incorrect bone assignments.
4. Check Morphs: Click on the Groups tab. You will see that you have two morphs this time - "body" will be listed first - this is the normal body used by fit/normal fitness stages. The second is "~00MORPHMOD.1" which is the fat morph, used when the sim gets fat. For now, we're going to leave both morphs visible.
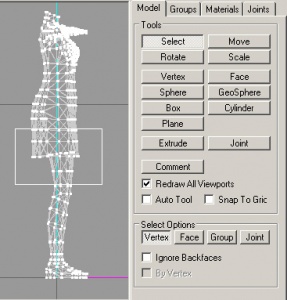
5. Zoom In: We're going to be editing the hem of the skirt, pulling it down more toward the knees. To do that, we're going to remove a row of polygons in the leg. So we need to zoom in on the area we'll be editing. On the Model tab, click Select, and then make sure Vertex select mode is on. Draw a box around the bottom of the skirt and knee area in the side view. It doesn't have to be exact - just make sure you've got the top of the leg selected too. Then right-click in the side view and choose Frame Selection to zoom in on that area.
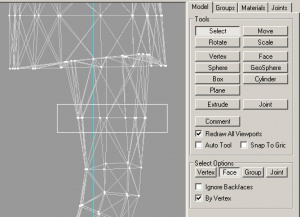
6. Select Row of Vertices: Now, still on Select mode, change from Vertex to Face, and select the "By Vertex" option. This will allow us to select polygons by selecting the vertices at their corners. Make sure "Ignore Backfaces" is unchecked. Now drag a box around the first row of vertices on the leg under the hem of the skirt to select them. The polygons above and below this row will turn red to indicate they're selected. That's because the polygons above and below are all connected to that row of vertices.
7. Deselect Unwanted Polygons: We don't want to remove all of those selected polygons, however - just the top section above the row of vertices we selected. So we need to deselect the bottom part. To do that, press and hold the Shift key and right-click and drag a box around the bottom row of vertices connected to the red, selected part (above the knee). If you need to move the view down a little bit, you can CTRL-click and drag first.
8. Double-Check Selection: When you've deselected the bottom row, you should just have one section of polygons selected - the very top part of the leg. You can look in the other view panes to confirm that you have just that part selected. If you've made a mistake, just start over selecting until you are sure you have only the top section of the leg selected.
9. Delete Selection: Now, press the Delete key on your keyboard (or Edit - Delete Selection). The top part of the leg which you have selected will disappear, leaving a gap between the skirt and the remaining part of the leg. This may look strange for the moment, but this is actually what we want to happen.
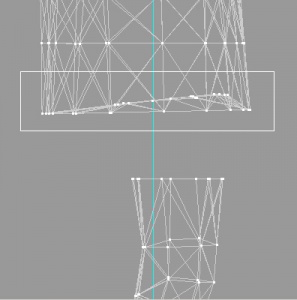
10. Select Bottom of Skirt: On the Model tab, click back onto Vertex select mode. Then, drag a box around the bottom part of the skirt, which will select both the very bottom edge of the skirt, and the "modesty cap" part underneath.
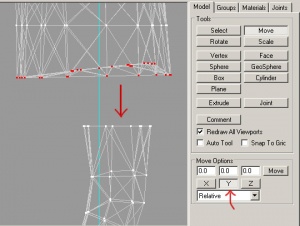
11. Move Down Bottom of Skirt: On the Model tab at the top, click Move mode.Toward the bottom of the Model tab, you'll see three boxes, with three buttons underneath: X, Y, and Z. Click on X and Z so they are both unselected, leaving Y as the only button there still pressed down. This will make it so when you move your selection, it will only move on the X axis (up and down) and not on the Z axis (front and back) or X axis (left and right).
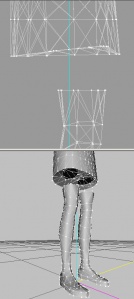
Then in the side view, with the bottom part of the skirt still selected, click and drag to move the bottom of the skirt down till the bottom of the hem is just below the top of the leg.
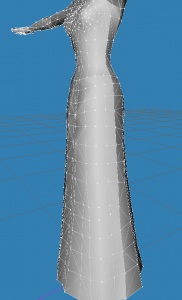
12. Check Moved Bottom: In the side view, your moved skirt bottom should look basically like the picture shown. If you look in the 3D view, you'll see that the bottom of the skirt almost matches up with the top of the legs, but there's still some small gaps around the edges. We need to fix those gaps so everything matches up perfectly.
13. Save: Let's go ahead and save our MS3D document. We have a lot of steps still to go, and if we periodically save our work, we won't lose anything we've worked on if Milkshape crashes, the power goes out, or our cat runs across the keyboard. File - Save As and save your file to your "TutorialDressTwo Files" folder. Call it "TutorialDressTwo-1.ms3d"
14. Hide Fat Morph: On the Groups tab, select the "~00MORPHMOD.1" morph (your fat morph) and click Hide. This will make your "body" morph (your normal, regular morph) the only visible part. We are going to fix the gaps on each of them separately, so we need to have the "body" group as the only one showing for now.
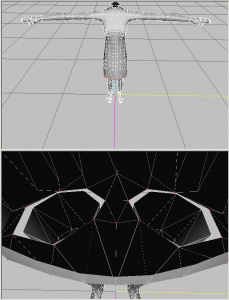
15. Position Camera to View Gaps: Now, we need to position things right so we can see where the gaps are, and fix them easily. The best way to do that is in the 3D view, as it lets us see the gaps in the best way. Position the camera in the 3D view so you're looking at the front of the dress from above, looking down somewhat. Then shift-click and drag to zoom in until the camera goes inside the dress, looking down on top of the legs. Remember the Milkshape movement controls from the first Tutorial?
- CTRL-click and drag to move up, down, left, and right.
- SHIFT-click and drag to zoom in and out.
- Click and drag to change the angle of the camera in the bottom right (3D view pane).
- If you get lost and lose your model, don't panic! Right-click in the pane and choose Frame All.
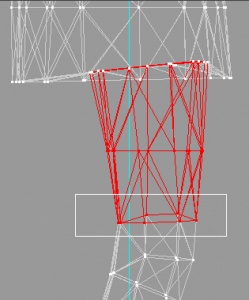
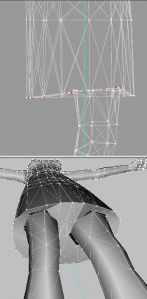
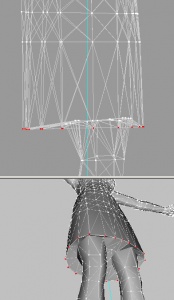
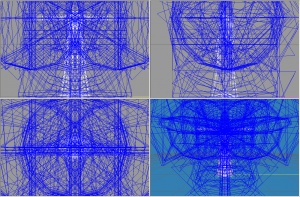
You should be able to clearly see the gaps between the bottom of the skirt and the top of the legs once you get your camera positioned properly, as shown in the bottom image to the right.
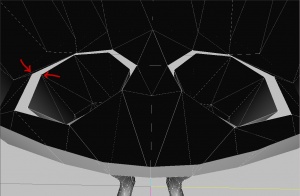
16. Select Matching Vertices: If you look closely at the top of the leg and the hole in the bottom of the skirt, you'll notice that they both have the same number of vertices going around, and that they are roughly positioned in the same way. What we're going to do is select each pair of vertices and put them in the same place, one by one.
On the Model tab, you should still be in Select mode, with Vertex selected. Look closely at the 3D view, and identify the first set of matching vertices. It may be a bit hard to see them, so if you want to make the 3D view fill the Milkshape window, right-click in the 3D pane and choose "Maximize" at the bottom of the menu. In order to select in the 3D view, you'll have to hold down ALT and click. Don't drag around the vertices (as you may accidentally grab vertices in the feet or skirt hem underneath too) - just ALT-click the first vertex, and then ALT-SHIFT-click to select the second of the two vertices as shown in the image to the right. They will turn red to show that they are selected.
Un-Maximize the 3D view and check to make sure you don't have any other vertices in the dress selected. The only red spots should be in the very bottom of the skirt.
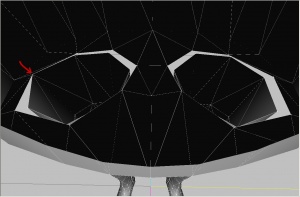
17. Vertex Data Merge: Now we want to match up the location of those two vertices so they are in exactly the same place. To do this, we're going to use Wes's Vertex Data Merge plugin, which you should have gotten before beginning (in the What You Will Need section). You also should have set up the Milkshape shortcuts as advised so you can just press a key and have it do what you want it to.
With those two vertices still selected, press the C key on your keyboard. If you have the shortcuts set up right, the vertex selected in the top of the leg should jump over to the same spot as the vertex in the bottom of the skirt. If you -don't- have the shortcuts set up right, you can still use the plugin as long as you installed it properly by going to the Vertex menu and selecting Sims2 UniMesh Vertex Data Merge V4.09. That handy little plugin makes it very easy to match up seams!
18. Save: Now is a good time to save your work in case you mess up at all on the next step. File - Save As and save your file as "TutorialDressTwo-2.ms3d" - don't just File - Save and save over the original. Get in the habit of making numbered (incremental) saves, so if you realize you've messed up somewhere along the way, you don't have to start over from the beginning.
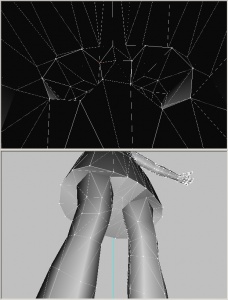
18. Fix Remaining Gaps: Now you'll repeat steps 16 and 17 for the remaining vertices around the top of both legs. ALT-click/ALT-SHIFT-click to select pairs of matching vertices, and C (or Vertex Data Merge from the Vertex menu) to match up each set, one by one. If you need to reposition the camera to see the pairs better, you can do so with the camera controls as explained in step 15. Make sure after selecting each set that you don't have anything extra selected!
It can help sometimes to switch to Wireframe view if you're having trouble seeing what matches up with what. To do that, right-click in the 3D window, and at the top part of the right-click menu, you'll see four options: Wireframe, Flat Shaded, Smooth Shaded, and Textured. Select Wireframe to go into Wireframe view. You can always right-click again and go back to Textured to get out of Wireframe.
When you're done matching up your gaps, your mesh should be nice and gap free. Make sure to check from all angles both on the inside of the skirt, and on the outside. If you've messed up anywhere (like accidentally grabbed part of the skirt hem too) then either Undo until it looks right again, or go back to the file you saved in Step 18 and start that part over.
19. Save: Again, File - Save As to save your changes. This one will be "TutorialDressTwo-3.ms3d"
20. Hide Normal Morph, Unhide Fat Morph: On the Groups tab, select the "body" group and click Hide. It should disappear, leaving nothing showing. Select the "~00MORPHMOD.1" group (fat morph) and click Hide to unhide it. It should appear, and be the only group showing.
21. Temporarily Rename Fat Morph: There's a little quirk of the Vertex Data Merge plugin that won't let you use it on a fat morph normally. There's good reasons for this, but we need to use it to fix the fat morph's gaps. We need to rename the fat morph for now, so the plugin doesn't think it's a fat morph. On the Groups tab, select the fat morph. There will be a blank down below with the fat morph's name. Click in that box, and just delete the first character of the name, the ~ and then click Rename. You'll see the name change in the list of groups up above. Now you can use Vertex Data Merge on the fat morph without it complaining.
22. Fix Gaps on Fat Morph: Repeat steps 15 through 18 to fix the gap on the fat morph the same as you did for the normal morph. Make sure to double-check your work when you're done to make sure you've done it properly. If you mess up anywhere, Undo until it looks right, or go back to the file you saved in Step 19.
23. Rename Fat Morph: We need to make sure the fat morph has the name it originally had, or it won't be read properly. Go back to the Groups tab, select the fat morph, and in the little box below, click and put the ~ back in. On a QWERTY keyboard, the ~ will be to the left of the 1 - you will have to press Shift to get it to work. Or you can just copy-paste the proper name from this tutorial. Click Rename and you'll see it goes back to being called "~00MORPHMOD.1" as it should be.
22. Save: Again, File - Save As. This time, call it "TutorialDressTwo-4.ms3d" - sensing a pattern yet?
23. Unhide Normal Morph: On the Groups tab, click on the "body" group (normal morph) and click Hide to unhide it. You should now have both the normal and fat morphs showing at the same time.
24. Select Bottom of Skirt: On the Model tab, Select should be pressed, and Vertex mode selected. In the side view, drag a box around the very bottom row of vertices in the skirt. You'll have to be careful to just grab this bottom row, and nothing in the leg. If you do happen to grab something in the leg, you can SHIFT-right-click to deselect those vertices. Double-check that you have only the bottom of the skirt, the ring around the very edge of the hem selected, before continuing. Looking at the 3D view is a good place to double-check.
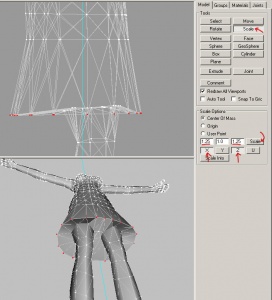
25. Flare Bottom of Skirt: On the Model tab, click on Scale. Down toward the bottom, you'll see three blanks, with buttons underneath for X, Y, and Z. Click on Y to deselect it. Then in the blanks above X and Z, type "1.25" - these settings will make it so we scale by 1.25 on both the X (left and right) and Y (front and back) axis, but not on the Y (up and down) axis. When you have the settings set up properly, click Scale once. This will flare the skirt outward.26. Save: Again, File - Save As. This time, call it "TutorialDressTwo-5.ms3d"
HINT: When you're scaling something and you don't know exactly how much you want to scale it by, you can always scale multiple times. For example, if you know you want the skirt flared but not by how much, you can always choose to flare it by 1.1 or 1.05 and click Scale multiple times until it's the right size. Same with if you want to un-flare something - you can use .99 or .95 to do it by just a little bit at a time.
Now that we've got our major mesh changes done, it's a good time to take a little break. Go get another cup of coffee, have a stretch, have a bite to eat, and come back. Remember when you're doing a long, complex edit to remember to take breaks often - it can be tempting to just sit and work until it's done, but you'll work a lot better if you go easy on yourself! When you're ready, come back and we'll go on to the rest of the editing - fixing the UV map.
Part 7 - Replace Model in Mesh File
Now that we have our model edited, we need to replace the 3d model in our mesh file with the one we just made.
1. Open Mesh File: Open SimPE, and open your mesh file ("TutorialDress_MeshFile.package") from your "TutorialDress Files" folder.
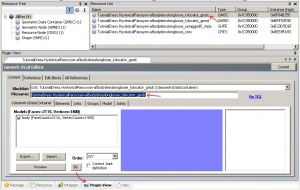
2. Copy GMDC Name: Click on the GMDC in the Resource List. Then make sure you're in Plugin View, and look at where it says "Filename" under "Blocklist" - Select that whole line of text in the blank and CTRL-C to copy it.
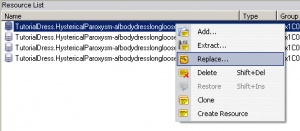
3. Replace GMDC: Right-click on the GMDC in the Resource List, and in the menu that pops up, choose Replace. Browse to your "TutorialDress Files" folder and select the "Edited_GMDC-1.simpe" which you exported from Milkshape and then click Open. You will get a popup saying (basically) "Resource Changed - Should SimPE reload it?" Click Yes. You will see the name of the GMDC in the Resource List change to the filename you just imported, and will go italic.
4. Paste GMDC Name: In the Filename blank where it now says "Edited_GMDC-1_tslocator_gmdc" select that whole line of text and CTRL-V to paste back the name that was there originally.
- NOTE: Steps 2 and 4 are not absolutely necessary for the mesh to work - it will still function just fine with the changed GMDC name, but it looks much neater and nicer with the proper name, and it's a good habit to get into.
5. Commit: Click the "Commit" button (top right on Plugin View) to commit your changes. You'll get a popup saying "Changes were committed." The name of the GMDC will also change back to how it was before, still in italic to indicate unsaved changes.
6. Save: File - Save to save your changes.
Part 8 - Test Edited File in Body Shop
Now for the moment of truth... let's go take a look at what our edited mesh file looks like in Body Shop!
1. Copy Mesh File to Downloads: In Part 7 you edited the file in "TutorialDress Files" again. Remember to copy the file from that folder to your Downloads folder again. You will be asked if you want to replace the existing file (as you already copied the old version there once). Say Yes.
2. Open Body Shop: Run Body Shop. Cross your fingers, toes, and knees!
3. Look at Your Dress: Click Create Parts - Start New Project - Create Clothing - Formal. Your recolour should be the first thing showing up, with your "TutorialDress" tooltip on it. The thumbnail image probably looks exactly as it did before, with no changed waist - that's fine, as the thumbnail is cached (saved) by Body Shop and not regenerated every time you run it. When you click on the thumbnail to select that outfit, though, you should see your changes: a narrower waist, and there should be no dangly thing on the back.It may not be the most amazing edit ever... might look a little sharp under the arms in the back, but hey, it's your first try - it doesn't have to be spectacular, it just has to work!
- TIP: If you want to get a closer look, press F3 on your keyboard. Left click and drag to change the camera angle. Use both left and right click and drag to move the camera around. You can also press F9 to toggle showing the interface options - so you can see just your dress by itself with more room.
- TIP: You may also want to take a moment to load the game and look at your new mesh in Create a Sim too - just make an adult female sim, go to the formalwear selection, and look at your outfit there. While it's not essential for this particular mesh, in-game testing is a good habit to get into going forward.
Congratulations! You have just made your very first new mesh! Give yourself a pat on the back and a cookie!
Homework/Followup
Once you have successfully completed this tutorial, it's best to experiment with the techniques taught in this tutorial before moving on to more advanced techniques.
So, for "homework" your assignment is to create at least two more meshes. For simplicity's sake as a beginner, you need to make sure they are full body meshes.
Try to make one with a skinnier waist as you did in this tutorial. See if you can make the other with a fatter waist using these same techniques. Get them showing up properly in Body Shop and the game.
- NOTE: You will not be able to use the technique of deleting vertices to remove stuff in most cases, as you did with the dangly thing. As mentioned in that part of the tutorial above, it is a special case as it is a separate part. If you try doing the same thing with most meshes (for example, trying to delete the sleeves off a shirt) you will end up with big holes in your mesh, not a sleeveless mesh.
A note on uploading...
It's great to be excited about having completed your first few projects. However, these first few beginner projects are usually just that: basic beginner projects, meant more to show you that you can do it than make anything spectacular. You and a thousand other people will have done this tutorial, and there's really no need for you to upload your finished mesh (especially considering that WDS Brianna uploaded her dress without the dangle way back in 2005. So please don't upload either this tutorial's project or your homework projects to MTS2 - such basic stuff will not be accepted. Wait until you've got a bit more experience under your belt (i.e. when you have gone through the other Unimesh tutorials) before uploading.
Having trouble?
In a perfect world, everyone would follow this tutorial word-for-word and do everything just right and never have any trouble. But sometimes things go wrong. So here's a list of common problems and mistakes people make, and the most likely fixes.
Body Shop Shows Wrong Dress
If you are getting this in Part 4, Step 6:If you are getting this in Part 8, Step 2:
- Did you forget to put your "TutorialDress_MeshFile.package" in your Downloads folder before running Body Shop?
- Something may have gone wrong with the linking. Go over the linking parts again.
- Did you forget to put your "TutorialDress_MeshFile.package" in your Downloads folder before running Body Shop, making sure to replace the existing file already there?
- Are you sure it's actually showing the wrong dress? Remember, the thumbnail will be wrong, but clicking on the dress should show you the right outfit.
- Maybe you accidentally replaced your GMDC with the original GMDC in Part 7, Step 3.
- Maybe you forgot to click Commit after replacing your GMDC in Part 7, Step 5.
- Maybe you forgot to save your edited file after replacing the GMDC in Part 7, Step 6.
Body Shop Shows No Changes
If you are getting this in Part 8, Step 2:
- Did you forget to put your "TutorialDress_MeshFile.package" in your Downloads folder before running Body Shop, making sure to replace the existing file already there?
- Are you sure it's actually showing the wrong dress? Remember, the thumbnail will be wrong, but clicking on the dress should show you the right outfit.
- Maybe you accidentally replaced your GMDC with the original GMDC in Part 7, Step 3.
- Maybe you forgot to click Commit after replacing your GMDC in Part 7, Step 5.
- Maybe you forgot to save your edited file after replacing the GMDC in Part 7, Step 6.
Wrong Dress Shows In-Game
If you test in-game and you are getting an unexpected or wrong outfit showing up, the most likely cause is incorrect game settings. In the game's graphics settings, you must set "Sim/Object Detail" to high for custom meshes to show up properly. At this time there is no known way to edit the low detail meshes properly.
Milkshape Error: "Face Count Mismatch"
This error occurs if you try to export your edited mesh and your morphs have a different number of faces/vertices. This most often happens if you have deleted too much/not deleted enough in removing the dangly thing or forgotten to remove it from the morphs. Start over the Milkshape editing part and make sure to delete the whole dangly thing from all three morphs - normal, fat, and pregnant. Make sure there are not any holes or anything else selected before you delete to prevent deleting too much.
Blue Lines/Circles in Milkshape
If you are seeing a bunch of weird blue lines/circles all over the place after importing your mesh, then you forgot to uncheck Show Skeleton as described in Part 6, Step 4. Uncheck it to hide the skeleton.
Sharp Seams/Lines Down Arms and Sides
If you are seeing sharp lines, seams, or edges down the arms and sides either in Milkshape or once you're looking at your edited mesh in Body Shop, then you forgot to uncheck Auto Smooth as described in Part 6, Step 3, or at some point you accidentally hit "Smooth All" on the Face menu. This is not fixable once imported - you must start over the Milkshape editing parts, and import without Auto Smooth checked.
Strange Transparency or Holes
If your mesh appears to have invisible parts, things showing through that shouldn't, or holes, then you probably said No when asked if you wanted to correct underweight bones in Part 6, Step 4. Reopen your MS3D file in Milkshape that you saved in the last step of Part 6. Then on the Vertex menu, select "Sims 2 UniMesh Fix Underweighted Bones V4.09" and then click OK when it tells you how many were adjusted. Re-export your mesh and continue with the rest of the steps in the tutorial from Part 7 onward.
Confused When Linking
If, on Part 4 when you open your recolour file, there are only 6 items in the Resource List rather than the correct number (8), and your file is just named "TutorialDress.package" rather than something like "5f3a3d82_TutorialDress.package" then you are likely opening the file from your My Documents\EA Games\The Sims 2\Projects\TutorialDress\ folder. That is an unfinished file. Make sure you are opening the finished file from your My Documents\EA Games\The Sims 2\SavedSims\ folder instead.
DirectX Error on Part 5
If you get a DirectX related error when you try to export the GMDC in Part 5, then you didn't get the Managed DirectX 9.0c mentioned in the "What you will need" section. It's linked on the SimPE download page under "Needed software to run SimPE" and you must get it and install it before continuing.
Mesh Replaces Maxis Original
If you suddenly notice that the Maxis outfit you based yours on has had its mesh replaced by your modified one, then you have unwittingly made a default replacement by forgetting to do Fix Integrity properly and give your mesh a new name. Go back and repeat Part 3, Steps 7 and 8, plus all of Parts 4, 5, and 7.
Questions? Comments?
There is a discussion thread for this tutorial which is here: http://www.modthesims2.com/showthread.php?t=296915
Please make sure you've checked the "Having trouble?" section above and re-read anything you're stuck on before posting. Also remember that the discussion thread is -only- for questions directly relating to this tutorial. If you're having trouble with or have questions regarding something else, please post in the main Body Shop Meshing Forum.
Related Links
| Tutorials by Category | |
|---|---|
|
Body Shop: Recolouring | Meshing | Modding | Sims Objects: Object Creation | Recolouring Building: Building | Landscaping | Walls & Floors | Other: Careers & Majors | Hacks and Game Mods |
