Sims 3:Creating A New Base Texture
| Tutorials by Category | |
|---|---|
|
CAS | Patterns | Objects | Building | Worlds | Modding | Modding Reference |
Contents |
Base Textures
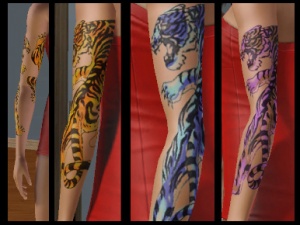
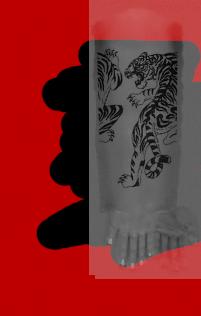
Base textures can be thought of as the "canvas" the game "paints" the patterns and colors onto. The game uses the Alpha layer of the base texture to determine what parts of the texture you want displayed. Whereas the base texture itself adds details to the CAS part like wrinkles and folds. Altering the base texture can turn bland boring opera gloves into beautiful tattoos like these.
What This Tutorial Will Do
- Teach you how to alter the base textures of CAS parts in the Sims 3.
- Teach you how to add translucent effects to base textures.
What This Tutorial Will NOT Do
- Show you step by step how to make a tattoo!
-
 Following this tutorial will lay the foundations, but it'll take a lot more work and practice to actually make them look good.
- Teach you how to make new meshes.
- Teach you how to make new patterns.
-
 Take a look at HP's Custom Pattern Tutorial for that.
- Add multicolored RGB masks
-
 Take a look at Basic Mask Editing for that.
Difficulty
- This tutorial is written for beginners, however, some basic knowledge on how to use your imaging program is needed.
- Keep in mind that the more intricate and detailed you want your finished product to be, the more tweaking and practice you'll need.
- Although a tattoo was used as an example, it's advised to start simpler... consider that a warning.
What You'll Need
- Adobe Photoshop (purchase) or GIMP 2.0 (free)
- Delphy's CAS Texture Unitool
- DDS Plug-in for Photoshop or GIMP
The Tutorial
Part I: Extracting the Base Texture
Step 1
Open the CAS Texture Unitool (CTU).
Step 2
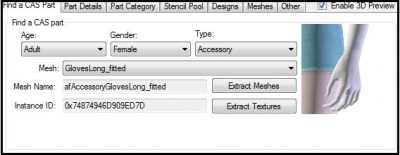
In the "Find A CAS Part" tab, set the CAS part details to the parameters of the mesh you wish to change the base texture of. (i.e. Adult-Female-Accessory) Next choose the mesh you want to use from the drop down list (i.e. afAccessoryGlovesLong_fitted).
Step 3
Move over to the "Designs" tab and click "Add New Design".
Step 4
Under the "Textures" sub-tab click the base texture key to highlight it.
Step 5
Being sure that the base texture key is highlighted, click on the "find" button at the bottom of the window.
Step 6
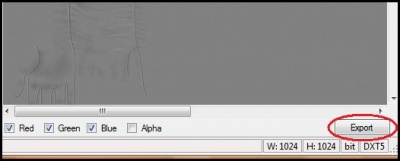
A DDS Preview window should pop up. Click the Export button at the bottom right corner of the preview window. Choose a destination for the file, give it a name, then save it.
Part II: Editing
Open up the newly exported DDS file in your image editor. If asked, load default sizes and do not generate MIPmaps.
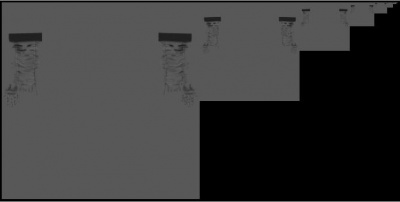
Note: If you get an image that looks like the one below, then you accidentally generated the MIPmaps. Close the file and reopen it, being sure to NOT LOAD MIPMAPS!
Now here comes the fork in the road. There are two things you can do with the base texture: change the way the alpha looks, or change the way the base texture itself looks.
Editing the Alpha
- The alpha channel controls what pieces of the CAS parts you want displayed. You can turn a conservative one-piece swimsuit into a Bay Watchesque skin fest by just removing parts of the alpha channel.
- There are three methods to change the alpha channel: the "subtractive" method, the "trace" method and the "cut-out" method.
Note: The cut-out method only works for Photoshop users.
A Little Info
- Black areas in the Alpha are completely hidden in the game.
- White areas are completely opaque in the game.
- Grey areas between RGB values 151/151/151 - 149/149/149, give a translucent affect to the texture. 151/151/151 is the lightest (think highlights) whereas 149/149/149 is the darkest.
Subtractive Method
- Make sure your canvas background color is set to black
- Click on the channel view and hide all channels except the Alpha channel.
- Using the eraser, erase the major parts of the Alpha image that will not be a part of your new base texture.
- Use the paint brush to add details and shading using the colors mentioned above.
Trace Method
- Change your canvas background color to white
- Create a new layer on top of the base texture
- Design what you want your new base texture to look like. (Use the existing base texture as sort of a guide.)
- When you finish, switch over to the Channels view, and delete the existing Alpha channel.
- Create a new Alpha channel and make it visible.
- Pick one other color channel and make it visible as well.
- Erase the general area of where your base texture design is located
- Using the paintbrush, fill in any unwanted areas with black. (Note: although black might be selected, your paint might appear as a different color).
- Next, hide the other color channel, keeping the Alpha channel visible. Add details and shading using the grey scale colors mentioned above.
Cut-Out Method
- Create a new layer on top of the base texture
- In that new layer, design what you want your new base texture to look like. (Use the existing base texture as sort of a guide.
- When you finish, hold CTRL + Layer (click the layer with your new base texture design on it; if your design spans over multiple layers, merge them down into one layer. DO NOT MERGE IN THE ORIGINAL BASE TEXTURE) This should select your entire design.
- Switch over to the Channels view, and delete the existing Alpha channel.
- Create a new Alpha channel
- With the Alpha channel selected, hit ALT + Delete (this should make a basic cut-out of your new base texture design). If ALT + Delete doesn't work, try CTRL + Delete
- Using the eraser and the paintbrush, clean up the cutout and add details and shading using the colors mentioned above.
The End Result
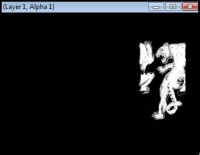
Depending on how complicated your new CAS part is, you might have to use a combination of the three methods. Regardless, your end result should more or less look like this:
Note: It does not have to be as intricate as this! Adding greyscale details and shading is totally optional. If you're a beginner you should just stick to a plain white alpha channel for now, anyways! :)
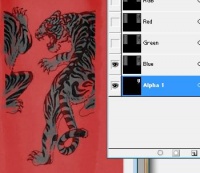
Tip: To get a feel for where the highlights/lowlights would go, try making the alpha channel plus one other color channel visible while editing. See the example below.
Editing the Base Texture
- The base texture is the foundation of your CAS part. Using our example with the glove texture, you can see how the cloth wrinkles and highlights are already painted in. Here is where you'd change how the CAS part appears to wrinkle and fold. For example, if you were making a tattoo or something that was skin tight, you'd want to erase and smooth out a few of the wrinkles, and vice-versa for looser fitting clothes.
- Depending on what you're trying to accomplish, some editing directly on the base texture is needed. Generally, if you're making something that has recolorable parts (like a tattoo) then some solid outlines might be required.
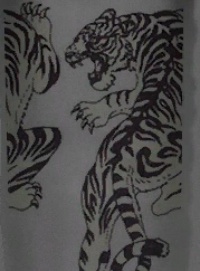
- Take the tiger tattoo for example; On the alpha, the area where the tiger stripes are supposed to be are completely white, which means that that specific area on the texture is 100% visible. On the base texture itself you can see that the tiger stripes are already inked in. You see, if the tiger stripes weren't already drawn in, the game would show nothing but a plain tiger like cut-out with a few highlights thrown in the mix.
- You can also add color to the base texture. It may be hard to see, but there's a slight tint added to the tiger to give it more color definition. Remember how the different greyscale hues create different translucent effects? Well we can use that to our advantage to add the aforementioned highlights and also create varying hues withing the texture.
- Editing on the base texture itself is 99.9% optional, it all depends on what you're trying to change about your CAS part. If you simply want to make a pair of socks longer or turn a halter into skimpy mid-drift, then you don't really need to do any extra editing to the base texture, all you need to do is change the alpha.
Part III: Saving the Base Texture
Step 1
Depending on what you changed about the base texture dictates what you need to do next.
If you only changed the alpha...
- Make all color channels visible again.
- Switch back to the Layers tab and hide any extra layers you may have created. Leave only the original grey background texture visible.
- Next, flatten the image.
If you only changed the base texture...
- Hide any layers that are not part of the final base texture.
- Next, flatten the image.
If you changed them both...
- Make all color channels visible again.
- Switch back to the Layers tab and hide any layers that are not part of the final base texture.
- Next, flatten the image
Step 2
Go to File → Save As. Pick D3D/DDS as your save format from the drop down list.
Make sure that the Alpha Channels box is ticked. Give the file a name, then click save. When you do the DDS plug-in box should come up.
Step 3
In the long drop box, pick DXT5 ARGB 8bpp | interpolated alpha, then press save.
GIMP Users: Pick the BC3/DXT5 format and tick Generate Mipmaps , then press okay.
Make sure the MIPmaps are generated.
![]() See Replacing Textures to learn how to add your new base texture to a CAS Part.
See Replacing Textures to learn how to add your new base texture to a CAS Part.
Hints, Tips and Other Tidbits
- Some find it easier to use the Skin Specular in place of the Base Texture as for skin tight things like tattoos a body marks.
- Just FYI, although tattoos were used as an example, you'll need to learn how to create RBG masks to get them to color right.
Questions?
- For more help, go to the MTS forum about this tutorial.
Special thanks to Robokity for letting me pick apart her fabulous tattoos
| Tutorials by Category | |
|---|---|
|
CAS | Patterns | Objects | Building | Worlds | Modding | Modding Reference |
