Tutorial:Sims 3 Localized Coding
Introduction
|
This tutorial will cover how to use the localization methods from TS3's core, and how to build the STBL resources to store the related strings. It will do so by a concrete example, but it will not cover how to embed that example in a complete script or how to get that script executed in an object mod or scripting mod.
If you came here after going through the object modding tutorial, going through it successfully that is, you probably couldn't help but wonder why the pie menu button of your interaction was blank. This is exactly the point where this tutorial carries on.
Before you read on, be aware that this tutorial is NOT an introduction on how to write mods for TS3! It won't explain how to write the code for an object mod or script mod beyond the localization code. If you're new to modding, please refer to Tutorial:Sims_3_Pure_Scripting_Modding and TUTORIAL: Object Modding (aka adding interactions).
What You Need
- The knowledge and the tools to write object mods and/or scripting mods.
- The locale codes
- STBLize This one isn't absolutely necessary, but it makes things a lot more convenient and will be used in this tutorial.
Theory
An STBL, a string table, is like a C# dictionary. It has a certain number of entries and each entry consists of key and value. You use the key to fetch the value you want to show in the game. You use string keys in the code, these will be hashed to ulong values and these hashes must be in one of the string table entries. Trying to access an entry that doesn't exist, won't cause an exception, though. ;)
It doesn't matter in which STBL an entry is; for the game only the keys matter. So unless you deliberately want to override an existing string, your string key must be unique in order to lead to a unique hash value!
Coding Localized
The Starting Point
Let's just get going. It will all be clear if we just look at an example interaction.
public class SayHello : ImmediateInteraction<Sim, Sim>
{
	public static readonly InteractionDefinition Singleton = new Definition();

	public override bool Run()
	{
                string message = "Hello, " + base.Target.Name + "!";
		base.Actor.ShowTNSIfSelectable(message, StyledNotification.NotificationStyle.kSimTalking);
		return true;
	}

	[DoesntRequireTuning]
	private sealed class Definition : ImmediateInteractionDefinition<Sim, Sim, SayHello>
	{
		public override string GetInteractionName(Sim a, Sim target, InteractionObjectPair interaction)
		{
			return "Say Hello";
		}
		public override string[] GetPath(bool isFemale)
		{
			return new string[] { "Interactions" };
		}
		public override bool Test(Sim actor, Sim target, bool isAutonomous, ref GreyedOutTooltipCallback greyedOutTooltipCallback)
		{
			return !isAutonomous;
		}
	}
}
There are three strings in this interaction:
- "Hello, " + base.Target.Name + "!"
- "Say Hello"
- "Interactions"
Right now, they're hard-coded; that means no matter in what language the player plays Sims3, the output will be the same. We will change that.
Coding Localized
The game code already has everything we need to do all the "fetching of the string" earlier mentioned. Look at Sims3.Gameplay.Utilities.Localization and there especially at
- public static string LocalizeString(string entryKey, params object[] parameters)
- public static string LocalizeString(bool isFemale, string entryKey, params object[] parameters)
Without any further delay, just look at how to use these methods:
public class SayHello : ImmediateInteraction<Sim, Sim>
{
    public static readonly InteractionDefinition Singleton = new Definition();

    public override bool Run()
    {
        string message = Localization.LocalizeString("TwoBTech/LocalizedMod/SayHello:Message", new object[] { base.Target });
        base.Actor.ShowTNSIfSelectable(message, StyledNotification.NotificationStyle.kSimTalking);
        return true;
    }

    [DoesntRequireTuning]
    private sealed class Definition : ImmediateInteractionDefinition<Sim, Sim, SayHello>
    {
        public override string GetInteractionName(Sim a, Sim target, InteractionObjectPair interaction)
        {
            return Localization.LocalizeString("TwoBTech/LocalizedMod/SayHello:InteractionName", new object[0]);
        }
        public override string[] GetPath(bool isFemale)
        {
            return new string[] { Localization.LocalizeString(isFemale, "TwoBTech/LocalizedMod/SayHello:Path", new object[0]) };
        }
        public override bool Test(Sim actor, Sim target, bool isAutonomous, ref GreyedOutTooltipCallback greyedOutTooltipCallback)
        {
            return !isAutonomous;
        }
    }
}
As you see, all the hard-coded strings are now replaced with method calls. Let's look at the call in GetInteractionName():
Localization.LocalizeString("TwoBTech/LocalizedMod/SayHello:InteractionName", new object[0])
As stated before, the key will be hashed. You can't just use "InteractionName" and "SayHello:InteractionName" would make a very poor string key too. Begin it with something that is unique for you, add something that makes it unique for your mod, i.e. the mod's name, and finally add something that makes it unique for the area of code. In this case, that's "TwoBTech/LocalizedMod/SayHello:", but of course that's only an example you shouldn't actually use.
The second parameter is for things you want to give the Localization method to build the final string. As you see it's just an empty array in this case as there are no dependcies on the actor or target of the interaction.
It's a bit different for the call in GetPath():
Localization.LocalizeString(isFemale, "TwoBTech/LocalizedMod/SayHello:Path", new object[0])
The last parameter is still an empty array, but now we pass isFemale right through to the Localization method. We'll see later what to do with that.
In Run() we have yet another different call:
Localization.LocalizeString(base.Target.IsFemale, "TwoBTech/LocalizedMod/SayHello:Message", new object[] { base.Target })
We now pass the target sim's gender as first parameter, and the whole target sim as part of the third parameter.
Writing The Lookup Table
Open a text editor and copy and paste this:
<?xml version="1.0" ?>
<TEXT>

<KEY>TwoBTech/LocalizedMod/SayHello:InteractionName</KEY>
<STR>Say Hello</STR>

<KEY>TwoBTech/LocalizedMod/SayHello:Path</KEY>
<STR>{MA.Whiny}{FA.Grumpy} Interactions</STR>

<KEY>TwoBTech/LocalizedMod/SayHello:Message</KEY>
<STR>Hello, {0.SimName}!</STR>

</TEXT>
You should immediately recognize the keys in the <KEY> tags. The part in the <STR> tags are the strings. Of course, you need to change the keys to match what you wrote in the localization calls.
Say Hello
Plain and easy. That's just the same as the original hard-coded version, just that you can change it for the other languages now.
{MA.Whiny}{FA.Grumpy} Interactions
This one looks a little different than the original hard-coded string, just to show the point of the isFemale parameter. MA/FA stands for "Male Actor"/"Female Actor". I'm actually guessing the "Actor" part, but you get the idea. The game will parse the expression and if the isFemale paramter is True, it will insert the string between '{FA.' and '}' in the final string. In this case the final string would be "Grumpy Interactions". If isFemale is False, the final string will be "Whiny Interactions". Not difficult, right?
Hello, {0.SimName}!
Ok, what about {0.SimName}? The expression tells the localization code to insert a sim's name at that position and to get that name from the object at index zero, i.e. the first object, of the parameters array in the method call. Take another look at the method call if you don't remember it.
Now save the file in UNICODE format to your project folder, copy STBL.exe to that same folder and drag&drop the text file on STBL.exe; it will compile the file to an STBL file.
If you release the mod later, you can just give translators the text file and let them translate the part in <STR> tags. You need to explain them a little bit how it works of course, and they need to be aware that they must not change the keys, but the text file has the advantage that translators don't need any special tools.
String Tables
Now open your mod package in S3PE.
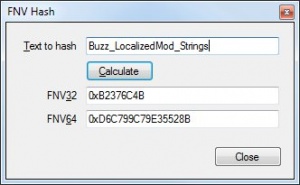
- Click on Tools->FNV Hash...
- Enter something unique for your mod. Again something with your name and the mod's name in it is a good choice.
- Click on Calculate.
- Copy the value from the FNV64 field.
- Click on Close.
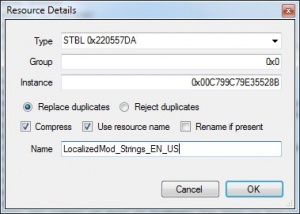
- Click on Resource->Add...
- As type choose STBL.
- Enter 0 for Group and the paste the instance you created with the Hash tool. Now the first byte, i.e. the first two digits, indicates the locale code of the string table. If you play the game in English, that's 00. Replace the first two digits with you language code.
- For convenience enter a name for the STBL.
- Click on Ok.
The STBL will be added to your package, but it's still empty. Right-click on the STBL resource, and select "Replace...". Navigate to your project folder, select the STBL file STBL.exe created and click on Open.
If you click on the resource now, the preview should now show something like this:
   [0] 0x233597618807DF5A: {MA.Whiny}{FA.Grumpy} Interactions
   [1] 0xEFCFE0322BC7EB08: Say Hello
   [2] 0x7E6CB1745A6AB764: Hello, {0.SimName}!
I don't need to tell you that the FNV64 hash of "TwoBTech/LocalizedMod/SayHello:InteractionName" is 0xEFCFE0322BC7EB08, right?
Save the package and give it a run in the game.
Debugging The Localizing
It can be a pain to find errors in localized coding. When a key didn't bring up a string value, the localization code will just return an empty string. It used to return the localization key itself, but the devs changed that at some point. The best and only advice is to use a core mod that brings the old behavior back; twallan's ScriptError mod does that.
Final Hints And Specifics
- In this tutorial we used an external STBL compiler to build the actual string table. There are different ways to it and a couple different tools to do it. Finding the way that suits you best and how to use these tools, will be your job. Maybe have a look at Jonha's String Tool which is now in the caring hands of Peter Jones. Another choice may be twallan's The Packer.
- We only created one STBL resource in this tutorial. For a mod that's going to be released to the public, and there wouldn't be much point to make it localizable if you didn't want to release it, you need to add one STBL resource for every locale code. Your mods should always fully support English, and all non-supported languages should contain the English strings in the beginning.
- You may have noticed that the call for the notification passed the gender of the related sim, but the string didn't make use of it. In some languages, names are used with gender-dependent articles. In others, verbs, adjectives or adverbs may be gender-dependent. Make sure that you always pass the gender of a sim if the sim is subject or object of a sentence. It gets difficult if one sim is the subject and another is the object, I guess. ;)
- When you add a localization call to your code, your very next step should be to add the related entry to the string table or source text file. You can rephrase it later, but it's a pain to keep track of it if you don't do it immediately.
- Sims aren't the only objects you can pass as a parameter to the Localization methods, of course, and SimName isn't the only keyword. Also you can basically pass as many parameters as you want, just make sure that the number in the string matches the index of the parameter. Keywords without claim to completeness:
- SimName
- SimFirstName
- String
- Number
- Money
Should be very obvious what paramters need to be passed for each.
- Most escape sequences don't do anything in the strings, but use the usual \n for line feeds.
- In this tutorial we used the localization methods directly. That's all right for smaller mods' code sections. Look at EAxian interactions and you'll find individual LocalizeString() methods and sLocalizationKey constants. It's probably a good idea to copy that style to have it a bit easier.
Questions
Ask them here: Q&A thread Sims 3 Localized Coding

