MTS2:Creator Guidelines/Screenshot Basics CAS
Contents |
Taking better "in-game" photos for CAS uploads in Sims 4
|
So you've made a piece of clothing that you simply 'must' share! ... sweet! Before you upload here, hopefully you read the creator guidelines that indicate that your item needs an in-game photo attached to your upload. So if this is your only attached photo, well ... you might be getting a CR notice shortly! ;)
|
Distance and Angle
|
"Okay, I got a screenshot from the game ..." The in-game screenshot requirement is meant to be a way to show downloaders what they will get when they load your item in-game, as well as a way for the moderating team to see if there are any glaring discrepancies between the CAS item and its in-game appearance (such as dramatic blurriness, completely distorted mapping, etc.) It is not intended to be an afterthought--it needs to be clear, shown from a proper angle, and well-lit. This photo, while satisfying the basic "in-game requirement," would not be acceptable because of the high overhead angle and lack of focus on the shirt.
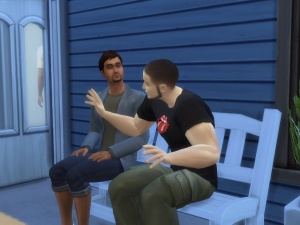
Likewise, this photo is not so much a photo of the clothing as a photo of two sims interacting: Cute interactions and animations should not be the main focus of your screenshots! Remember, you're trying to show off your clothes here! |
Camera
|
"Okay, how do I get better screenshots?" Glad you asked! First things first, you've probably noticed that the camera is a bit ... excitable. There are two mods out there that will prove invaluable: Live Mode and Tab Mode Camera Mods - No Drift & Lower Level, and No Fade Sims and Objects. These two mods will allow you to get very close to your sims while in "cameraman mode." (Press the "tab" key to enter "cameraman mode"--you can move the camera around with the mouse, or with your arrow keys.)
Try to get a direct shot of the item of clothing that you are displaying. Here are three in-game photos of the same shirt. The first one is good, but could be zoomed-in a bit more, since the upload is of a shirt, not a full outfit. The second one is better, as it focuses directly on the created item and lets downloaders and the moderators see the needed details. The third shot is completely inadequate for seeing the item at all, and will almost certainly get you a CR notice.
|
Lighting
|
The next most important thing you need, besides a straight shot of your item, is good lighting. Indoor lighting in Sims 4 is quite dark and not particularly good for showing off CAS items. Again, there is a very useful mod out there to help with this: Improved Lighting, but you can also overcome this with additional wall / overhead lamps in a small space, or by using the invisible lights available in the buydebug catalogue. To access the invisible lights, open Build Mode in your game, use "ctrl + shift + c" to open the cheat window, type in "bb.showhiddenobjects" and press enter. Select filters and choose Content ... Debug.
Here are three photos taken in the same house.
Outdoor photos are much easier to take, as the outdoor lighting in Sims 4 is great for photos--however, the same principles apply. You want good lighting, and you want the sim to face the light source. Ideally, your photos should be taken with your sim facing the sun (with their shadow behind them) at some time between 8 a.m. and 4 p.m. Photos taken at dawn, dusk, or nighttime are very likely to be too dark.
|


