Difference between revisions of "Tutorials:Simple Mesh Replacement In Blender-Bones Triangulating And MeshSwap"

From SimsWiki
Jump to: navigation, search
(Created page with " {|style="border-spacing:8px;margin:0px -8px" |- {|style="border-spacing:8px;margin:0px -8px" |style="width:50%;border:1px solid #cef2e0;background-color:#C9C8E6;vertical-alig...")
 
 
Line 11: Line 11:
  
  
==Bones, Triangulating, and MeshSwap
+
==Bones, Triangulating, and MeshSwap==
 
Now we have to assign our mesh to the bones in the RIG(object skeleton). We also need to change all the faces in our mesh from 4-point(quads) to 3-point(tris). Then we can swap our mesh with the EA mesh.
 
Now we have to assign our mesh to the bones in the RIG(object skeleton). We also need to change all the faces in our mesh from 4-point(quads) to 3-point(tris). Then we can swap our mesh with the EA mesh.
 
===Step 21===
 
===Step 21===

Latest revision as of 12:59, 23 January 2013


[edit] Bones, Triangulating, and MeshSwap

Now we have to assign our mesh to the bones in the RIG(object skeleton). We also need to change all the faces in our mesh from 4-point(quads) to 3-point(tris). Then we can swap our mesh with the EA mesh.

[edit] Step 21

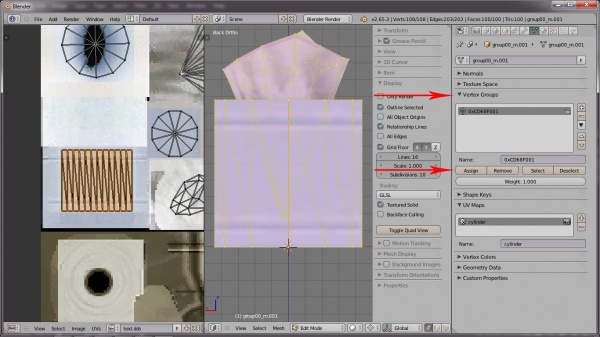
While still in Edit mode, press A to select all. In the Properties editor press the Object Data button and under Vertex Groups, click the Assign button to assign the vertices to the 0xCD68F001 bone. In the 3D view, press T to change the faces into triangles(required for TS3). Press TAB to go to Object mode.

Meshswap1.jpg

[edit] Step 22

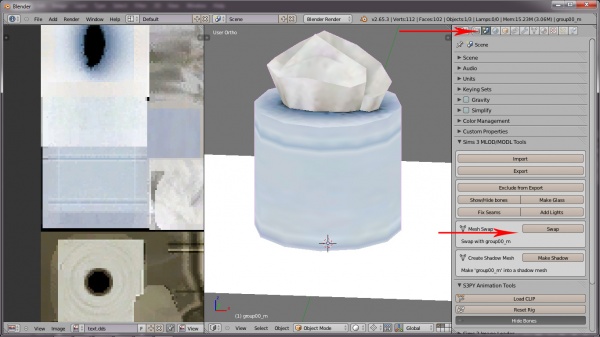
With the cylinder object still selected, hold SHIFT and press 1 to show layer 1. hold SHIFT and right-click on the original tissue box. In the Properties editor, press the Scene button(has a light, sphere, and cylinder on it). Under Sims 3 MLOD/MODL Tools, click the Swap Mesh button. This replaces the original mesh with your mesh.

Meshswap2.jpg
<<Back Next>>
Personal tools
Namespaces

Variants
Actions
Navigation
game select
Toolbox