Tutorial:Sims3Repository
| Tutorials by Category | |
|---|---|
|
CAS | Patterns | Objects | Building | Worlds | Modding | Modding Reference |
Contents |
Overview
Objects cloned in The Sims 3 can share the same textures and meshes as another. This method is useful if you are making EA add ons and wish to use the same textures or if your wanting to make picture "recolors" and don't need to include the mesh. Both of these will help to keep your package sizes smaller.
This tutorial will show you how to create your master/slaved package. It will not go into meshing, uvmapping, or any other part of creating your object. There are other tutorials already available for that. This is not a beginners tutorial and you must be comfortable working in S3PE and using hex values.
What will I need?
You will need to download and install the following:
Cloning the Package
- Open S3OC
- File/Cloning/Normal
- Scroll to the item you want to clone
- Select Clone or Fix button
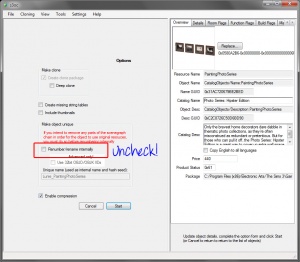
- Uncheck the Renumber/rename internallyr box
| Note: It is important to uncheck the Renumber/rename internally box. By renumbering this makes your clone unique, but right now we want our resources to be in their original form. |
Cleaning up the Package
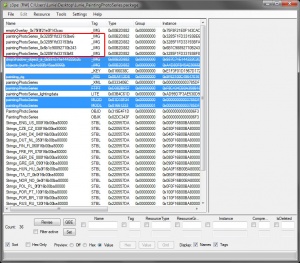
We are going to delete some resources that we don't need in the package and so that they stay linked to the original EA resources in the game files. This example is a picture that we want to add our own custom presets using this same mesh. So we are going to delete the meshes along with some other resources that are highlighted in blue.
- Delete: MLOD, MODL, _RIG, FTPT.
- Delete: dropShadow
Highlighted in red are the dds images for the specular, multiplier, mask and overlay. For this particular example we only need to keep the overlay since we are only changing the images inside the frame. We will need to view each dds to find the right one, so right click/view DDS. Find the one that looks like the image below and delete the others, the one your looking for has the actual images on it. You may need to uncheck the alpha box when viewing the dds to see the image.
- Delete Specular, Multiplier, and Mask
- Save your package
| Note: If your creating an add on object at this step you can delete ALL four images. You can export all four to help with your uvmapping, but they don't need to be in the package. |
Renumbering the Package
Now that you have removed excess resources it is time to renumber your package to make it unique and not override original EA resources.
- Open S3OC
- File/Open - browse to your saved package
- Select Clone or Fix button
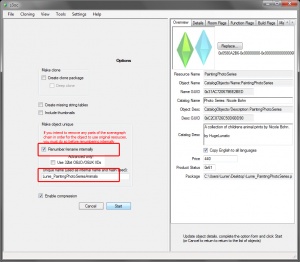
- Check the Renumber/rename internally box
- Enter a new unique name in the box or accept the one there
- Check the box Copy English to All Languages
- Change the Catalog Name, Catalog Description and Price
- Recategorize if desired
- Click Start
| Note: This will overwrite your package! If you don't want to do this, you can make a copy and then Renumber the copy. |
Conclusion
And your done! This tutorial has shown you how to use EA textures as the master, but you can also do this for custom objects. This can be especially useful for custom paintings where all your changing is the custom painting images. If your using custom objects make a copy of the original and start with the Cleaning up your Package step. Delete the unnecessary resources such as meshes, mask, specular and multiplier and then renumber the copy of the package.
| Note: Doing this on custom meshes will require the original custom package! |
What Links Where
So what if you've already cloned an EA object but want to remove the textures and link to the original? Then there are two places where you need to change the instance number of your packages textures to the originals of EA. You will need to find the original instance numbers for the textures you want to link to. You can either browse through the game files or you can clone the object using the method above, which is usually faster.
TGIBlocks
- Select OBJD
- Select TGIBlocks at the bottom and expand selecting [...]
- In the TGI Block List Editor find the _IMG with the instance number of your texture and change to the original EA one
- Save
MaterialsList
- Select Materials (3rd line down)and expand selecting [...]
- This will list all presets and you need to change each one
- Select TGIBlocks and expand seleting [...]
- In the TGI Block List Editor find the _IMG with the instance number of your texture and change to the original EA one
- Repeat for each Material listed
- Save
You will need to do this for any and all images that you want to link.


