Tutorials:Modifying a TS3 Mesh
Contents |
Tutorial: Modifying a TS3 Mesh
| Modifying a TS3 Mesh | |
|---|---|
| Author | WesHowe |
Step One:
This is a simple tutorial about doing a simple mesh modification to a Sims 3 body mesh. The things you need to begin are:
- A release copy of the Sims 3 game.
- Echo's Postal package tools
- MilkShape 3D
- Q-Mesh Sims 3 plugins for MilkShape
- Sims 3:Installing Package Files (OUTDATED Instructions Rick's game modding method)
Follow the instructions for installing each of these tools, then get at least familiar with what they look like and test that they work.
Overall strategy:
We are going to make a package from some game file data, extract the main mesh file, modify it in MilkShape, and then make our files into a new package that will be used by the game instead of the built-in game mesh. The change is only effective as long as the new package is in Mods/Package... remove it and the game is as it was.
Our Target is reworking the adult Aviator Sunglasses. We are going to start by making a copy of one (large) file from the game itself, so we won't accidentally overwrite the original game data.
In my case, I have made this copy on an external harddrive, M:\Sims 3\. Make a place you want to work from or make a new directory for your work (more files will be made later) and write it down. Then, copy the file from C:\Program Files\Electronic Arts\The Sims 3\GameData\Shared\Packages\FullBuild0.package to your working directory. If you have a 64-bit Vista system, the game will be installed in "Program Files (x86)" rather than "ProgramFiles".
Step Two:
Now we will open FullBuild0 and get the mesh file we want. You need to have Echo's Postal program installed, or you will stay stuck at this step.
Run the program, then use the File -> Open menu and steer yourself to the directory and copy of the FullBuild.package file you made in the previous step (yes, the copy... don't risk accidental modification of your game files, a reinstall might be required if you mess the original up). Open it.
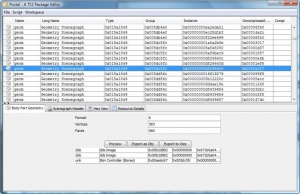
Scroll down until you find the 0x015a1849 files (the GEOMS). Then scroll down looking at the group until you see some in group 0x005dc5fc. These are all related to the mesh for the afAccessoryGlassesAviator. Find the one with the instance value 0x00000000d826640e, and DOUBLE-CLICK on it. For GEOMS, the first characters in instance are always eight zeroes.
You should see something very similar to the picture below. You may have to adjust the column widths and window size (as I did) to see all of the values I discussed.
Step Three:
Now we are going to extract all of the needed files using Postal. The file you have selected is the mesh for the frames of the Aviator sunglasses (for adults and young adults, male and female). Click on the button marked "Export to Wes" (funny how Echo named that button so much like my name).
Change the name in the save dialog to "SunglassesMain.package", making sure the directory is the work one you made (where you opened the copy of FullBuild0.package). Then click the Save button.
After a little chugging, there will be a new package named SunglassesMain.package in your work directory, and it will have the mesh, the BONE and some texture images in it.
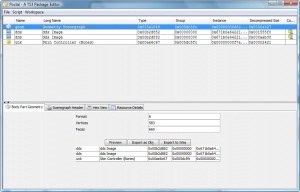
Go back to the File -> Open menu and open SunglassesMain.package. There will be four files in it, a GEOM (Geometry Scenegraph), two dds Image files and a Skin Controller (Bones) package.
Double-click on the GEOM file.
Looks like this:
Step 4:
Now we are going to extract the files we need from our SunGlassesMain.package to separate files the we can work with in MilkShape. Since you already have the GEOM selected, it will be first.
Click on the tab marked "Hex View" and then click on Export. In the file dialog make sure you are in your work directory and on the filename keep the values but change the extension from .geom to .simgeom and then click the Save button.
Next, double-click on the Skin Controller line. On the Hex View tab (which should be the first one on this type) click on Export. Make sure you are in the work directory, accept the name, but change the extension from .unk to .skcon.
If you miss the changing the extensions, MilkShape will not show the mesh file unless you use the "All Files (*.*)" filter, and the importer plugin will be unable to find the BONE (Skin Controller) file.
You should close Postal for now, although we will be using it again later. Failiure to close it for the time being can interfere with the next steps.
Step 5:
Now we can use MilkShape to load the mesh file. But first, before we load the file, we need to set an important option. Start MilkShape. Go to the Groups panel (these look like tabs) and make sure that Autosmooth is unchecked. For Sims 3 meshing, unless you are a very advanced mesher, always leave this option unchecked (normally, once unchecked it stays that way, barring a reinstallation).
From the File -> Import menu select the Q-Mesh Sims 3 GEOM Importer V0.10 item. A file open dialog should appear. Navigate to your work directory and select the "S3_015a1849_005dc5fc_00000000d826640e.simgeom" file. If you are sure you are in your work directory and don't see it, you probably extracted the files to the wrong place, or forgot to rename the extensions.
Selct the file and click the Open button. If you get a dialog complaining about not being able to open the BONE file, you missed a step when extracting that. In this case, the default values used will work, but that will not always be the case.
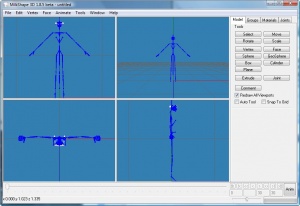
You should now have a fiule that looks like the attached one. If you don't see the skeleton, you can change the "Show Skeleton" checkbox in the joints tab to turn it on. If you see a bunch of blue lines (usually first-time MilkShape users) then you need to set the File -> Preferences menu, misc tab "Joint Size" value to 0.01 or 0.012.
Step 6:
We will now modify the mesh. Go to the front view of the mesh, which in the picture above is the view in the upper-left quarter. If you don't have a front view, make one of the windows show this by right-clicking on the window and selecting Projection -> Front.
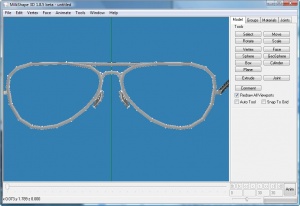
Now, in the front view select right-click and select Maximize. This will make just a single view show instead of four. In the window, use you middle button or the scroll-wheel to zoom in closer to the glasses. Holding the shift key down makes zoom go faster. Use the CTRL and the left mouse button to shift the glasses in the window to keep them centered. Alternate these steps until you are zoomed in far enough to work on the mesh, like in the picture below.
Go to the joints panel and unset the Show Skeleton checkbox (this will make it easier to see what we will be working on. Use the right button and turn on "Textured" and "Wireframe Overlay".
Step 7
Now we will modify the mesh. Click on the Model tab, and then click on the "Select" button. Below, on the Select Options make sure that the Vertex button is highlighted and the two checkboxes below it are unchecked.
Now you need to select the middle set of vertices on the top bar at the middle of the nose bridge area. You do this with the left mouse button, clicking and dragging a small rectangle that selects only these vertices. If you get too many selected, or too few, click somewhere away from the glasses to reset the selection and try again.
Now, with the right vertices selected, click on the "Move" button. Click and hold the left button somewhere in the window and move the mouse so that the vertices move straight downward. If you slide a little to the side, correct it while you have the left mouse button still depressed. When the bottom selected vertice is just a teeny bit above the ones on the curved nose part and aligned from side-to-side, release the mouse button. If you slip and get this step wrong, just go to the Edit -> Undo menu and undo it, then try again.
If it looks like the picture below, you are done editing. Further changes should be left to do later on, after you have tasted sweet success. Go to the file menu, pick export, and then Q-Mesh Sims 3 GEOM Exporter V0.10.
In the file dialog box that opens, select our "S3_015a1849_005dc5fc_00000000d826640e.simgeom" filename, and click save. If you have been following this tutorial exactly, it should be the only item showing. When it ask if you want to replace the file, click on yes.
Close MilkShape. We're hitting the final stretch now.
Step 8
We only have a little bit left. We need to rename and package this file and save it to the Mods/Packages folder, and then inspect our work in the game.
Start Postal Again. Select "New Package" from the file menu. Go to the WorkSpace menu and pick "Add Resource". Navigate to the work directory and select the file we saved before "S3_015a1849_005dc5fc_00000000d826640e.simgeom".
It will show up in the list as "Unknown Resource". Double-click on this item. In the bottom pane, click on Resource Details and put 0x015a1849 in the box next to Type. Put 0x005dc5fc for the Group. Put 0x00000000d826640e in the instance box. These numbers are the ones that were in the filename. You can use copy and paste from this post to reduce the chance of a typing error.
When you have double checked that the right numbers are in the right boxes, click on the Commit button. The top pane will now say "Geometry Scenegraph". Go to the file menu, pick Save As and navigate to the game install directory in the new Mods/Packages you made using Rick's method. You need to follow his method or mods will not show in the game. Name your new file "ModdedSunglasses.package" and click on "Save As".
If you have my amGlassesMeshPack.package there, remove it, as it is the same mod we just did.
Step 9
This is the moment of truth. Now that the file is in place (and mine removed) start the game, start a new game (or a test one if you already have such a thing you have been using) and go to "Create Sims".
Select a teen or young adult model, male or female. If they have a hat or big hair, change that to something that won't interfere with you seeing what you did.
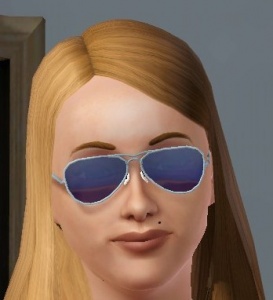
Go to clothing, then accessories, and pick the Sunglasses, any frame color. It should resemble the results below.
Step 10:
Congratulations, you are now a modder and a mesher. I hope the thrill makes up for the effort it takes to learn this, it isn't really rocket science, but it is hard. You should be proud of your success, and try applying this knowledge to make something new to share with everyone.
Questions and Answers
- Custom Sims3 Forums - Visit this thread @Custom Sims3 Forums
- Wes's MTS Forum - Visit Wes's thread @MTS Forum
