Tutorials:TS3 Add Change Object Images
From SimsWiki
| Tutorials by Category | |
|---|---|
|
CAS | Patterns | Objects | Building | Worlds | Modding | Modding Reference |
Contents |
What this tutorial covers
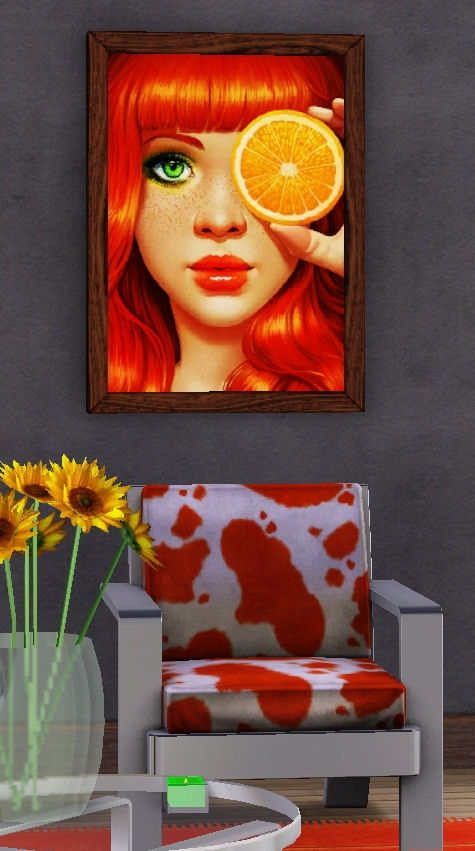
- Change the default image on a cloned object using an EA painting as an example.
- Change the default pattern settings on a cloned object using an EA painting frame as an example.
- Add new overlays to a cloned object using an EA painting as an example.
If you have questions about the tutorial please ask in the support thread here at Simlogical
There is no meshing involved in these processes. The same steps described here can be used on objects other than paintings.
What you will need:
- s3oc at Simlogical. Pick the Easy Installer Version and install according to the directions.
- Texture Tweaker Tool by Inge Jones. Install according to the directions.
- An image editor of your choice. I use Paint Shop Pro but Photoshop, GIMP, Paint.NET and others will work just as well.
Cloning the Painting
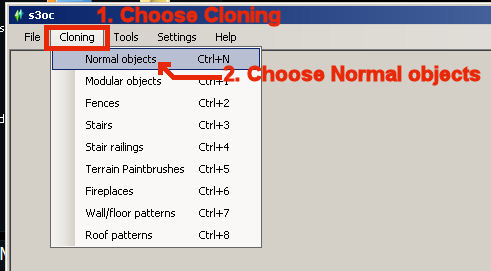
| 1. Open S3oc and click Cloning in upper left corner. Choose Normal objects from the drop down menu. | |
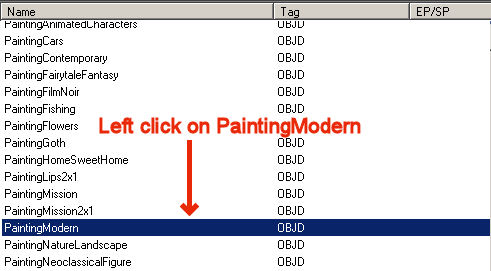
| 2. Once the list assembles scroll down until you find PaintingModern and then left click on it so a blue line shows up across it. | |
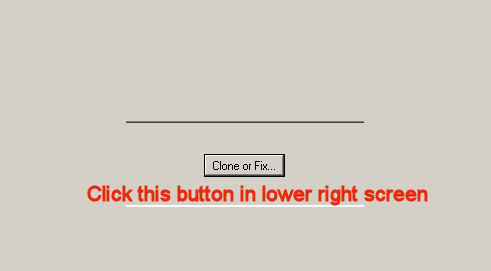
| 3. Click the Clone or Fix button on the lower right side of the screen. | |
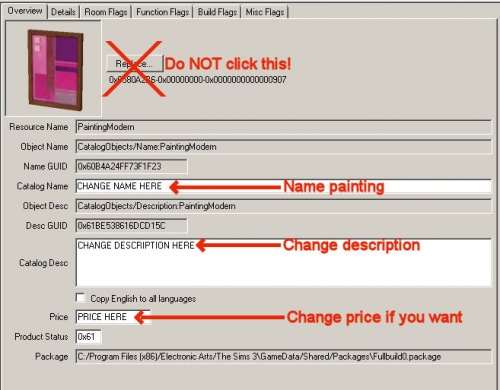
| 4. On the right hand side fill in the new catalog name and description you want for your painting and change the price if you want. Leave the other boxes alone and do NOT click the Replace button by the thumbnail. | |
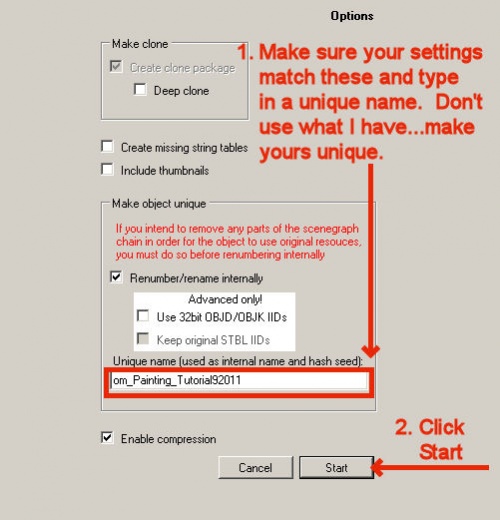
| 5. On the left hand side make sure your Renumber/rename internally box and your Enable compression box are both checked. Change the Unique name of the painting to something...well...unique. Most people use their creator name followed by the type of object it is and the name of it. To be extra safe you could add the date. Once you've finished click the Start button. When the pop-up box shows up, navigate to your working folder and click the Save button. Close s3oc. |
Changing the Painting Image
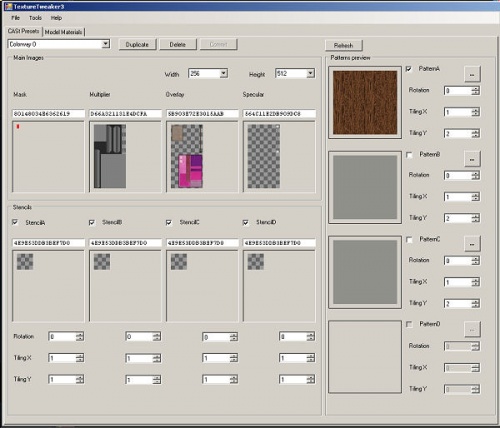
| 1. Open up the Texture Tweaker Tool(TTT) and in the upper left corner click File and choose Open from the drop-down menu. Navigate to where you saved your painting and double click on it to open it. Your screen should now look like this: | |
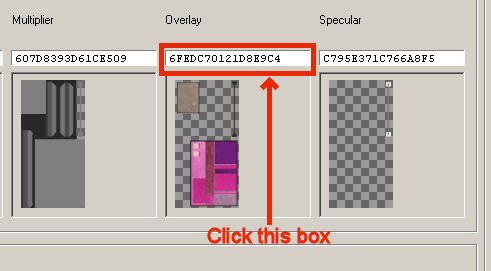
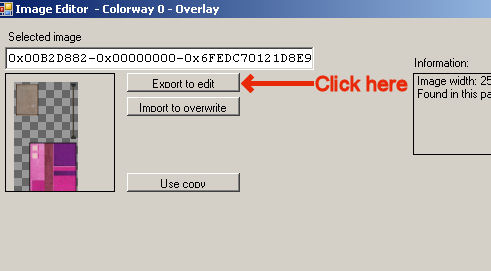
| 2. Put your mouse in the white box over the area where the painting image shows and click it. Click on the Export to edit button when the pop-up box appears. Navigate to your working folder and save the IMG .dds there. You can name it whatever you want. Click Ok in the pop-up box to close it. Close or minimize the TTT. | |
| 3. Open the IMG .dds in the image editor of your choice. Figure out the size of the EA painting image by cutting out the part you want to replace. In this case the size is 189 x 263. | |
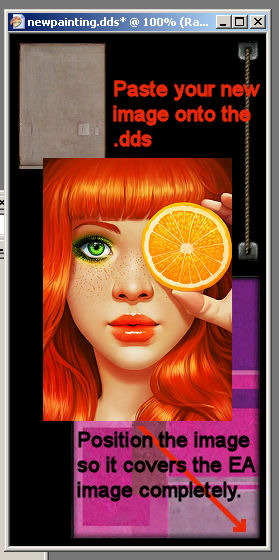
| 4. Resize your image so it is the exact same size and paste it onto the .dds. Move it so it lies directly over the EA painting image. | ] |
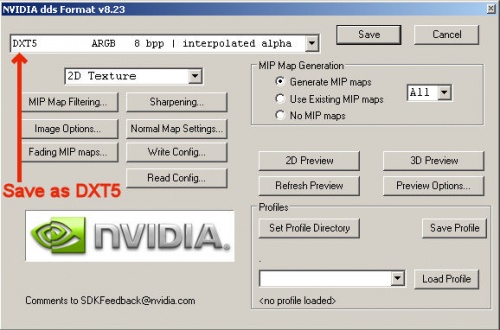
| 5. Merge all layers and save as an interpolated alpha (DXT5) | |
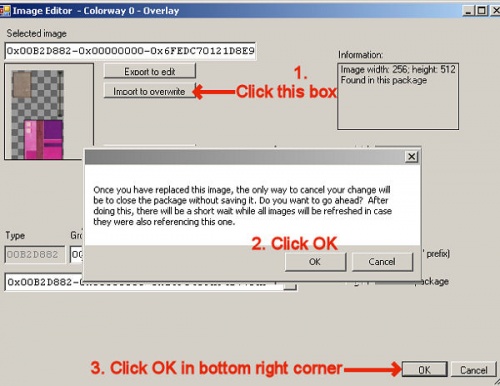
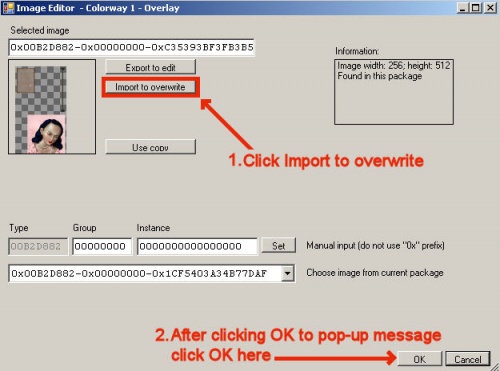
| 6. Open or bring up the minimized TTT. Click on the box over the EA painting image to get the pop-up box again. This time select the Import to overwrite box. Select your saved, edited .dds and click Ok on the new box that pops up. Then click the OK button in the lower right corner of the pop-up box. | |
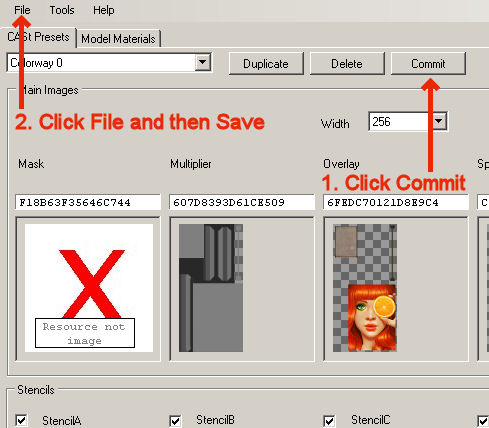
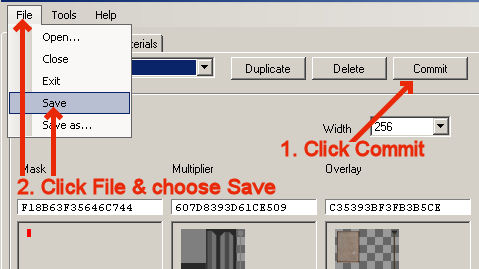
| 7. Click the Commit button and then File and Save. |
Now you can either move on to changing the default frame pattern or put your painting in your mods folder and check it in the game.
Changing a Default Pattern
| 1. Open up TTT and then open the painting .package as before. If you haven't closed TTT after changing the image you can simply proceed to step 2. | |
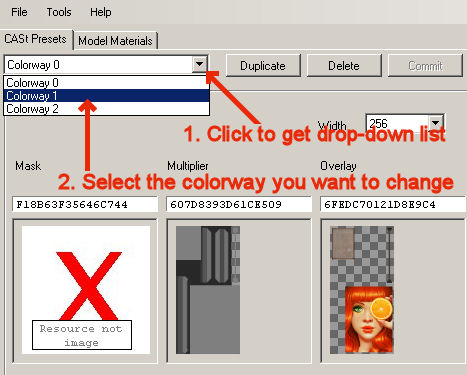
| 2. Click on the colorway you would like to change in the upper left hand corner. Each colorway is for a single preset pattern. Colorway 0 is the one you see when you buy the painting without making a specific selection of frame. For this tutorial we're going to change Colorway 1 which is the second choice of frame pattern in Buy mode. To do this first left-click the arrow next to the words Colorway 0 and left-click on Colorway 1. | |
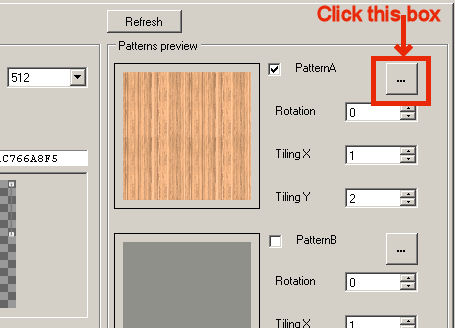
| 3. Over on the right side you will notice that the wood square has changed color. Click on the little box to the right of it that has 3 dots in it. | |
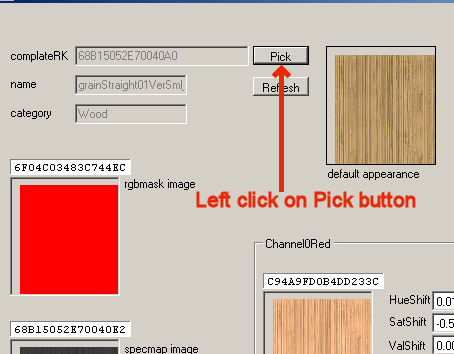
| 4. A large pop-up box will appear. Left click on the box that says Pick on it. | |
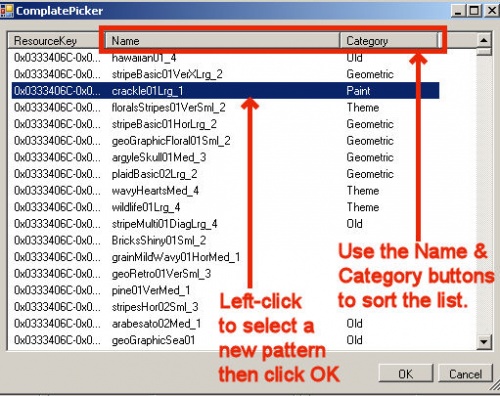
| 5. The ComplatePicker pop-up will appear and has all the EA patterns you can choose from listed on it. If you want to browse by category you can click the Category button. If you prefer an alphabetical list you can click the Name button. To pick a pattern you left click on it and hit the OK button. | |
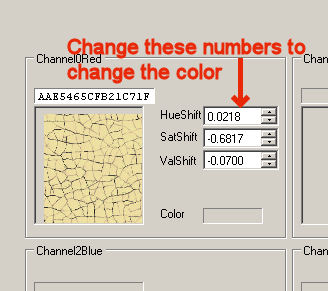
| 6. The ComplatePicker pop-up will then close and the larger pop-up shows the new pattern. If you don't like it repeat step 5 to find one you want. If you would like to change the color you can play around with the HueShift, SatShift, and ValShift numbers until you get one you like. You must click out of the box you've changed to see what color results from your change. It will be reflected on the square pattern swatch to the left of the numbers you're changing. | |
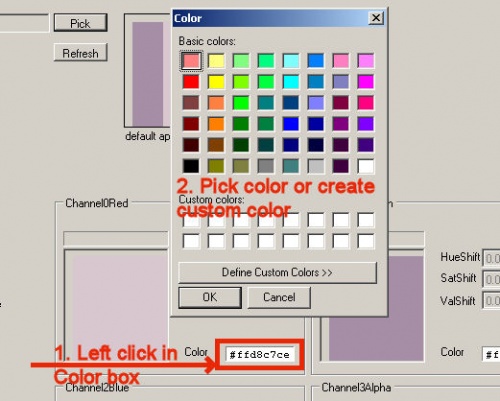
| Note: some of the patterns have a number in the Color box instead of in the HueShift, SatShift, and ValShift boxes. To change these colors you must left click on the Color number and pick a new color or create a custom color using the Color popup box. | |
| 7. When you have the pattern you want in the color(s) you want it in click Done in the upper right corner. The large pop-up will close and you will see your new pattern has replaced the EA default pattern that was there. Before making any other changes click the Commit button and then click File and Save. If you do not Commit before moving on to another pattern choice your work will be lost. In the case of this painting there is only one default pattern per Colorway. Other items will have up to 4 default patterns you can change. | |
| 8. After saving all your pattern changes close the TTT and check your painting in game unless you want to move on to adding multiple images to it. |
Adding Multiple Images to a Painting
| 1. Open Texture Tweaker (TTT) and open the tutorial painting you made using the first painting tutorial. | |
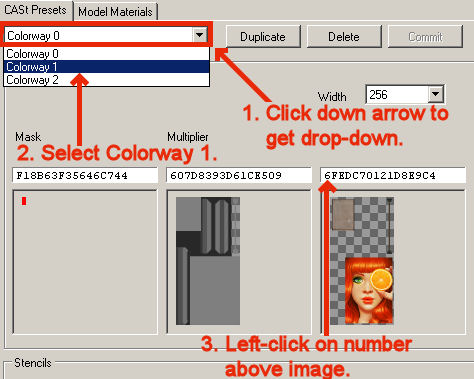
| 2. In the upper left corner, click the down arrow next to the word Colorway 0 to get a drop-down menu. From that menu select Colorway 1 and then click the number in the white box above the image you added before. | |
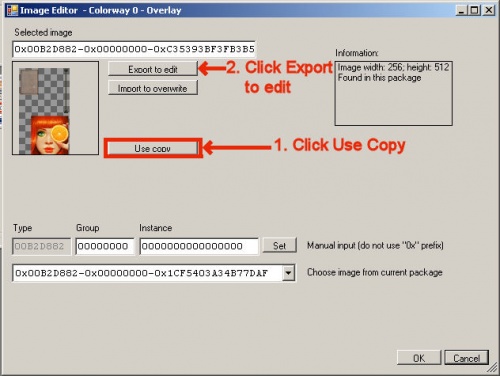
| 3. The image editor pop-up will appear. First click Use Copy then, right after that, click Export to edit as before. Navigate to your working folder and save the .dds there using a different name than you used in the first tutorial. Something like Second_Image works. | |
| 4. Open the freshly saved .dds in your image editor. Paste your new image on it and slide it into place so it completely covers your old image. | |
| 5. Merge the layers and save as DXT5 - Interpolated Alpha. | |
| 6. Bring up TTT again and make sure you have Colorway 1 open. It may have reverted to Colorway 0. If so just pick Colorway 1 as you did in step 2. Click on the number above the image again and select Import to overwrite. Navigate to where you saved the image in step 3 and open that image. Click ok when the message box pops up and then click OK in the lower right corner of the Image Editor pop-up box. | |
| 7. Click Commit and then File/Save. If you don't do this, and go on to add another image, the work you've done will be lost. | |
| 8. Repeat steps 2-7 for Colorway 2 making sure you Commit and File/Save between each change you make to a colorway. Remember, if you don't Commit you will lose your work. Now all three of the painting selections in Buy mode have been changed. You can stop here or continue to add even more image choices to the painting by going on to step 9. | |
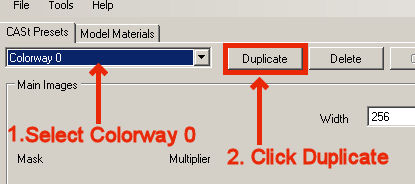
| 9. Go back to Colorway 0 and click the Duplicate button. | |
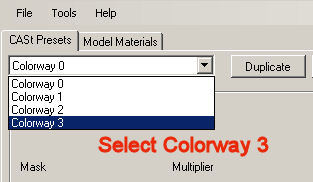
| 10. Go to the Colorway drop-down again and select Colorway 3 which has now been added to your package. Click on the number above the image, as before, and select Use copy. Then select Export to edit and name the image something like Fourth_Image. | |
| 11. Edit the image in your image editor as before. Then, back in TTT, click on the number above the image and choose Import to overwrite as you did before. | |
|
| |
| 12. You can add more images to the painting by following steps 9-11. Be sure to name the exported image something different if you're putting it in the same folder as you put the other images in. Make sure to click Commit and File/Save between each image you add. |
Test in-game to see your new painting.
| Tutorials by Category | |
|---|---|
|
CAS | Patterns | Objects | Building | Worlds | Modding | Modding Reference |
