Difference between revisions of "Game Help:Uninstall"
EllaCharm3d (Talk | contribs) (→added EA link as source) |
EllaCharm3d (Talk | contribs) (→added 64bit path) |
||
| (One intermediate revision by one user not shown) | |||
| Line 80: | Line 80: | ||
# '''If this uninstaller will not work for some reason or left some files behind, you can manually delete the program data files.''' | # '''If this uninstaller will not work for some reason or left some files behind, you can manually delete the program data files.''' | ||
# [[Image:Uninstall3.png|thumb|300px|click to enlarge]]To do this, go to My Computer, and double click the drive that your game is installed on (this is usually the C: drive).<br clear="all" /> | # [[Image:Uninstall3.png|thumb|300px|click to enlarge]]To do this, go to My Computer, and double click the drive that your game is installed on (this is usually the C: drive).<br clear="all" /> | ||
| − | # Double click the ''Program Files'' folder (click 'show the contents of this folder' if the files are hidden), and then the ''EA Games'' folder. | + | # [[File:64bit Programs path.png|thumb|300px|click to enlarge]]Double click the ''Program Files'' folder (click 'show the contents of this folder' if the files are hidden), and then the ''EA Games'' folder. |
| + | #* If you have 64bit Windows, you should navigate to Program Files (x86) instead. | ||
# [[Image:Uninstall4.png|thumb|300px|click to enlarge]]Right-click the ''The Sims 2'' folder, and hold the shift key down and click delete. Click ''Yes'' if asked for confirmation. By holding down Shift it deletes that whole folder immediately, without sending the contents to the Recycle Bin. This is helpful as it's such a big folder. | # [[Image:Uninstall4.png|thumb|300px|click to enlarge]]Right-click the ''The Sims 2'' folder, and hold the shift key down and click delete. Click ''Yes'' if asked for confirmation. By holding down Shift it deletes that whole folder immediately, without sending the contents to the Recycle Bin. This is helpful as it's such a big folder. | ||
# Delete ''The Sims 2'' folder, and then any folders for any expansion packs you have as well. | # Delete ''The Sims 2'' folder, and then any folders for any expansion packs you have as well. | ||
| Line 95: | Line 96: | ||
# Select the Local Disk (C:) drive folder. | # Select the Local Disk (C:) drive folder. | ||
# Select the Program Files folder. | # Select the Program Files folder. | ||
| + | #* If you have 64bit Windows, you should navigate to Program Files (x86) instead. | ||
# Select Tools, then Folder Options, then View, then select "Show hidden files and folders." | # Select Tools, then Folder Options, then View, then select "Show hidden files and folders." | ||
# Select the InstallShield Installation Information folder. | # Select the InstallShield Installation Information folder. | ||
| Line 168: | Line 170: | ||
** If you have Sims 2 Double Deluxe you will need to right click and delete the Sims 2 Double Deluxe folder as well as the 'The Sims 2' folder. Double Deluxe players will also have a Nightlife folder to delete, but no folder for Celebration Stuff. | ** If you have Sims 2 Double Deluxe you will need to right click and delete the Sims 2 Double Deluxe folder as well as the 'The Sims 2' folder. Double Deluxe players will also have a Nightlife folder to delete, but no folder for Celebration Stuff. | ||
** If you have Sims 2 Holiday Edition you will need to delete the key for that as well as the Sims 2 folder. | ** If you have Sims 2 Holiday Edition you will need to delete the key for that as well as the Sims 2 folder. | ||
| + | ** If you have University Life Collection, you need to also make sure the following are gone: | ||
| + | **# the Sims 2 EP1 folder | ||
| + | **# the Sims 2 SC folder | ||
| + | **# the Sims 2 SE folder | ||
| + | **# the Sims 2 SP6 folder | ||
| + | ** If you have Best of Business Collection, you need to also make sure the following are gone: | ||
| + | **# the Sims 2 EP3 folder | ||
| + | **# the Sims 2 SP5 folder | ||
** You may also have an entry for 'The Sims 2 Homecrafter Plus', it is not necessary to delete this as it will not affect the game at all. | ** You may also have an entry for 'The Sims 2 Homecrafter Plus', it is not necessary to delete this as it will not affect the game at all. | ||
* [[Image:Uninstall8.png|thumb|300px|click to enlarge]]'''Warning:''' Make sure you only delete the folders listed here - do not delete the EA Games folder, software, or any other folders! | * [[Image:Uninstall8.png|thumb|300px|click to enlarge]]'''Warning:''' Make sure you only delete the folders listed here - do not delete the EA Games folder, software, or any other folders! | ||
Latest revision as of 09:03, 7 March 2012

|
This article is written for The Sims 2. For the equivalent Sims 3 article, click here. |
|---|
Contents |
[edit] Uninstall
[edit] Problem(s)
- Uninstalling deleted my downloads/sims/neighborhoods!
- Stops, freezes, or errors when trying to uninstall
- Don't know how to uninstall a single expansion pack
- Don't know how to uninstall the entire game completely.
- When you try to reinstall a game, you get the notice that the game is already installed, but the game cannot be started.
[edit] Solutions
- If you just wish to reset one neighborhood or all the base neighborhoods while keeping your custom content, see Game Help:Reset Neighborhoods.
- If you wish to reset the game files without saving any custom content or reinstalling, see: Game Help:Reset All User Files.
- If you are having trouble with getting the game uninstalled or don't know how, read below.
- If you would like to just uninstall one expansion pack, also see below.
[edit] Uninstall via Control Panel
Warning: These instructions will delete all of your savegames, custom content, characters and lots. If you wish to back these up first, follow the instructions given at: Game Help:Back Ups.
- Close the game, and make sure that SimPE, Datgen, Homecrafter, Bodyshop or any other programs that use the game's files are closed too.
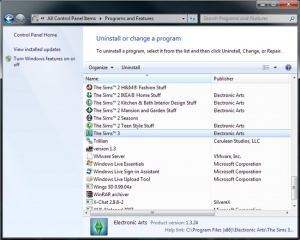
- Go to Start/Control Panel/Programs & Features (Vista/W7) or Start/Control Panel/Add Remove Programs (XP).
- Then follow the on-screen instructions to uninstall the game - it's a standard "next, next, next" type uninstall. There will be separate uninstall options for every expansion and the base game.
- Uninstall according to release dates, going backwards.
- Now you need to restart your computer, before continuing with the guide.
[edit] Uninstall Expansions
- If you just wish to remove one (or more) expansion pack, leaving the base game (or the base game and other expansions), you can do so using the game's uninstall program.
- Warning 1: These instructions will delete all of your savegames, custom content, characters, and lots. If you wish to back these up first, follow the instructions given at: Game Help:Back Ups.
- Warning 2: Saved games are not backwards-compatible - this means that if you don't like an expansion and want to remove it, you cannot keep your neighborhoods. Any of your custom content that required the expansion you are uninstalling will also no longer work after uninstalling - and custom objects and hacks that required that expansion might even crash your game if you try to use them. Use caution when you do this, and back up your data beforehand. See: Game Help:Back Ups.
- Warning 3: If you have The Sims 2 Deluxe or The Sims 2 Double Deluxe, it is not possible to separately uninstall the EP or SP components of the game.
- Go to Start - Programs - EA Games - The Sims 2 (Expansion Name) - Uninstall.
- Then follow the on-screen instructions to uninstall the game - it's a standard "next, next, next" type uninstall. It will also warn you that it is about to remove your user files - don't hit allow it to continue past that screen until you have followed the instructions at: Game Help:Back Ups.
[edit] Uninstall Everything
- Go to Start - Programs - EA Games - The Sims 2 (or Expansion Name) - Uninstall.
- Then follow the on-screen instructions to uninstall the game - it's a standard "next, next, next" type uninstall. It will also warn you that it is about to remove your user files - don't hit allow it to continue past that screen until you have followed the instructions at: Game Help:Back Ups.
- If you wish to do a full uninstall, follow-through until every Sims 2 related programs is gone from the Start Menu or Control Panel.
[edit] How to Fully Uninstall Sims 2
Sometimes, the installer does not completely remove all of the game references, and then problems can occur when you try to reinstall. The rest of this guide shows how to clear your system of every little bit of the game off the PC.
[edit] Remove User Data
- First, we'll remove all of your user files - your neighborhoods, custom content, and other saved data unique to your game.
- Open your My Documents\EA Games folder. Right-click on The Sims 2 folder and click Delete.
- When asked to confirm deletion, click Yes.
[edit] Remove Leftover Program Data
If the UnInstaller does its job properly, these files are already removed, but it does not, you need to remove them manually.
- If this uninstaller will not work for some reason or left some files behind, you can manually delete the program data files.
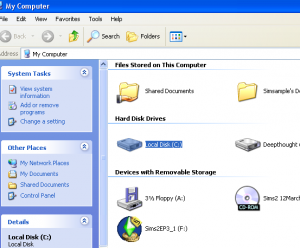
- To do this, go to My Computer, and double click the drive that your game is installed on (this is usually the C: drive).
- Double click the Program Files folder (click 'show the contents of this folder' if the files are hidden), and then the EA Games folder.
- If you have 64bit Windows, you should navigate to Program Files (x86) instead.
- Right-click the The Sims 2 folder, and hold the shift key down and click delete. Click Yes if asked for confirmation. By holding down Shift it deletes that whole folder immediately, without sending the contents to the Recycle Bin. This is helpful as it's such a big folder.
- Delete The Sims 2 folder, and then any folders for any expansion packs you have as well.
- Note: If you have The Sims 2 Deluxe or The Sims 2 Double Deluxe, the 'Sims 2' will be renamed accordingly.
[edit] Remove Leftover Windows Uninstall Data
If the UnInstaller does its job properly, these files are already removed, but it does not, you need to remove them manually.
- Click the Start button and select My Computer.
- Select the Local Disk (C:) drive folder.
- Select the Program Files folder.
- If you have 64bit Windows, you should navigate to Program Files (x86) instead.
- Select Tools, then Folder Options, then View, then select "Show hidden files and folders."
- Select the InstallShield Installation Information folder.
- Delete the following folder(s) if it appears:
- {1A2A15C2-6780-49c1-B296-503230E9DE00} - The Sims 2 Mansion and Garden Stuff
- {2D37F6AE-D201-4580-B91A-6BF9BB93ED2D} - The Sims 2 Double Deluxe
- {40C03514-89C3-41BA-0090-3B440256DB87} - The Sims 2 DVD edition
- {41AA7187-8272-462C-9EED-7B614DA1404E} - Fun With Pets Collection
- {4817189D-1785-4627-A33C-39FD90919300} - The Sims 2 Pets
- {5C648FDB-0138-4619-B66E-230EF53E8E2C} - The Sims 2 Teen Style Stuff
- {6522C636-B04C-4333-9BEB-9E0C0B6350D6} - The Sims 2 Kitchen & Bath Stuff
- {6BDD9CE6-D0A6-478A-BAD3-BA6945E89EB0} - The Sims 2 Family Fun Stuff
- {6CB35178-9E25-48FB-9F86-E40ADC7043B6} - Best Of Business Collection
- {6E17F9751-F056-4335-B718-8AF1B1092AFB} - The Sims 2 IKEA Home Stuff
- {6E7DD182-9FC6-4651-0095-2E666CC6AF35} - The Sims 2 UK/European CD edition
- {76703039-C98C-4E62-A12C-4D7066BE9985} - University Life Collection
- {7B3577F5-1D82-4C9B-008B-69D026FD8BCA} - The Sims 2 Open For Business
- {84DDE556-43EF-43ed-B2DF-37AF9E5DDD75} - The Sims 2 H&M Fashion Stuff
- {87F6C83D-F949-4d14-B5CB-DC8C75F8932D} - The Sims 2 FreeTime
- {8AB8D458-939E-403F-0097-9BA1C1F013D5} - The Sims 2 CD edition
- {8FD3F4BA-A4A6-4380-00A6-CC6853AB2DC2} - The Sims 2 University
- {9C244239-ED8E-40f1-937F-51C706CD2160} - The Sims 2 Deluxe
- {9CDBC303-3EED-40b0-8E41-A7C65AA96C26} - The Sims 2 Glamour Life Stuff
- {B6F5B704-06D3-4687-90F3-6195304AD755} - The Sims 2 Apartment Life
- {DFEF49D9-FC95-4301-99B9-2FB91C6ABA06} - The Sims 2 Seasons
- {EAA38532-7AD0-4f78-918A-4F4F02096ECE} - The Sims 2 Celebration Stuff
- {F248ADFA-64E0-4b03-8A83-059078BED6A0} - The Sims 2 Bon Voyage
- {F7529650-B9DB-481B-0089-A2AC3C2821C1} - The Sims 2 Nightlife
[edit] Remove Registry Entries
Now, we must remove the Registry entries. The chances are that the Uninstaller will have done this, but if for some reason it has not, or the uninstaller does not work, you can manually delete them.
[edit] Using a Registry utility
If you prefer not to mess with Registry manually, use a utility like Ccleaner.
- Download, and follow the onscreen instructions to install it.
- Launch the program after installation has completed.
- Click the Registry tab, and click the Scan for Issues button.
- When scanning has completed, click the Fix Selected Issues... button.
- When you're prompted to backup, click Yes, accept the default name and location
- Click Fix All Selected Issues
[edit] Delete the registry keys manually
Warning: Tinkering around in your computer's registry can cause problems with your entire computer. Make sure you back up your registry before you begin editing anything, following these instructions from Microsoft. That way, if something goes wrong, you can restore it. That may sound scary, but as long as you follow these instructions you will be okay.
- These registry keys contain your Registration Key - your serial number for the game, so before you delete them, you should write the values down in a safe place first. For more information on that, see: Game Help:Finding Your License Key.
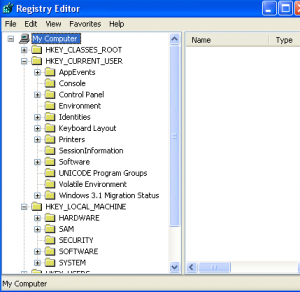
- Click Start, then Run. When the Run window comes up, type regedit and then click OK.
- When Regedit comes up, you'll see something like the image on the right.
- If it looks a bit confusing, you can press the 'home' key on your keyboard (on the right, above the four arrow keys). Then close Regedit, and restart it as you did before. It should now look nice and neat like this.
- Locate the following entries by expanding the "+" to get to the next level or the "-" to collapse it.
- If any of the entries are missing, that is fine. This means the uninstaller for that program has done its job.
- If you're uninstalling certain games only, do not delete the "parent" folder but remove its "children".
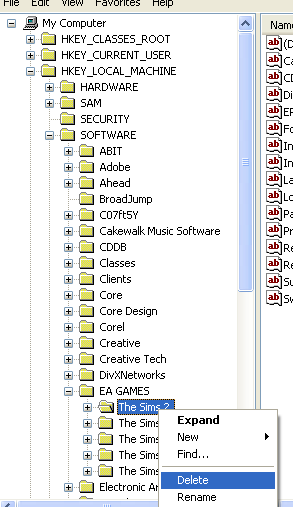
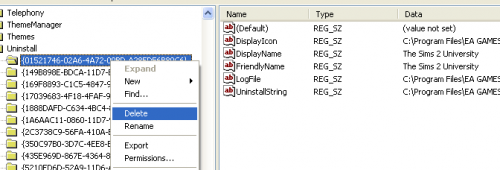
- Right-click each of the entries below and select Delete.
- Right click on 'The Sims 2' folder and click 'Delete and ‘'Yes'.
- If you have any Expansion packs, also right click and delete those folders.
- If you have any Stuff packs, also right click and delete those folders.
- If you have Sims 2 Deluxe you will need to right click and delete the Sims 2 Deluxe folder as well as the 'The Sims 2' folder. There is no separate folder for EP2 with this.
- If you have Sims 2 Double Deluxe you will need to right click and delete the Sims 2 Double Deluxe folder as well as the 'The Sims 2' folder. Double Deluxe players will also have a Nightlife folder to delete, but no folder for Celebration Stuff.
- If you have Sims 2 Holiday Edition you will need to delete the key for that as well as the Sims 2 folder.
- If you have University Life Collection, you need to also make sure the following are gone:
- the Sims 2 EP1 folder
- the Sims 2 SC folder
- the Sims 2 SE folder
- the Sims 2 SP6 folder
- If you have Best of Business Collection, you need to also make sure the following are gone:
- the Sims 2 EP3 folder
- the Sims 2 SP5 folder
- You may also have an entry for 'The Sims 2 Homecrafter Plus', it is not necessary to delete this as it will not affect the game at all.
- Warning: Make sure you only delete the folders listed here - do not delete the EA Games folder, software, or any other folders!
- Warning: DO NOT delete any of the others; you can tell if you have the correct keys because when you click them you should see the words ‘Sims 2’ in the pane to the upper right of the regedit window. If there is no reference to 'Sims 2', please do not delete the entry.
- Look for the following keys and delete each of them that you have (if you haven't installed any Expansion Packs/Stuff Packs/Collections, those entries will be missing):
- HKEY_LOCAL_MACHINE
- SOFTWARE
- Classes
- .Sims2Pack
- .Sims2Skin
- (If you have 64-bit Windows OS, all entries below will be under the wow6432Node)
- ---
- EA Games
- The Sims 2
- The Sims 2 Double Deluxe
- The Sims 2 Apartment Life
- The Sims 2 Bon Voyage
- The Sims 2 Celebration Stuff
- The Sims 2 Family Fun Stuff
- The Sims 2 FreeTime
- The Sims 2 Glamour Life Stuff
- The Sims 2 H&M Fashion Stuff
- The Sims 2 IKEA Home Stuff
- The Sims 2 Kitchen & Bath Stuff
- The Sims 2 Mansion and Garden Stuff
- The Sims 2 Nightlife
- The Sims 2 Open For Business
- The Sims 2 Pets
- The Sims 2 Seasons
- The Sims 2 Teen Style Stuff
- The Sims 2 University
- University Life Collection
- Best Of Business Collection
- Fun With Pets Collection
- ---
- Electronic Arts
- EA Games
- The Sims 2
- The Sims 2 Double Deluxe
- The Sims 2 Apartment Life
- The Sims 2 Bon Voyage
- The Sims 2 Celebration Stuff
- The Sims 2 Family Fun Stuff
- The Sims 2 FreeTime
- The Sims 2 Glamour Life Stuff
- The Sims 2 H&M Fashion Stuff
- The Sims 2 IKEA Home Stuff
- The Sims 2 Kitchen & Bath Stuff
- The Sims 2 Mansion and Garden Stuff
- The Sims 2 Nightlife
- The Sims 2 Open For Business
- The Sims 2 Pets
- The Sims 2 Seasons
- The Sims 2 Teen Style Stuff
- The Sims 2 University
- University Life Collection
- Best Of Business Collection
- Fun With Pets Collection
- ---
- Microsoft
- Windows
- CurrentVersion
- Uninstall
- {1A2A15C2-6780-49c1-B296-503230E9DE00} - The Sims 2 Mansion and Garden Stuff
- {2D37F6AE-D201-4580-B91A-6BF9BB93ED2D} - The Sims 2 Double Deluxe
- {40C03514-89C3-41BA-0090-3B440256DB87} - The Sims 2 DVD edition
- {41AA7187-8272-462C-9EED-7B614DA1404E} - Fun With Pets Collection
- {4817189D-1785-4627-A33C-39FD90919300} - The Sims 2 Pets
- {5C648FDB-0138-4619-B66E-230EF53E8E2C} - The Sims 2 Teen Style Stuff
- {6522C636-B04C-4333-9BEB-9E0C0B6350D6} - The Sims 2 Kitchen & Bath Stuff
- {6BDD9CE6-D0A6-478A-BAD3-BA6945E89EB0} - The Sims 2 Family Fun Stuff
- {6CB35178-9E25-48FB-9F86-E40ADC7043B6} - Best Of Business Collection
- {6E17F9751-F056-4335-B718-8AF1B1092AFB} - The Sims 2 IKEA Home Stuff
- {6E7DD182-9FC6-4651-0095-2E666CC6AF35} - The Sims 2 UK/European CD edition
- {76703039-C98C-4E62-A12C-4D7066BE9985} - University Life Collection
- {7B3577F5-1D82-4C9B-008B-69D026FD8BCA} - The Sims 2 Open For Business
- {84DDE556-43EF-43ed-B2DF-37AF9E5DDD75} - The Sims 2 H&M Fashion Stuff
- {87F6C83D-F949-4d14-B5CB-DC8C75F8932D} - The Sims 2 FreeTime
- {8AB8D458-939E-403F-0097-9BA1C1F013D5} - The Sims 2 CD edition
- {8FD3F4BA-A4A6-4380-00A6-CC6853AB2DC2} - The Sims 2 University
- {9C244239-ED8E-40f1-937F-51C706CD2160} - The Sims 2 Deluxe
- {9CDBC303-3EED-40b0-8E41-A7C65AA96C26} - The Sims 2 Glamour Life Stuff
- {B6F5B704-06D3-4687-90F3-6195304AD755} - The Sims 2 Apartment Life
- {DFEF49D9-FC95-4301-99B9-2FB91C6ABA06} - The Sims 2 Seasons
- {EAA38532-7AD0-4f78-918A-4F4F02096ECE} - The Sims 2 Celebration Stuff
- {F248ADFA-64E0-4b03-8A83-059078BED6A0} - The Sims 2 Bon Voyage
- {F7529650-B9DB-481B-0089-A2AC3C2821C1} - The Sims 2 Nightlife
- ---
- Press the home key, and close registry editor. Your game is now completely uninstalled and your computer has no recollection of ever having The Sims 2 installed upon it!
[edit] Contributor Credits
Thanks to bairy for the original article, Simsample for the revision, and Julianarosalia for registry key entries. Thankyou Numenor for information about the Deluxe and Double Deluxe versions.
[edit] Related Links
- Game Help:Install
- Game Help:Reset Neighborhoods
- Game Help:Back Ups
- Game Help:Finding Your License Key
- How do I manually uninstall The Sims 2 and the expansion and stuff packs? from EA support site - source for the Product keys
