Difference between revisions of "Tutorials:Simple Mesh Replacement In Blender-Mapping The Top"
(Created page with " {|style="border-spacing:8px;margin:0px -8px" |- {|style="border-spacing:8px;margin:0px -8px" |style="width:50%;border:1px solid #cef2e0;background-color:#C9C8E6;vertical-alig...") |
(→Step 16) |
||
| Line 13: | Line 13: | ||
==Mapping the Top== | ==Mapping the Top== | ||
UV mapping is placing the UV parts on an image so that the textures show up on the mesh in the correct places. First we will do the top of the cylinder. | UV mapping is placing the UV parts on an image so that the textures show up on the mesh in the correct places. First we will do the top of the cylinder. | ||
| − | ===Step | + | ===Step 17=== |
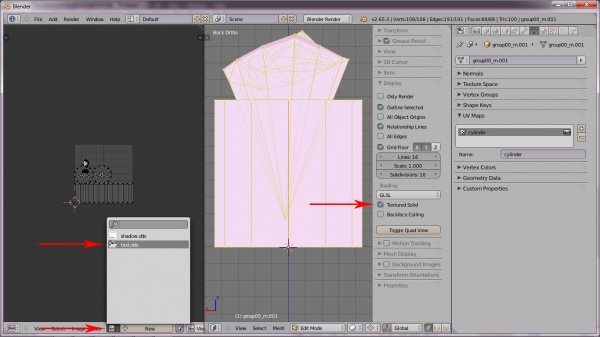
Press N to open the Properties Panel. Under Display->Shading check the Textured Solid box to allow you to see the image on the mesh. Press A until the whole mesh is selected. In the UV/Image editor, click the button with the little paper with a folded corner, and select the tex.dds. | Press N to open the Properties Panel. Under Display->Shading check the Textured Solid box to allow you to see the image on the mesh. Press A until the whole mesh is selected. In the UV/Image editor, click the button with the little paper with a folded corner, and select the tex.dds. | ||
[[File:Mappingtop1.jpg|600px|center]] | [[File:Mappingtop1.jpg|600px|center]] | ||
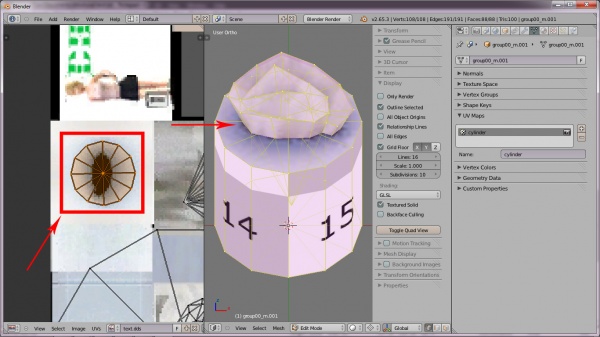
You should now see the image on the mesh. | You should now see the image on the mesh. | ||
| − | |||
===Step 17=== | ===Step 17=== | ||
Revision as of 17:23, 23 January 2013
|

