Game Help:Sim Files Not Appearing
| Sims 3 Game Help Categories: | |
|---|---|
|
Custom Content | Installation | Gameplay Guides | Technical & Graphics Issues | Miscellaneous Issues | |
| MTS Help Q&A Forums | |
Contents |
.Sim Files Not Appearing
Problem
When you install sims in .sim format, they don't show up in CAS.
Solution
Check Installation
The most common cause of custom content not showing up is its being installed incorrectly.
If you are:
- Trying to install .sim files by double-clicking them
- Putting .sim files in Mods/Packages
- Putting .sim files in Program Files
You need to re-read Game Help:TS3 CC Basics!
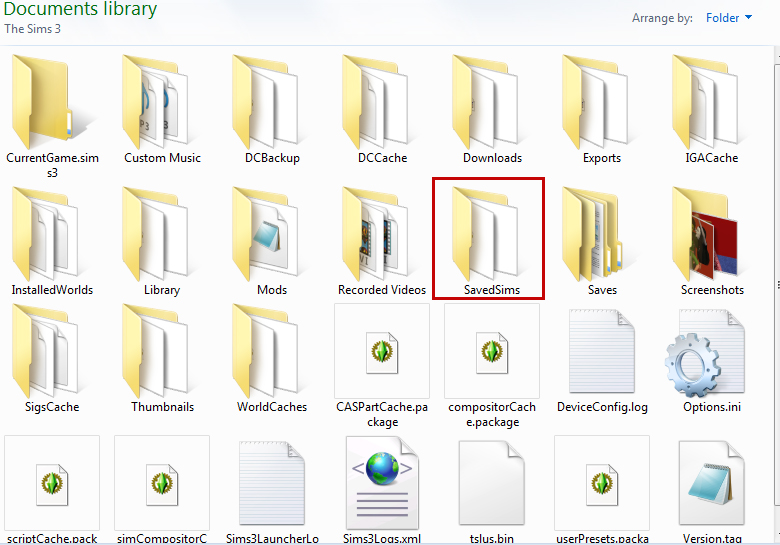
Check that your SavedSims folder is in the right place, and is named correctly.
Open your SavedSims folder. Make sure that the address box, at the top of the window, looks exactly like this:
The Documents part is particularly important!
If the address bar says anything different, including if it says this...
You need to re-read Game Help:TS3 CC Basics!
Go up one folder, to the main The Sims 3 folder. Make sure that your SavedSims folder is named exactly that: SavedSims. If the folder is named savedsims, SavedSim, savedsim, SaveSims, or anything else, it won't work! Also make sure that you see all of these other files and folders, in the same place as the SavedSims folder:
If the folder is named incorrectly, right-click it and choose Rename. Type in the correct name, and hit enter. Your sims should now work!
Check Sim Bin
Another common cause of problems with .sim files is looking in the wrong part of the sim bin, or the wrong part of the game altogether.
Remember that downloaded sims don't show up in the family bin, in Edit Town! To get to your downloaded sims, go into Create-A-Sim. Click the Sim Bin button:
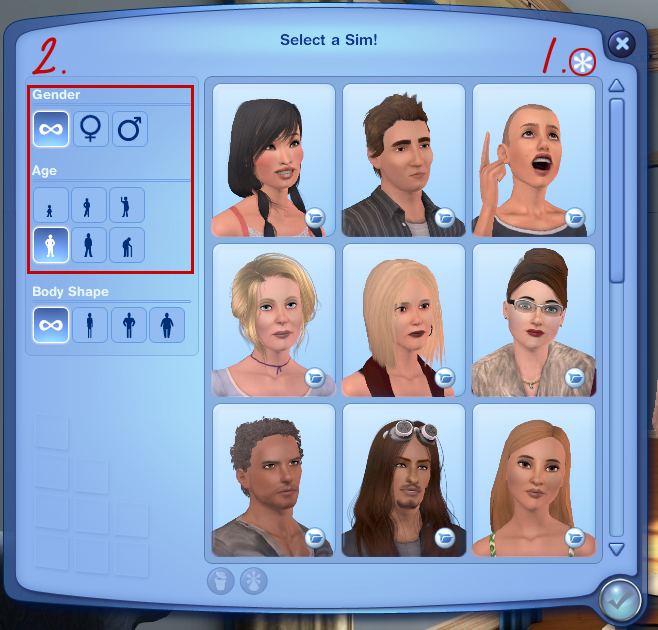
Creators don't always make it clear whether a sim is, for example, an adult or a young adult, so it can be very easy to not notice a sim you have installed. It's also easy to not notice a custom sim in amongst all the EA sims. To avoid this problem, click the CC star icon in the top corner of the sim bin, to show only custom or downloaded sims. Then check each age and gender section for your downloaded sims.
If you've found your sims, yay! Go play!
If you've found your sims but they're showing up strangely, or they have black skin, read Game Help:Downloaded Sims Have Black Skin
If you still can't find your sims, read on.
Diagnosing Permissions Issues
Sometimes, Sims 3 does strange things to the SavedSims folder, which stops the game seeing the folder. To find out if this is the cause of your problems, we're going to make a new sim and save it to the bin.
Make the sim as normal in CAS. It doesn't have to be anything special - just any old sim. Give it a name you will remember.
Once you've finished making the sim, click the three dots next to its picture in the bottom of the window. Then click the icon with the curved arrow pointing into a folder - this will save the sim to the sim bin. Once you've done this, quit the game.
Now open your SavedSims folder again. Look for a file with the same name as your sim. If you can see the file, click here. If you can't see the file, click here.
Finding the Sim File
If you can't see your file in the SavedSims folder, there are two possible explanations. One is that the file is in a different folder; the other is that the file wasn't saved at all. To find out which is the case, we need to try to find the file.
First, go to the main The Sims 3 folder in Documents. Look for a new SavedSims folder, with your new sim's file in it. If you find one, move all your downloaded sims into that folder, and delete the old folder. Your sims should now work!
If there is no new SavedSims folder, open your regular Documents folder: we're going to search for the file. First you need to figure out the name of the file - it's very easy. The file will have the same name as your sim, with any spaces replaced by underscores (_), and .sim on the end. So, if you named your sim John Smith, the file will be called "John_Smith.sim". If you called the sim Martha Jones, the file will be called "Martha_Jones.sim". If your sim has no last name, the file will be called the first name followed by an underscore, then .sim - for example, "Sarah_.sim".
In the Document folder, look at the top right corner of the window; you should see a box which says Search Documents. Into that box, type the sim's file name, then hit enter. Be patient, because it might take some time for the search to complete, depending on how much stuff you have in Documents.
If you are using Windows XP, you will need to click "Search" at the top of the window. The search box will show up on the left hand side of the folder window. Pick "All filetypes", and type in the file name.
If you don't get a result, then the file wasn't saved. Click here to fix the problem.
Check Sim Bin Again
We know that Sims 3 saved your sim correctly, so now we need to check whether or not it can see the sim file. Open the game again, and check the Sim Bin. Is your newly saved sim showing up in the bin?
Yes! - Good, your sims should be fixed! You may need to delete and redownload any custom sims for them to show up; if you put them in the SavedSims folder alongside your test sim, they should then work straight away.
No! - Click to fix!
Fixing Permissions Issues
At least we know what the problem is now! Permissions issues can be fixed in several ways, so first we will try the really simple ones, and we'll move on to the more complex solutions if those don't work.
Game-generated SavedSims Folder
Sometimes the best thing to do with finicky software is to play along. Open the The Sims 3 folder in Documents, and right-click your SavedSims folder. Click Cut, then right-click anywhere on your desktop and click Paste. This gets the SavedSims folder out of the way, so the game can make a new one.
Now you need to open the Sims 3, make a test sim in CAS and save it to the bin, just like we did earlier. It doesn't matter what you call the sim. Once you have made the sim and saved it to the sim bin, close the game.
If you look in the The Sims 3 folder in Documents now, there should be a new SavedSims folder. Open that folder, and also open the old SavedSims folder that you moved to your desktop. Select all the .sim files in the old SavedSims folder, right-click them, and click Copy. Then right-click anywhere in the new SavedSims folder, and click Paste. Start up Sims 3 to test - the sims should work now! If your sims are fixed now, you can delete the old SavedSims folder on your Desktop.
Manually Changing Permissions
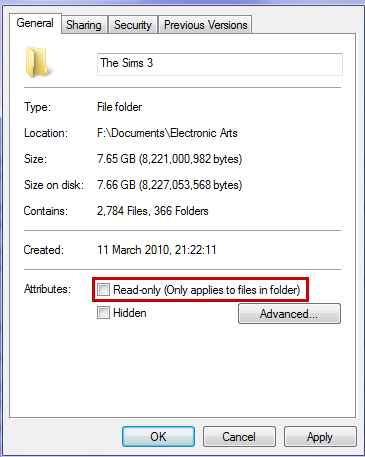
If having the game generate a new SavedSims folder didn't work, then you can try fixing the folder permissions yourself. Go into The Electronic Arts folder in your Documents - the one that has the The Sims 3 folder inside of it. Right-click the The Sims 3 folder, and click Properties (see picture).A new window should pop up, called Properties. At the bottom of the window is a section called Attributes, and one of the boxes there says "Read-only". That box will probably contain a blue square; click it once, so that the box is empty, then click Apply.
A box will pop up asking for confirmation: select the second option - Apply changes to this folder, subfolders and files - and click Ok. Wait while the progress bar goes across, then go ingame and check to see if your sims are showing up. If your sims are fixed now, you can delete the old SavedSims folder on your Desktop.
The Nuclear Option
Hey, it's extreme, but launching a nuke is actually a very simple process. And effective.
Thus far, your game is being very stubborn. This final process is a bit daunting, but it's actually very easy, and is guaranteed to fix your sims.
Open the Electronic Arts folder, as we did above - you should see your The Sims 3 folder there. Right-click the folder, and click rename. Change the name to The Sims 3 Backup, and hit enter. Now run the game, make a sim in CAS, and save it to the sim bin, then close the game.
If you look back at the Electronic Arts folder, there should be two folders in there now - The Sims 3 Backup, and a new The Sims 3 folder. Open the new The Sims 3 folder, and select everything except the SavedSims folder, which should contain just your new test sim. Delete everything except that SavedSims folder.
Now go back into the old The Sims 3 Backup folder, and select everything except the SavedSims folder. Right-click the selected items, and click Cut. Then go into the new The Sims 3 folder, right-click anywhere, and click Paste. It might take a minute or two for everything to be moved, especially if you have lots of other custom content. Once you've done that, open the SavedSims folder in the old The Sims 3 Backup folder. Select all the .sim files, right-click them, and click Cut. Then open the SavedSims folder in the new The Sims 3 folder, and Paste the .sim files.
Open the game, and you should find that your sims are showing up in the sim bin as they should be! If it has worked, you can delete the old The Sims 3 Backup folder, as well as the SavedSims folder that's on your Desktop.
Related Links
| Sims 3 Game Help Categories: | |
|---|---|
|
Custom Content | Installation | Gameplay Guides | Technical & Graphics Issues | Miscellaneous Issues | |
| MTS Help Q&A Forums | |


