Difference between revisions of "Mini Custom Icons for Accessories by SnowStorm"
(→Drag and Drop your image file into the 3D Referencing File Editor) |
|||
| (34 intermediate revisions by one user not shown) | |||
| Line 13: | Line 13: | ||
==Overview== | ==Overview== | ||
| − | + | This tutorial will show you how to add custom images into your accessory packages so they show up correctly in CAS and BodyShop. | |
| + | |||
| + | |||
| + | <gallery> | ||
| + | Image:BeforeIconChange.jpg|Accessory image ''Before'' icon change - showing original glasses | ||
| + | Image:AfterIconChange.jpg|Accessory image ''After'' icon change - showing correct image in Game's '''Change Appearance''' Note: The new icon doesn't show up in Body Shop | ||
| + | </gallery> | ||
==What you will need== | ==What you will need== | ||
| − | SimPe | + | * SimPe |
| − | Image editing software | + | * Image editing software |
| + | * Attention to detail | ||
| + | |||
| + | |||
| + | ==Mini Custom Icons for Accessories== | ||
| + | |||
| + | I've taken the information from SnowStorm's original tutorial and wikified it to incorporate the changes since the psje tool came out. Since the original was a pdf. I captured new images. | ||
| + | |||
| − | |||
===How to Match the 3DIR to the correct XMOL files=== | ===How to Match the 3DIR to the correct XMOL files=== | ||
<blockquote> | <blockquote> | ||
| − | '''Important:''' EA is inconsistent with it's numbering so directions like ''pick the 3rd down'' don't always apply. The surefire way to get the correct parts is to sort by '''instance''' values. That matches the '''3DIR''' 3D Reference file with the '''XMOL''' Mesh Overlay parts. This example | + | '''Important:''' EA is inconsistent with it's numbering so directions like ''pick the 3rd down'' don't always apply. The 3DIR reference files are also for other parts that aren't used for the icons so you need to pay attention to which part you are modding. The surefire way to get the correct parts is to sort by '''instance''' values. That matches the '''3DIR''' 3D Reference file with the '''XMOL''' Mesh Overlay parts. This example shows 3 Instance sets in a mesh cloned from the ''even more hip'' glasses, for Teen, Young Adult, Adult and Elder female. The YAE parts all use the same '''XMOL''' name which in this case is the glasses called '''afaccessorysunglassesevenmorehip...''' </blockquote> |
| + | |||
| + | Note: These numbers are from this example. Yours may vary | ||
* Teen - instance = 1025 tfaccessorysunglassesevenmorehip... | * Teen - instance = 1025 tfaccessorysunglassesevenmorehip... | ||
| Line 32: | Line 46: | ||
* Adult - instance = 16385 afaccessorysunglassesevenmorehip... | * Adult - instance = 16385 afaccessorysunglassesevenmorehip... | ||
| − | To insert the icons into the correct place, you need to know which 3DIR goes with which part. This is how you sort and match them. | + | To insert the icons into the correct place, you need to know which ''3DIR'' goes with which ''XMOL'' part. This is how you sort and match them. |
# Open your recolor package in SimPe. | # Open your recolor package in SimPe. | ||
| Line 38: | Line 52: | ||
# On the ''Resource List'' side, click the '''INSTANCE''' heading. | # On the ''Resource List'' side, click the '''INSTANCE''' heading. | ||
# By sorting the Instance values, you can match up the '''3IDR''' (3 D referencing file)goes with the correct '''XMOL''' (Mesh Overlay file). | # By sorting the Instance values, you can match up the '''3IDR''' (3 D referencing file)goes with the correct '''XMOL''' (Mesh Overlay file). | ||
| − | # It's a good idea to get a screencapture of the instance values now. Or, write them down, whichever is easier for you. | + | # It's a good idea to get a screencapture of the instance values now. Or, write them down, whichever is easier for you. In this example the values are in parenthesis, (1025), (2049), (4097), (16385) |
| − | [[Image:Sort-instances.jpg|right| | + | [[Image:Sort-instances.jpg|right|600x600px]] <br style="clear:both" /> |
| − | + | An alternate way to find the correct sets via Instances is to select the '''Mesh Overlay XML (XMOL)(4)''' on the Resource Tree side. Then on Resource Lst, you'll find all the Mesh Overlay files and their corresponding values under the instance tab | |
| + | [[Image:Instances-2.jpg|right|600x600px]] <br style="clear:both" /> | ||
| + | Now that your know how to find the matched group sets under the Instance column, on with the tutorial. | ||
===Make Your ICON=== | ===Make Your ICON=== | ||
| Line 53: | Line 69: | ||
# Save it where you can find it. | # Save it where you can find it. | ||
| + | [[Image:128-eagle-flat-fan.png|right|128x128px]] <br style="clear:both" /> | ||
| − | === | + | ===Add your new ICON into the Package=== |
# Open your recolor package in SimPE | # Open your recolor package in SimPE | ||
| Line 63: | Line 80: | ||
[[Image:Add-image.jpg|right|300x300px]]<br style="clear:both" /> | [[Image:Add-image.jpg|right|300x300px]]<br style="clear:both" /> | ||
| − | |||
| − | |||
===Now tell SimPe what type of file it is.=== | ===Now tell SimPe what type of file it is.=== | ||
| Line 79: | Line 94: | ||
NOTE: If you didn't get the correct Instances go to the top of this tutorial to find out how. | NOTE: If you didn't get the correct Instances go to the top of this tutorial to find out how. | ||
| + | |||
| + | * Select one of the '''3IDR''' files that have your new mesh. | ||
| + | * Click the '''Resource''' Tab. | ||
| + | * Copy the '''Group ID''. | ||
| + | |||
| + | [[Image:Groupvalue.jpg|right|400x400px]]<br style="clear:both" /> | ||
| + | |||
| + | * Reselect '''jpg/tga/png Image (IMG) (1)''' on left. | ||
| + | * Select '''jpg/tga/png Image''' on the right. | ||
| + | * Select the '''Resource''' Tab. | ||
| + | * Enter / Paste in the ''group id'' you had copied from the ''3IDR''. | ||
| + | * Hit enter and tab to next field. | ||
| + | * Verify group id was changed by hovering your cursor over the '''jpt/tga/png''' Image resource on the upper right. You | ||
| + | should see the group id change from '''0x00000000''' to your new group. | ||
| + | |||
| + | <gallery> | ||
| + | Image:Group-0x00000000.jpg| Original Group ID | ||
| + | Image:New-group-id.jpg|New Group ID | ||
| + | </gallery> | ||
| + | |||
| + | |||
| + | * '''SAVE''' | ||
| + | * Check your other mesh groups to make sure that they all use the same Group ID as the Image. | ||
| + | |||
| + | |||
| + | <br style="clear:both" /> | ||
| + | |||
| + | ===Drag and Drop your image file into the 3D Referencing File Editor=== | ||
| + | |||
| + | You need to modify the other 3IDR's Reference files with the updated icon image. | ||
| + | |||
| + | * In the ''Resource Tree'' on the left, Select '''3D ID Referencing File (3IDR)'''. | ||
| + | * In the Resource List, select your first 3IDR file with the instance '''0x00000001''' (female gender) or '''0x0000002''' (male gender) | ||
| + | * At the bottom, select the '''Plugin Tab'''. | ||
| + | * Click the '''Package''' button | ||
| + | * In the '''PackageSelectorForm''' popup window, Click on the '''jpg/tga/png Image...etc...''' file and '''Drag''' it to the '''3D ID Referencing File''' box and '''Drop''' it there. | ||
| + | * Click '''Commit''' | ||
| + | * Repeat for every 3IDR that has some resources. Don't bother with any of the blank ones. | ||
| + | |||
| + | [[Image:Drop-image.jpg|right|400x400px]] <br style="clear:both" /> | ||
| + | |||
| + | ===Update the BINX files=== | ||
| + | |||
| + | Update '''ALL''' the Binary Index (BINX) files. | ||
| + | |||
| + | * On left in the ''Resource Tree'', select '''BinX'''. | ||
| + | * On the Resource List side, select the first Binary Index file. | ||
| + | * Click the '''Plugin View''' tab. | ||
| + | * In the plugin tab '''CPF Editor''', select '''iconidx''' | ||
| + | * In the '''Value Box''' change the value from '''0x0000000''' to '''0x0000004'''. | ||
| + | * Click '''Commit'''. | ||
| + | * '''SAVE''' | ||
| + | * Repeat for each BINX file. | ||
| + | |||
| + | [[Image:BINX.jpg|right|400x400px]]<br style="clear:both" /> | ||
| + | |||
| + | |||
| + | * Test in CAS or in Game. | ||
| + | |||
| + | |||
| + | If everything was done right, you should see your new image in CAS and in the game's Change Appearance. | ||
| + | |||
| + | [[File:AfterIconChange.jpg]] | ||
| + | |||
| + | [[File:Doneright.jpg]] | ||
| + | |||
| + | If you cloned Glasses, remember to make your accessory wearable with other accessories by changing the the bin number in the Mesh Overlay XML. | ||
| + | |||
| + | Glasses use '''0x0000000F''' | ||
| + | |||
| + | That's 0x (for Hex) followed by 8 digits. | ||
| + | |||
| + | You must be sure to change the bin number of all the ages you are using, but you only need to do it to your original BodyShop .package in your Saved Sims folder. Then if you later make recolors from it, BodyShop will include the new bin number in your recolors. | ||
| + | |||
| + | '''What is a Hex number?''' | ||
| + | |||
| + | Hex numbers use 0-9 and A-F as their digits. They're written in SimPE as '''0x''' followed by 8 digits. | ||
| + | |||
| + | So, the glasses value '''0x0000000F''' has the numeric value of 15 | ||
| + | |||
| + | What you need to do is create some random 8 digit long number in hex (using any combination of 0-9 A-F) and put that value in instead, after the 0x part. so, '''0x0000CD3F''' or some value of your own choosing. | ||
==Credit== | ==Credit== | ||
* Originally written by SnowStorm | * Originally written by SnowStorm | ||
| − | * wikified and | + | * wikified and updated by porkypine |
==Related Links== | ==Related Links== | ||
Latest revision as of 22:50, 28 March 2013
| Tutorials by Category | |
|---|---|
|
Build Mode | Walls & Floors | Body Shop | Object Recolouring | Careers | Sims | Object Creation | BodyShop Meshing | Hacks and Game Mods | |
| Tutorials by Level | |
| Level 1 (Newbie) | Level 2 (Beginners) | Level 3 (Intermediate) | Level 4 (Advanced) | Level 5 (Numenorean) |
| Mini Custom Icons for Accessories by SnowStorm | |
|---|---|
Base Game | |
| Author | SnowStorm |
Contents |
[edit] Overview
This tutorial will show you how to add custom images into your accessory packages so they show up correctly in CAS and BodyShop.
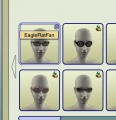
Accessory image Before icon change - showing original glasses
Accessory image After icon change - showing correct image in Game's Change Appearance Note: The new icon doesn't show up in Body Shop

[edit] What you will need
- SimPe
- Image editing software
- Attention to detail
[edit] Mini Custom Icons for Accessories
I've taken the information from SnowStorm's original tutorial and wikified it to incorporate the changes since the psje tool came out. Since the original was a pdf. I captured new images.
[edit] How to Match the 3DIR to the correct XMOL files
Important: EA is inconsistent with it's numbering so directions like pick the 3rd down don't always apply. The 3DIR reference files are also for other parts that aren't used for the icons so you need to pay attention to which part you are modding. The surefire way to get the correct parts is to sort by instance values. That matches the 3DIR 3D Reference file with the XMOL Mesh Overlay parts. This example shows 3 Instance sets in a mesh cloned from the even more hip glasses, for Teen, Young Adult, Adult and Elder female. The YAE parts all use the same XMOL name which in this case is the glasses called afaccessorysunglassesevenmorehip...
Note: These numbers are from this example. Yours may vary
- Teen - instance = 1025 tfaccessorysunglassesevenmorehip...
- Adult - instance = 2049 afaccessorysunglassesevenmorehip...
- Adult - instance = 4097 afaccessorysunglassesevenmorehip...
- Adult - instance = 16385 afaccessorysunglassesevenmorehip...
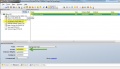
To insert the icons into the correct place, you need to know which 3DIR goes with which XMOL part. This is how you sort and match them.
- Open your recolor package in SimPe.
- In the Resource Tree section, click All Resources
- On the Resource List side, click the INSTANCE heading.
- By sorting the Instance values, you can match up the 3IDR (3 D referencing file)goes with the correct XMOL (Mesh Overlay file).
- It's a good idea to get a screencapture of the instance values now. Or, write them down, whichever is easier for you. In this example the values are in parenthesis, (1025), (2049), (4097), (16385)

An alternate way to find the correct sets via Instances is to select the Mesh Overlay XML (XMOL)(4) on the Resource Tree side. Then on Resource Lst, you'll find all the Mesh Overlay files and their corresponding values under the instance tab

Now that your know how to find the matched group sets under the Instance column, on with the tutorial.
[edit] Make Your ICON
- Take screenshot of your new item in game, save as a JPG or a PNG.
- Crop and resize to 128x128
- Save it where you can find it.

[edit] Add your new ICON into the Package
- Open your recolor package in SimPE
- On the right side in the TYPE section, Right click anywhere and select Add
- Select All Files (*.*)
- Click on your image file
- Click Open

[edit] Now tell SimPe what type of file it is.
- On the Resource Tree side, Select 0x00000128(UNK)(1) - This is the image you added.
- On the Resource List side, Select 0x00000128
- At the bottom, click the Resource tab
- Next to Type: click the drop down box and select jpg/tga/png Image - This sets the file type to a jpg/tga/png Image type. The Type will change from 0x00000128 to 0x856DDBAC

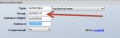
[edit] Insert the new Icon into the correct 3DIR
NOTE: If you didn't get the correct Instances go to the top of this tutorial to find out how.
- Select one of the 3IDR files that have your new mesh.
- Click the Resource Tab.
- Copy the 'Group ID.

- Reselect jpg/tga/png Image (IMG) (1) on left.
- Select jpg/tga/png Image on the right.
- Select the Resource Tab.
- Enter / Paste in the group id you had copied from the 3IDR.
- Hit enter and tab to next field.
- Verify group id was changed by hovering your cursor over the jpt/tga/png Image resource on the upper right. You
should see the group id change from 0x00000000 to your new group.
Original Group ID
New Group ID

- SAVE
- Check your other mesh groups to make sure that they all use the same Group ID as the Image.
[edit] Drag and Drop your image file into the 3D Referencing File Editor
You need to modify the other 3IDR's Reference files with the updated icon image.
- In the Resource Tree on the left, Select 3D ID Referencing File (3IDR).
- In the Resource List, select your first 3IDR file with the instance 0x00000001 (female gender) or 0x0000002 (male gender)
- At the bottom, select the Plugin Tab.
- Click the Package button
- In the PackageSelectorForm popup window, Click on the jpg/tga/png Image...etc... file and Drag it to the 3D ID Referencing File box and Drop it there.
- Click Commit
- Repeat for every 3IDR that has some resources. Don't bother with any of the blank ones.

[edit] Update the BINX files
Update ALL the Binary Index (BINX) files.
- On left in the Resource Tree, select BinX.
- On the Resource List side, select the first Binary Index file.
- Click the Plugin View tab.
- In the plugin tab CPF Editor, select iconidx
- In the Value Box change the value from 0x0000000 to 0x0000004.
- Click Commit.
- SAVE
- Repeat for each BINX file.

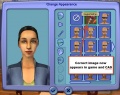
- Test in CAS or in Game.
If everything was done right, you should see your new image in CAS and in the game's Change Appearance.


If you cloned Glasses, remember to make your accessory wearable with other accessories by changing the the bin number in the Mesh Overlay XML.
Glasses use 0x0000000F
That's 0x (for Hex) followed by 8 digits.
You must be sure to change the bin number of all the ages you are using, but you only need to do it to your original BodyShop .package in your Saved Sims folder. Then if you later make recolors from it, BodyShop will include the new bin number in your recolors.
What is a Hex number?
Hex numbers use 0-9 and A-F as their digits. They're written in SimPE as 0x followed by 8 digits.
So, the glasses value 0x0000000F has the numeric value of 15
What you need to do is create some random 8 digit long number in hex (using any combination of 0-9 A-F) and put that value in instead, after the 0x part. so, 0x0000CD3F or some value of your own choosing.
[edit] Credit
- Originally written by SnowStorm
- wikified and updated by porkypine