Difference between revisions of "Tutorial:Sims 4 Creating walls Floors"
HugeLunatic (Talk | contribs) (→Tools Needed) |
HugeLunatic (Talk | contribs) (→Creating XML) |
||
| Line 47: | Line 47: | ||
|} | |} | ||
| + | |||
| + | Each '''<wall>...</wall>''' section can be repeated if you want to have multiple colors for one wall. Example: [http://www.modthesims.info/download.php?t=538594 Cottage Boards] | ||
<br clear="all" \> | <br clear="all" \> | ||
Revision as of 02:35, 15 October 2014
| Tutorials by Category | |
|---|---|
|
CAS | Patterns/Walls/Floors | Objects | Building | Modding | Advanced Modding |
Contents |
Introduction
This tutorial will show you how to create new walls (floors and terrains coming soon). This tutorial assumes familiarity with your graphics editor and creating tile-able, seamless images.
Tools Needed
- WallEz by Granthes
- A Graphics Editor That can export .dds
- Text Editor - An advanced one that shows syntax such as Notepad++ or Sublime Text will make reading XML easier.
Creating Images
| Image Sizes |
|---|
|
The first thing you will want to do is create your images. Because TS4 has three wall heights, you will need to create three separate images. Create each image in the size shown (on right), ensuring each is tile-able and seamless.
Save each as a .dds format.
Creating XML
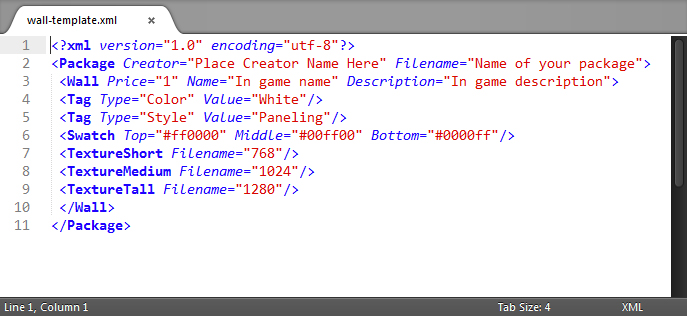
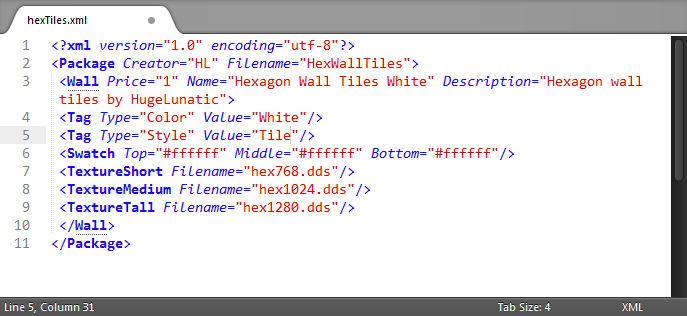
Download the sample template, then open in your Text editor.
How to Edit
- Line 2: Place your creator name in the space between the parenthesis. Place the name of your package between the parenthesis for Filename. Note: Your creator name will be appended to the Filename.
- Line 3: Enter the price, In game name and In game description between the associated parenthesis.
- Line 4: The Color Value is for in-game filtering. Enter the color choice between the parenthesis after Value.
- Line 5: The Style Value is for which wall category it will be in. Enter the wall style between the parenthesis after Value.
- Line 6: Color codes for the swatch. Can all be the same hex value.
- Line 7: The filename for the 256x768 image.
- Line 7: The filename for the 256x1024 image.
- Line 7: The filename for the 256x1280 image.
| IMPORTANT!! All values are case sensitive! |
Each <wall>...</wall> section can be repeated if you want to have multiple colors for one wall. Example: Cottage Boards
| Valid Color Values |
|---|
| Red, Blue, Green, Gray, Black, Orange, Amber, Aqua, Yellow, White, Pink, Purple, Burgandy, Silver, Gold, Magenta, Teal, Turquoise,
DarkBrown, Brown, LightBrown, Beige, Cream, HazelBlue, HazelGreen, LightBlue, LightGreen, BlueNavy, BlueLight, BrownLight, GreenNavy |
| Valid Color Values |
| Paint, Wallpaper, Tile, Paneling, Masonry, RockAndStone, Siding |
Creating .Package
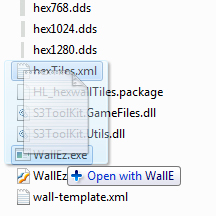
To create your .package files you will use Windows drag and drop feature. When you drag your XML file over the WallEz.exe it reads the XML, and creates the .package using the information in your XML file and the images you have specified in it. This means that the XML file and the images need to be in the same place. Generally it is easiest and most organized if you create folders for the project.
- Left click the XML file, and without letting go of the left mouse button, drag the file over the WallEz.exe until you see the "Open with WallE", then release the left mouse button.
- You will then see your .package file in the same location as your XML and images.
Questions
If you have questions please post them here: Q&A for Recategorizing
| Tutorials by Category | |
|---|---|
|
CAS | Patterns/Walls/Floors | Objects | Building | Modding | Advanced Modding |


