Difference between revisions of "Game Help:Getting Custom Content to Show Up"
| Line 2: | Line 2: | ||
__NOTOC__ | __NOTOC__ | ||
* Downloaded pets don't show up. | * Downloaded pets don't show up. | ||
| − | + | =='''Downloaded lots don't show up'''== | |
| − | + | ''Credits to Julianarosalia for the original article, thank you.'' | |
| + | =='''Problem'''== | ||
| + | You've downloaded a lot and it's not showing up in your game. | ||
| + | =='''Solution'''== | ||
| + | There are two reasons why a lot doesn't appear in the Lots & Houses Bin: either the lot isn't compatible with your game or it didn't install correctly. | ||
| + | |||
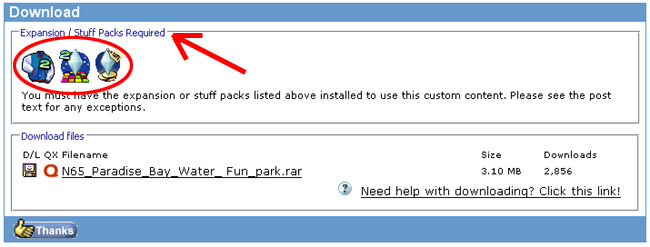
| + | First check to see if the lot is compatible with your game. Do you have the correct expansion packs installed? If you don't then either the lot won't appear or it will crash/freeze your game when you try to select it. | ||
| + | [[Image:Lots1.jpg|center]] | ||
| + | |||
| + | If the lot is compatible then it didn't install correctly. Close the game and delete anything that's in the Teleport folder; "C:\Documents and Settings\Username\My Documents\EA Games\The Sims 2\Teleport". Then redownload and reinstall the lot (if you normally use Q-Xpress, don't, download and install manually). | ||
| + | |||
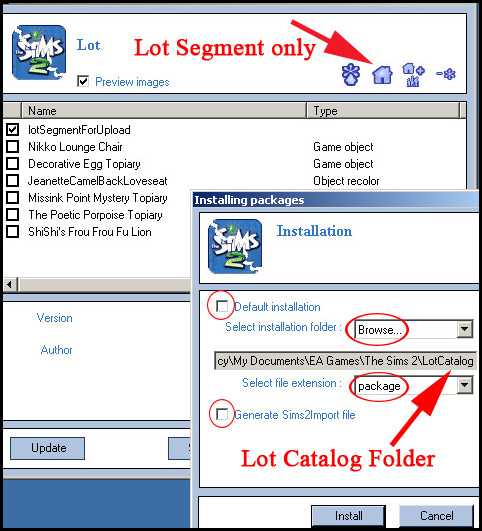
| + | You're going to use [http://sims2pack.modthesims2.com/ <u>Clean Installer</u>] to install the lot instead of the Maxis Installer. Open the lot file with Clean Installer and uncheck everything except for the following: lotSegmentForUpload and any terrain paints. | ||
| + | |||
| + | [[Image:Lots2.jpg|center]] | ||
| + | |||
| + | |||
| + | =='''Downloaded sims don't show up'''== | ||
| + | ''Credits to Julianarosalia for the original article, thank you.'' | ||
| + | =='''Problem'''== | ||
| + | You've downloaded some sims and they're not showing up in your game. | ||
| + | =='''Solution'''== | ||
| + | Sometimes a sim doesn't appear because it didn't install correctly. | ||
| + | |||
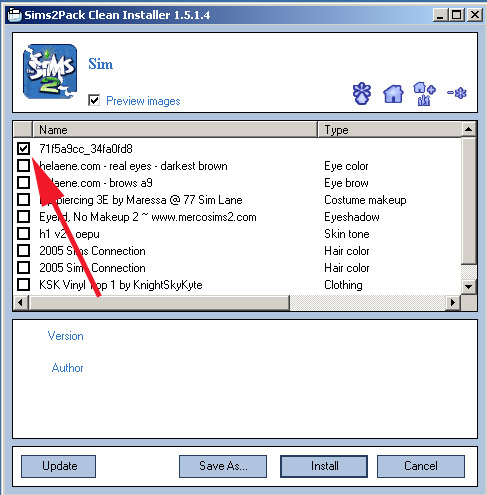
| + | You're going to use [http://sims2pack.modthesims2.com/ <u>Clean Installer</u>] to install the sim instead of the Maxis Installer. Open the sim file with Clean Installer and uncheck everything except for the following: the very first entry which will be a long string of numbers and letters. Install using the default settings. | ||
| + | |||
| + | [[Image:Cleaninstaller.jpg|center]] | ||
| + | |||
| + | |||
=Getting Custom Content to Show Up= | =Getting Custom Content to Show Up= | ||
Revision as of 12:07, 3 May 2007
- Downloaded pets don't show up.
Downloaded lots don't show up
Credits to Julianarosalia for the original article, thank you.
Problem
You've downloaded a lot and it's not showing up in your game.
Solution
There are two reasons why a lot doesn't appear in the Lots & Houses Bin: either the lot isn't compatible with your game or it didn't install correctly.
First check to see if the lot is compatible with your game. Do you have the correct expansion packs installed? If you don't then either the lot won't appear or it will crash/freeze your game when you try to select it.
If the lot is compatible then it didn't install correctly. Close the game and delete anything that's in the Teleport folder; "C:\Documents and Settings\Username\My Documents\EA Games\The Sims 2\Teleport". Then redownload and reinstall the lot (if you normally use Q-Xpress, don't, download and install manually).
You're going to use Clean Installer to install the lot instead of the Maxis Installer. Open the lot file with Clean Installer and uncheck everything except for the following: lotSegmentForUpload and any terrain paints.
Downloaded sims don't show up
Credits to Julianarosalia for the original article, thank you.
Problem
You've downloaded some sims and they're not showing up in your game.
Solution
Sometimes a sim doesn't appear because it didn't install correctly.
You're going to use Clean Installer to install the sim instead of the Maxis Installer. Open the sim file with Clean Installer and uncheck everything except for the following: the very first entry which will be a long string of numbers and letters. Install using the default settings.
Getting Custom Content to Show Up
This article describes the steps you need to take if your Custom Content doesn't show up in game
Credits to Daysies for the original article, and Simsample, Julianarosalia and HystericalParoxysm for input.
- Read this article: Installing Custom Content
- Try this article in the order it is written, as soon as you find the error and solve it you do not need to read the rest.
- You must actually DO the steps as written. Simply reading this article WILL NOT fix anything! DO THE STEPS.
- BACK UP YOUR FILES FIRST- CLICK HERE
Is Custom Content enabled?
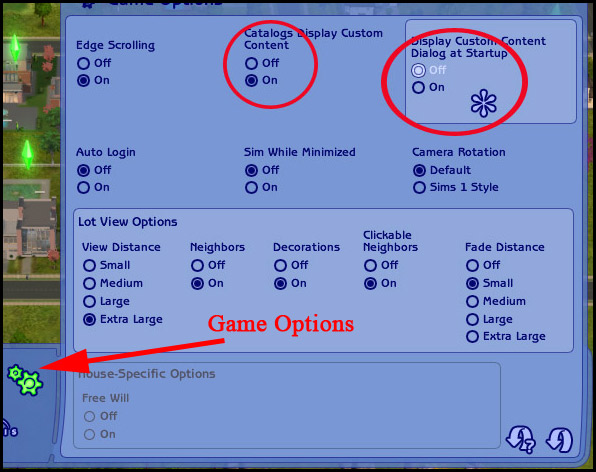
- In game, click on the Game Option Button (it looks like a little cog/gear):
- Make sure that custom content is enabled, and- if you have Nightlife and later EPs- turn the custom content dialog off.
- Now restart the game. Does your custom content show up now?
- If you have just installed a new expansion or stuff pack, and items that were showing up before you installed that expansion/stuff pack are now not showing up, please read this and follow the instructions: http://www.modthesims2.com/showthread.php?t=197511
Just installed a new expansion?
Problem
- Content that was showing up fine before installing a new expansion is now missing/not showing up.
Solution
Enable Custom Content
Even if you had content enabled before, you will likely have to enable it multiple times after installing to get things to show up. See above for how to enable custom content.
Run the game. Enable custom content, then close the game and RESTART it. It never works the first time.
If it still doesn't work, close the game, run it, enable custom content, and run the game again! It may take more than one try to get things working!
Now, all or most of your custom content should be showing up. However, if a particular set of content is still not showing up (i.e. you've done that and you still don't have any buy mode objects, which is most common)...
The Body Shop Trick
Follow these instructions TO THE LETTER. This is a very quick, easy fix, but you must do it EXACTLY as described or it won't work. We are going to remove your existing Downloads folder, and use Body Shop to regenerate a new one.
Step One:
- Open your My Documents/EA Games/The Sims 2/ folder.
- Select the Downloads folder.
- Cut (ctrl-x) - that's CUT, not COPY - your Downloads folder and Paste (ctrl-v) it to your computer's Desktop.
- Make sure there is now no folder called Downloads in your My Documents/EA Games/The Sims 2/ folder. It is important that the Downloads folder not be present in that folder for this to work.
Step Two:
- Run Body Shop. Body Shop comes with your game and is already installed. If you have never run it before, you can find a shortcut to it under Start - Program Files - EA Games - The Sims 2 (or newest expansion) - The Sims 2 Body Shop.
- It may seem like nothing's happening as Body Shop starts to load, and it may take several minutes to finish loading fully.
- When it has loaded, just close it again. You just needed to run the program - you don't need to do anything within it.
Step Three:
- Open your My Documents/EA Games/The Sims 2/ folder again. You will notice that there is a new Downloads folder in there, which Body Shop made when it ran.
- Open the Downloads folder that is sitting on your desktop.
- Select All (ctrl-A) and Cut (ctrl-x) to take out everything in that folder.
- Open the My Documents/EA Games/The Sims 2/Downloads folder and Paste your custom content files back into it.
- Delete the now-empty old Downloads folder that is on your desktop.
Step Four:
- Load the game and see if your missing content now shows up.
If you have certain specific objects (rather than a whole category) that don't work properly or certain specific objects are flashing blue, they will likely need to be updated for the new EP. Check back with the individual creators of those items in a little while to see if they have updated their creations so you can download a new version.
If the above fails
If you have tried both enabling content and restarting several times and you are still having trouble, or your custom content issues are unrelated to installing a new expansion, then continue on with this article.
Click Next: Do you have the required mesh? to continue...


