Tutorials:TS3 HTMG ChapK Packaging
From SimsWiki
K. Packaging & Editing in s3pe
K1. Bringing it all together:
- Before we start s3pe and start importing stuff back, let’s get organize. What did we change?
- the texture: main bumpmap and specular – 2 dds resources
- cleanup our xcf images (remove the labels), flatten and export as dds images
- after you do a Save As, open your .dds images again and verify the RGBA channels are still intact – especially the Alpha one – needs to be all white.
- the mesh – the number of MLODs and MODL depends on object cloned. At the very minimum, most objects have at least one MLOD and MODL; our table has 3 MLODs and 1 MODL that we exported in section E.
- these must be the recompiled versions
- these must be the recompiled versions
- the texture: main bumpmap and specular – 2 dds resources
K2. Fire up s3pe and
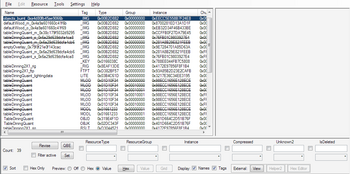
- Import resources. Select replace and compress options
- MLODs – look for
*.lodin respective folders. - MODL – look for
*.modelin MODL 00001 folder - _IMG – look for the
_m_<_hashname_>and_s_<_hashname_>with matching<_hashname_>.dds
- MLODs – look for
- 2. Edit information you want to change
- OBJD:
- select OBJD resource
- click

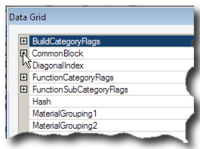
- in Data Grid dialog box, click on
 to expand the Common Block
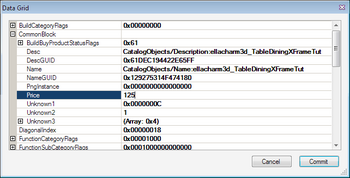
- you can edit these info here:
- a. catalog names / descriptions,
- b. prices
- c. build / buy flags
- d. function category flags
- e. room category flags
- f. others as necessary – explore on your own (I cannot possibly cover everything); some of the functions and info are still not known. Be the first to share your findings in the forums!
- a. catalog names / descriptions,
- when you’re done editing, click

- STBL entries: for the long descriptive text.
- OBJD:
- 3. Adding THUM resource.
- (you don’t need to do this if you don’t want your custom content to be differentiated from base-game content)
- So, the way I add object thumbnails is by cheating;
- I create my clone package without the THUM resource
- Delete the ObjectThumbnails.package from the ..\Documents\Electronic Arts\The Sims 3\Thumbnails\ folder so the game will generate a fresh, uncluttered one for me
- I loaded the game up and after testing usage, etc are all OK, I used all the recolors of the object i.e. place them in-game, save and exit
- Open the ObjectThumbnails.package in s3pe and extract the THUM resources. If you hadn’t deleted first, you’ll have to search for the picture among All of the objects you have ever used in the game
- edit them to include the custom icon, if you want to use a different customized view for the THUMbnail, you can do so also, but save as the same name
- import/add them into s3pe
- How the .package file recognizes THUM
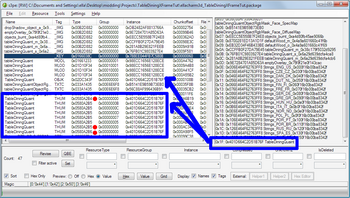
- when you Add or Import a THUM resource, s3pe will add another line in the _KEY resource that matches the Name and InstanceID of your OBJK resource
- the resources with GroupID ending with "00" are the default ones in 3 sizes
- a. TypeID ending with "B4" – 32x32 – this is used in the moodlets and thought bubbles
- b. TypeID "B5" – 54x54 – this is the recolors group series
- c. TypeID "B6" – 128x128 – this is the main icon listing your object in the catalog
- if you have imported with InstanceID but the Name is blank, the game will not load the custom THUM but default to a game-generated one
- So, the way I add object thumbnails is by cheating;
- (you don’t need to do this if you don’t want your custom content to be differentiated from base-game content)
- 4. From s3pe’s File menu → Save
Questions? Problems?
- If you encounter any problems with the steps outlined in this tutorial and need help, head on over to the Step-by-step Start-to-Finish HowTo mesh guide for TS3 thread to post your questions or
- If you need help in fixing your mesh, you may want to browse through our TS3 Meshing FAQs for some of the more common Meshing issues and their fixes or
- If none of the above links provided any help, you may want to browse through the threads in MTS' Meshing Forum or even start your own thread.
| |
|
TS3 HTMG ChapK Packaging | |
|


