Create a Pattern - Wallpaper Borders
Contents |
Sims 3 Create a Pattern Tool: Pattern Placement for Wallpaper Borders
Level - Beginners/Intermediate
The purpose of this tutorial is to create picturesque borders for your Sims wallpapers with the Create a Pattern Tool from Electronic Arts (CAPT). It will give you a more in depth knowledge on how the placement of the "stickers" work. The variations within the border are endless so what I will do here is give you the boundries for the borders along with a few simple ideas to get you started.
So let's begin and I hope you have fun.
Requirements:
Create a Pattern [1] Available free for registered Sims 3 game owners. (The basic interface is explained in the help documentation found in the upper left hand corner under the "?")
A Graphics program
Adobe PhotoShop (pay) - or
Paint Net [2] (free) - or
Gimp [3] (free)
Tutorial(s)
Carls Create A Pattern Tool Guide [4] (recommended)
Seamless Textures [5](recommended)
TS3 Patterns[6]...Indepth tutorials for working with channels and layers that will take your creativity to new heights. (Optional)
The Workspace and Measurements
Let's get familiar with the work area first...
The inner middle square is your work area and measures 256 X 256 pixels. The wall repeat area depends on your pattern and its placement on the work area. The area outside of the work area is also part of your pattern...it continues to the second half of the next panel of wallpaper. The sticker sizes are 58 X 58 pixels and can be resized from the smallest 1 x 1 (yeah barely visable) to 256 X 256 (the full work area). The top 32 pixels across the top of the wall is the ceiling area. This does not show in CAPT but when in the game it does cut off the pattern on walls with ceilings when you are doing screenshots or photoshoots. In order to make a layer recolourable - select the layer and toggle the curved double ended arrow so that the stickers are black...the circle on the right should be dark. The bottom layer with no eye is not recolourable. So far I have only done single colour layers as recolourable...the slider works for multi colour patterns.
Placement specification is important in borders and can be achieved my using the w,h,x and y co-ordinates:
w = width of the sticker (height when your sticker is rotated 90 degrees...really threw me for a loop when I first noticed it - I thought the whole tutorial was wrong!lol)
h = height of the sticker (width when your sticker is rotated 90 degrees)
Then the actual placement of the sticker
x = horizontal placement of the sticker on the worksheet
y = vertical placement of the sticker on the worksheet
Any multiple of 256 will create a great pattern but some of these borders are not placed in this range.
You can use a photo, graphics, clipart, windows wallpaper, actual wallpaper border images and especially those custom made graphics - basically any type of image as long as there is no copyright. When you use this type of image you don't have channels for recoloring just the slider. You can add single colour graphics such as stripes in the different layers to make it more colourful. Downsizing an image will maintain image quality. Some really interesting effects can be had by using the rotation/flip and resizing features of CAPT. To make a sticker of just an image say like Mickey Mouse use the magic wand to remove all of the background, inverse the image the cut and paste the image from the clipboard. You then save as a .png file and it will make the background transparent.
Just a note to always test your patterns to make sure they are seamless. This is easily seen in the preview panel of CAPT...zoom right up as close to the wall as possible to get a good look for any gaps or mismatched patterns. If it is not seamless something could be wrong with your sticker. One reason is that you still have an edge around the border of your original image, another that your original image or texture is not seamless (See the Seamless Texture tutorial).
Warning: Coverting your pattern from a Sims3package file to a package may cause game freezes or corrupt your CAP program. I have not found a program that will successfully convert these files Including TSRW, 3Viewer and Delphy's 3pk multinstaller.
Pattern Recognition and Placement on Walls
Once you have completed your pattern you will want to be able to identify it. Heres' how - first of all take a look at the four corners of the worksheet in the illustration below. Each corner is a different colour and they are all the same size.

This is how that same pattern looks in the Create a Style (CAS) sample of your catalogue:

Note the placement of the tiles...The tile on the bottom right is now on the upper left!! But at least now we know where to look for a paticular pattern. You can put an identifier (such as a small square of your border in the lower right hand corner (64 x 64) if you aren't using the pattern for anything else.
Wallpaper
These are the wallpapers we will be working with. The full flat wall has been included in order to show the pattern repeat on the full wall. You don't have go through the whole tutorial if you are just interested in one border but there are some pointers along the way so its good to read it over once. The basic placement is shown in the CAPT illustration. Each pattern was then completed and as you can see it is used effectively on other items.

Paint and Wallpaper - Flat Wall with Dado
This one is good for a photo, painting or single image just to use an example. To create the effect in the following illustration you will need a background colour or sticker. For this one I used an image search for a square frame and another of a swan. If you are using a sticker for the background resize it to fill the entire middle square on the first layer as follows:
Sticker Size:
w = 256 h = 256
Sticker Placement
x = 128 y = 128
Center your picture sticker on the first sticker or background colour using the next layer:
Sticker Size
w = 128 h = 128
Sticker Placement
x = 128 y = 128

Here's what it looks like in a finished room:

Wallpaper: Wall with Dado,Chair Rail,Trim & Baseboard Moulding
Here is a good demonstration of the co-ordinates of sticker placement. This image is a actually a quilt pattern and of course looks beautiful for bedding as well. In photoshop I put a line at the top and on the bottom, resized it to 256 x 256. Put in a contrasting background on the bottom layer...this is so you can see any gaps in your pattern placement.
In order to get the exact placement of the stickers - start with the first sticker in the upper left hand corner. The co-ordinates are:
Sticker size:
w = 64 h = 64
Sticker Placement
x = 32 y = 32
To place the next stickers perfectly:
Sticker #2: add 32 to x = 64 and y remains 32.
Sticker #3: add 32 to x to equal 96 and y remains the same.
Sticker #4: add 32 to equal 128 and y remains the same.
For next row the y changes to 64 etc

Once complete your pattern fits beautifully within the constraints of the large portion of the wall:

Border Frieze and Flat Wall with Border and Chair Rail'
This is a small pattern repeat basically....8 accross and 8 down) but we're going to be doing a pattern here that serves several purposes on wallpaper. First the border on the top is a repeat of 8 across and two down. The top row is actually the ceiling cutoff.
The first two rows have a sticker size of:
w = 32 h = 32
starting placement is:
x = 16 y = 16
and it spaced evenly across 8 times.
The next sticker is centered in the remaining space (if you place your sticker at x 128 it easy to center it from there :
Sticker Size:
w = 180 h = 156
Sticker Placement
x = 128 y = 160

And here is the very versatile finished product:

Top Border
Basically this border's y position is 60. This is one of the borders that will have ceiling cut off in screenshots. Therefore I've broken it down to two areas. First we'll do the top where the ceiling is cut off for photoshoots. This area is the top 32 pixels.
Sticker size:
w = 64 h = 32
Placement starting:
x = 32 y = 16
And this is co-ordinates of the main border.
Sticker size:
w = 64 h = 54
Placement starting:
x = 32 y = 60
Note...in the CAPT illustration the width and height indicate the opposite to what I wrote above...that's because I rotated the sticker 90 degrees.

Notice that in the picture the ceiling cuts off the top border but still looks good because of the two separate borders:

Border 1 - In both paint and wallpaper
Two stickers are used in this wallpaper because it keeps the image well in proportion. These are Windows wallpapers that CAPT automatically resized from 1024 x 768...amazing! Thank you to Leroysgirl for the co-ordinates:
Sticker size:
w = 128 h = 96
1st sticker placement:
x = 64 y = 145
2nd sticker placement:
x = 192 y = 145

and the border finished with the star pattern under themes.

Border 2
This one overlaps the worksheet. I had Leroygirls help on this one too. First we'll place the entire framework for the border at:
w = 256 h = 108
x = 128 y = 36
Anything can be placed within those constraints as with the other border areas. I chose to place the stickers evenly with four across starting at:
w = 64 h = 64
x = 32 y = 36

and here it is combined with a in game themed pattern:

Border with 3/4 Wall Placement
Last but not least this one is an actual wallpaper border that is perfect...it's seamless and stretches well.
The sticker size:
w = 256 h = 96
and the placement:
x = 128 y = 170

and the results:

Here is a little collage of clothing made from the wallpaper borders. The adult female hair is an sims points item otherwise all items are in game :

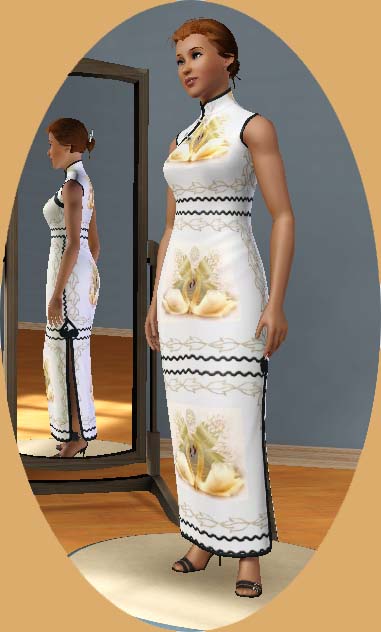
One last picture of how one full pattern can look nice on clothing:

You can download these tutorial patterns here [7]
That concludes this tutorial, I hope you have a much fun creating with it as I had putting this together.
Warning: Coverting your pattern from a Sims3package file to a package may cause game freezes or corrupt your CAP program. I have not found a program that will successfully convert these files Including TSRW, 3Viewer and Delphy's 3pk multinstaller.
Disclaimer: - This tutorial is not endorsed by or affiliated with Electronic Arts, or its licensors. Trademarks are the property of their respective owners. The Sims and The Sims 3 Logo are trademarks of Electronic Arts, Inc. Game content and materials copyright Electronic Arts Inc. and its licensors.